Map Module
Содержание
Purpose
The module is designed to visually plan city deliveries and create rate zones on the map in the uniform zoning mode.
Orders on the map
You can monitor the number of forthcoming deliveries as well as known and undiscovered addresses by displaying shipments on the map.
On the Orders tab, highlight the orders and press SPACE or select the Go to Addresses context menu item. The Addresses tab displays the items you want to deliver or pick up. For convenience, the shipment list can be sorted.
To open orders on the map, on the Addresses tab, click on the button ![]() . To view a specific shipment, highlight it and select the Show on map context menu item.
. To view a specific shipment, highlight it and select the Show on map context menu item.
The «Map» window will open:

The top menu contains the following buttons:
![]() — all map overview;
— all map overview;
![]() — print visible area of the map;
— print visible area of the map;
![]() — display settings of the information on the map;
— display settings of the information on the map;
![]() — search by address or coordinates.
— search by address or coordinates.
In the panel on the left adjust the display of the courier list:
- select from the drop-down list the branch whose couriers you want to view;
- specify the managers whose couriers you want to display in the list;
- specify the scheduled delivery date for couriers. For the courier to be displayed in the list, the following conditions must be met:
- The courier's card shows the date of employment;
- The courier is set for free attendance or there is a schedule for the planning date. For more information see «Employee Schedules».
The window on the right shows a map with the addresses of the shipments marked by markers.
Undiscovered addresses
Addresses that could not be found on the map are displayed at the bottom of the window.
If address is not dispalyed on the map:
- double-click on the line of a missing address and in the shipment card to check the correctness of the spelling according to the rules for entering address information;
- select Search for an address on the map from the context menu of the list of addresses that were not found. If the address is found, drag the entry from the bottom of the window to the point found on the map;
- select Search for an address on the web from the context menu of the list of addresses that were not found. The default browser window opens with the address on the map. Copy the coordinates of the found address, paste them into the search bar at the top and click on the
 button. The map displays the found address as a green diamond. Drag the entry from the bottom of the window onto the point found on the map. The image of the diamond will disappear if you delete its latitude and longitude coordinates from the search line;
 - if you know the exact location of a missing address on the map, drag the address to the right place.
If the shipment marker is in the wrong place, uncheck the point using the context menu (the address will be moved to "not found"), and then drag it to the right place.
MeaSoft remembers all the addresses found and specified in manual mode, and then automatically replaces them when you work with the module again.
Settings
Settings are called up by clicking on the ![]() button. The settings window looks as follows:
button. The settings window looks as follows:

Map Settings
The tab is used to set the display of shipments on the map. You can select one of the options:
- Status colors — the shipment is marked depending on its status. You can change the default colors. To change the color, press the
 button to the right of the color, the window with the options will open. Select the desired one and press OK. This mode helps the logistician to see scheduled and unscheduled deliveries on couriers;
 - Courier colors — the shipment is displayed with the color of the marker assigned to the courier. There are 24 different colors for couriers. If all colors are already assigned, all subsequent couriers are assigned a white color. This mode helps you to see the delivery area on the map when the number of couriers is relatively small.
The tab is for adjusting the print contrast. A problem with map clarity can occur if the logistician is using a black and white printer.
To improve image quality, enter a print contrast enhancement factor.
Map printing options:
- print the map from the Map window. Click on the Print button at the top left;
- automated printing. Allows you to print the map along with the documents required when issuing the shipment. You can set up printingbefore or after the issuance of the certificate.
There are the following options for marking shipments on the printed card when issuing:
- the shipment is numbered. Inside each box is the serial number of shipment from the acceptance certificate to the courier. If the recipient has several items, their serial numbers from the acceptance certificate will be listed on the square. This type of display is convenient when the courier needs to inform the logistician about the transfer of shipment to the recipient. Courier reports the number of the shipment, the logistician marks the transfer in the system. Variable setting
- the shipment addresses are numbered. Inside each box is an address number. If there are several recipients for one address, several shipments will have the same sequence number in the Number in the Certificate column.Variable setting
Map example:

Hints
The tab is used to configure the hints that are displayed when you hover the cursor over the marker.
Hints are separately configurable to display the map in different modes:
- by the Addresses button - hints on the Addresses tab;
- by the Tracking button - prompts when viewing the courier's route in the tracking;
- by the Handover in Tracking button - prompts when viewing the issued shipment in the tracking.
Additional features
The system provides parameters that allow you to set the conditions of the marker display on the map. For example, you can mark pickups as large blue triangles, and evening deliveries as small yellow squares. For more information see «Programmer's Manual».
Note We strongly recommend that you do not change this setting without the help of a professional. You can contact us, the marker setup for support rates 2 and 3 will be free or inexpensive in other cases.
Scheduling types
- Courier scheduling using maps:
- manually
- using schemes
- by orders
- Scheduling by the list
- Routing:
Manual scheduling
Manual scheduling types:
- assign a courier to the marker. In the context menu of the shipment marker select Schedule. The order is scheduled for the employee selected in the list on the left. By default, it is the first courier in the list. To select a specific courier, in the context menu of the marker select Schedule for courier;
- moving markers. For example, a courier is scheduled for delivery and you want to add more shipments. Hold down CTRL and drag the free marker to the scheduled employee's marker. The result is that the two addresses are scheduled to be delivered by the same employee. If both markers already have scheduled couriers, moving one to the other will assign the shipment to the employee on whose marker it was dragged;
- area selection. Hold down the right mouse button and circle the area with the markers, then select Schedule for courier in the area's context menu. As a result, the dispatch of this area is scheduled for delivery to the specified employee.
Schematic scheduling
- Schemes
- Graphically highlighted contours of delivery areas saved on a map, possibly with couriers assigned to them.
Scheduling with schemes allows you to reduce manual work with the help of created delivery areas. Delivery districts can be resized or combined, depending on the weight, volume and number of shipments. For example, if you have a large amount of shipments, you can reduce the delivery area to divide the load between couriers.

Creating a scheme
- Select the orders, go to the Addresses tab and click on the
 button. The «Map» window will open.
 - Click Add.
- In the drop-down list, select the added scheme.
- Click on the
 button near the Add button and select Edit scheme.
 - From the context menu on the map, select Create outline. For more information see «Creating contours on the map».
- Use the right mouse button to position the points on the outline so that it forms a closed area. When the outline is ready, press ENTER. To merge adjacent outlines, select them while holding down CTRL and choose Merge outlines from the context menu.
- To assign a courier to an outline, select Set Courier from the context menu.
- Create as many outlines with assigned couriers as you need to work, and then click the Complete button.
- Click on the button near the Add button and select Schematic options. In the window that opens, specify the name of the scheme and select the branch to which the scheme will apply.
The context menu item Specify zone number is used in client automation that is not included in the standard delivery. Details
When creating outlines, do not allow voids and intersecting contours. If the delivery or pickup address falls in an empty space between contours, then in the semi-automated scheduling no courier will be assigned to the delivery. If the address falls on an intersection of contours, the courier will be selected randomly from those assigned to the intersecting areas.
To use the outlines of one scheme for another or to create a new one, use the Copy Scheme function in the drop-down menu next to the Add button.
Scheduling
To start scheduling, in the "Map" window select the created scheme from the drop-down list and click on the button Schedule all. Shipments will be distributed among the working couriers, and a report will be generated in a separate window when the operation is completed. You can use ways of manual scheduling.
You can schedule one courier for several areas. To do this, select the districts by holding down CTRL and select a courier from the context menu.
Note: The temporary area drawn on the scheme has a higher priority. Temporary outlines can be used to assign another employee when one courier is scheduled for a large number of shipments that they will not be physically able to deliver.
You can create separate schemes for different cases of delivery areas: the amount of shipments, weekdays or weekends, holidays, etc.
Deleting a scheme
In the "Map" window select a scheme from the drop-down list, click on the button ![]() near the Add button and select Delete scheme.
near the Add button and select Delete scheme.
Manual routing
You can plan the courier route and generate trip sheets with a specified sequence of points.
- In the "Map" window, click the Delivery button. If there are shipments scheduled for courier on the specified date, the routes are automatically generated and displayed on the map. The points in the routes are arranged in random order.
- Correct routes if needed and click on the Accept all routes button. Point numbers in the route are recorded in the trip sheets.

The information in the Delivery panel is grouped by tabs:
- Scheduled - general information about the formed routes. Fields "Departure", "Arrival", "km" are not filled;
- Not Scheduled - a list of shipments that are not scheduled for a courier or date or not found on the map.
You can use ways to create routes manually on the map to indicate the courier.
Scheduled
The "Routes" table contains general information about the generated routes.
Possible actions:
- add a new route for a courier who is not yet on the list - select Create new route in the context menu and specify the employee;
- schedule the created route for the selected courier - select Schedule in the context menu;
- assign another courier to the created route - select Schedule for courier in the context menu.
The "Addresses" table lists the points included in the courier route. They are highlighted in the "Routes" table above. The points in the routes are in random order. You can move the points around:
- within the route - with the key combination UP + CTRL and DOWN + CTRL or with the context menu items Move above and Move below;
- between routes - use the context menu item Move to Route. The point is added to the end of the address list.
The selected point in the list is highlighted in the route on the map.
Shipments that are not suitable for delivery on the specified date are highlighted in pink. When hovering the cursor over such lines, a hint with the reason for the error is displayed. You can open the corresponding shipment by double-clicking on the line and correct the data.
To confirm the generated routes, press the Accept all routes button. The point numbers in the route are entered in the trip sheets.
Not scheduled
The tab contains a list of shipments with scheduling errors. Rows are highlighted in pink, and when you put the cursor over a row or in the "Note" column, a hint with the reason for the error is displayed:
- not scheduled for a courier - use the context menu item Move to Route. The point is added to the end of the route's address list;
- invalid scheduled delivery date — open the shipment by clicking on the line and correct the delivery date;
- location not confirmed - follow the steps described in «Undiscovered addresses»;
- courier is not available by schedule — make sure that the courier's card has a schedule as of the planning date.
Cartographic system
MeaSoft works with the mapping system OpenStreetMap.
The project was created by a community of mappers who add and maintain data on roads, trails, cafes, train stations, and many other sites around the world.
OpenStreetMap allows you to create areas and rate zones, assign couriers in the Map window, and schedule couriers for delivery.
OpenStreetMap is not able to build courier routes, to work with the new areas you need a permanent internet connection. Viewed map areas are cached and then available even without the Internet.
OpenstreetMap in the MeaSoft system does not require any regional settings and is immediately ready for use.
Geocoding
To display any information on the map geocoding is used.
If an office application does not know the coordinates of an address, it sends a request to the MeaSoft geocoder: it sends the city and address and receives the coordinates in response, which are stored in the system cache. So, before sending a request to the geocoder, it first checks to see if there is any data for that address in the cache. If there is, a request to the geocoder is not necessary.
Address simplification is triggered when writing and reading from the cache: before the first comma it is considered to be a street, 5 characters after it is a house number. Use of address simplification is determined by the variable References > Variables > Connections > Maps > Geocoding > Disable address simplification when geocoding:
- if simplification is enabled, only a part of the address is written to the cache, not the whole address. The address is also simplified before the search. For example, an address of the form «New York City, 6 Garden Street» и «New York City, 52 Lexington Street» is simplified to «New York City, street». And the system will reduce both addresses to a single point. If you turn on simplification, the accuracy to the house is not guaranteed;
- if address simplification is disabled, the search and cache recording of the address is performed as it is specified, and the time of coordinate determination may increase. If there is at least one character difference, the geocoder needs to be queried again. For example, these addresses will be different: «New York City, 6 Garden Street» и «New York City, Garden Street 6».
To improve geocoding results when simplification is enabled, specify a MeaSoft standard address. For example, in the Address field you should specify «Garden street 6», in the City/town field specify «New York City». Then the accuracy will be high with a good geocoding speed.
Unified zoning
- Unified zoning
- A system of courier scheduling in which orders are distributed by areas drawn on a map. This method has replaced planning by subwat stations. Unified zoning works for all branches of the company.
To enable unified zoning:
- Select References > Variables > Finance > Area Calculation by Address, set the variable to 1 and click Save. This will automatically turn on the related variables Calculate Cost by Address and Calculate Courier Area by Address.
- You can enable unified zoning for individual users. To do this, after 0 specify namesof the specific users and click Save.:
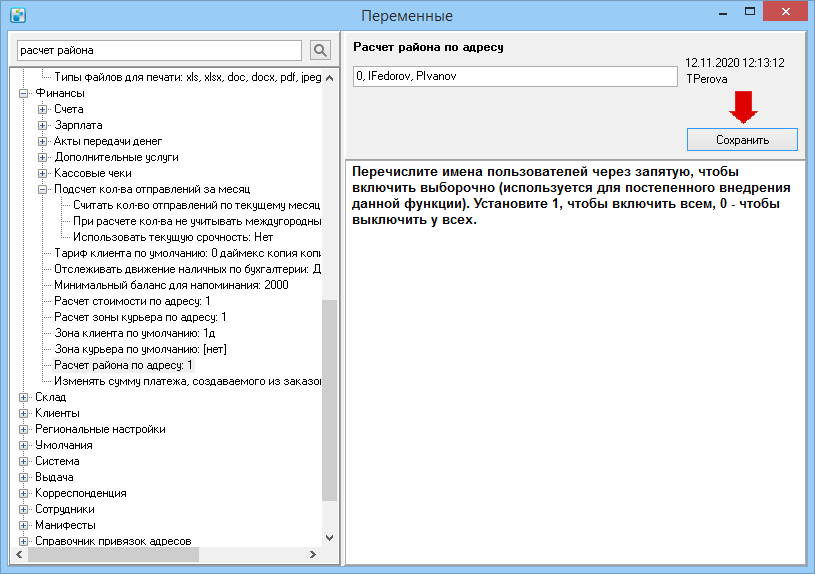
- You can enable unified zoning for individual users. To do this, after 0 specify names
- Select References > Variables > Shipment > Schedule by couriers in multibranch mode. Possible variable values:
- 0 — addresses on the map are planned by district, the window on the left will display a list of districts;
- 1 — addresses on the map are planned by couriers, the window on the left will display a list of couriers.
- To implement the functionality gradually, you can specify individual users in variables similar to the actions in step 1.
- Set the value of the variable and click Save.
- Select References > Variables > Defaults > Subway Alias and enter a name to replace the word subway in the system interface. For example, "areas".
- After changing the values of the variables, restart MeaSoft.

After unified zoning is enabled, the Subway, Streets, and subway station planning references will be unavailable. To set the rate zones:
- Select References > Areas, draw the delivery areas on the map and assign couriers to them for automatic scheduling.
- Select References > Zones on the Map and draw the courier and/or customer zones. For more information see «Zones on map».
When all the settings are complete, on the Addresses tab, select multiple addresses and click on the ![]() button. Depending on the value of the variable Schedule by couriers in multibranch mode, the map will display a list of couriers or delivery areas in the window on the left. If an incomplete list of couriers is displayed, go to the card of the employee absent from the list and check whether their employment date and work schedule are indicated.
button. Depending on the value of the variable Schedule by couriers in multibranch mode, the map will display a list of couriers or delivery areas in the window on the left. If an incomplete list of couriers is displayed, go to the card of the employee absent from the list and check whether their employment date and work schedule are indicated.