How to schedule a delivery — различия между версиями
Daria (обсуждение | вклад) (Новая страница: «The method of scheduling involves allocating deliveries to each courier. It is typically used by companies that dispatch the following day or later. At the end of…») |
Daria (обсуждение | вклад) |
||
| Строка 7: | Строка 7: | ||
__TOC__ | __TOC__ | ||
| − | == | + | ==Planning based on markers== |
| − | # | + | # Select the '''Orders''' tab. |
| − | # | + | # To go to the addresses, choose the correct order and hit '''Space'''. |
| − | # | + | # Go to the delivery map. To do so, click the '''Show all on map''' button, icon [[File:Показать на карте.jpg|25px]]. Select the address and then choose '''Show on map''' from the context menu by '''right-clicking'''. |
| − | # | + | # Choose a courier to allocate the delivery from the list on the left. |
| − | # | + | # Hover your mouse over the delivery marker you want to schedule, then '''right-click'''. The delivery will be allocated to the courier chosen in the list. |
| − | # | + | # Repeat steps 4 and 5 for each delivery marker on the map. |
<table style="border-style: solid; border-color: grey; border-width: 1px; background-color: #f8f9fa;" cellpadding="3"; > | <table style="border-style: solid; border-color: grey; border-width: 1px; background-color: #f8f9fa;" cellpadding="3"; > | ||
<tr> | <tr> | ||
| − | <td>[[File: planing_1.png|left|800px]] <p> | + | <td>[[File: planing_1.png|left|800px]] <p>Planning based on markers on the map</p></td> |
</tr> | </tr> | ||
</table> | </table> | ||
| − | == | + | ==Area Planning== |
| − | # | + | # Select the '''Orders''' tab. |
| − | # | + | # To go to the addresses, choose the correct order and hit '''Space'''. |
| − | # | + | # Go to the delivery map. To do so, click the '''Show all on map''' button, icon [[File:Показать на карте.jpg|25px]]. Select the address and then choose '''Show on map''' from the context menu by '''right-clicking'''. |
| − | # | + | # While holding '''right mouse button''', draw a bordered area on the map. Multiple sections can be created simultaneously for future planning. An area cannot be scheduled for a courier if it lacks any delivery markings. |
| − | # | + | # Choose a courier to allocate the delivery from the list on the left. |
| − | # | + | # Hover over the selected zone on the map, '''right-click''', and select '''Schedule'''. All deliveries in that zone will be assigned to the courier chosen in the list. |
| − | # | + | # To repeat for each delivery zone, follow steps 5 and 6. |
<table style="border-style: solid; border-color: grey; border-width: 1px; background-color: #f8f9fa;" cellpadding="3"; > | <table style="border-style: solid; border-color: grey; border-width: 1px; background-color: #f8f9fa;" cellpadding="3"; > | ||
<tr> | <tr> | ||
| − | <td>[[File: Зонирование.png|left|800px]] <p> | + | <td>[[File: Зонирование.png|left|800px]] <p>Scheduling areas on the map</p></td> |
</tr> | </tr> | ||
</table> | </table> | ||
| Строка 41: | Строка 41: | ||
<tr> | <tr> | ||
<td> | <td> | ||
| − | <p style="text-align:left"> | + | <p style="text-align:left">Previous step</p> |
| − | [[File:left.png|link= | + | [[File:left.png|link=How_to_add_an_order_and_addresses|left|75px|Назад]] |
</td> | </td> | ||
<td> | <td> | ||
| − | <p style="text-align:right"> | + | <p style="text-align:right">Next step</p> |
| − | [[File:right.png|link= | + | [[File:right.png|link=How_to_hand_over_shipments_to_the_courier|right|75px|Вперед]] |
</td> | </td> | ||
</tr> | </tr> | ||
</table> | </table> | ||
Текущая версия на 09:39, 14 ноября 2022
The method of scheduling involves allocating deliveries to each courier. It is typically used by companies that dispatch the following day or later. At the end of the working day, the logistician typically plans deliveries for couriers. Each courier then has a list of deliveries for the day in the morning. For instance, most online stores operate in this manner. Two main planning strategies are discussed in this article. See the Map Module article for further details on the map and planning.
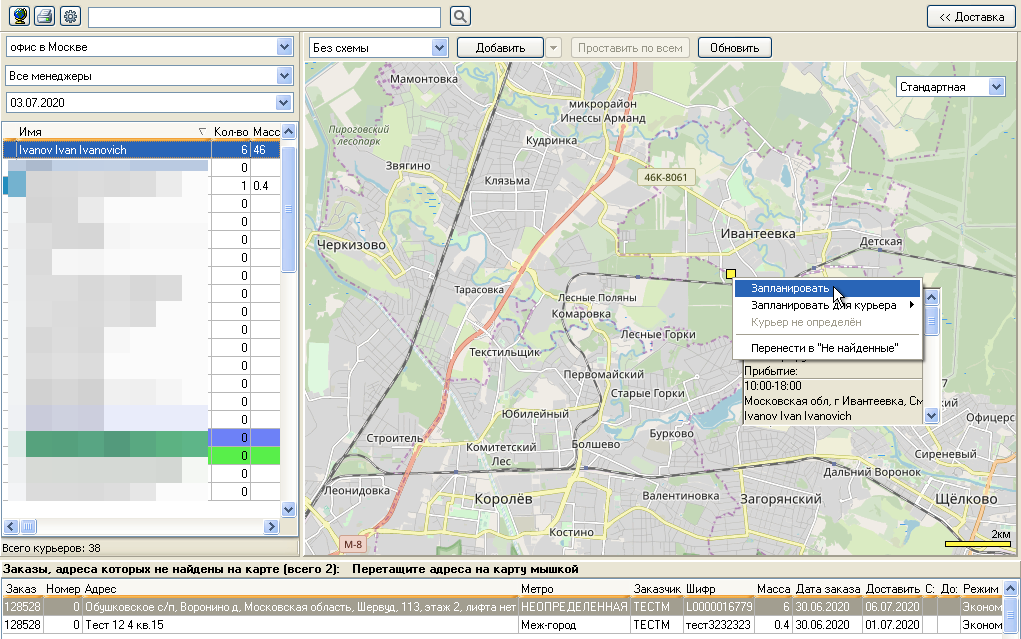
A city map is used for planning. On it, the system highlights the delivery address with markers. There are two ways to schedule manually:
- assign a courier separately for each marker;
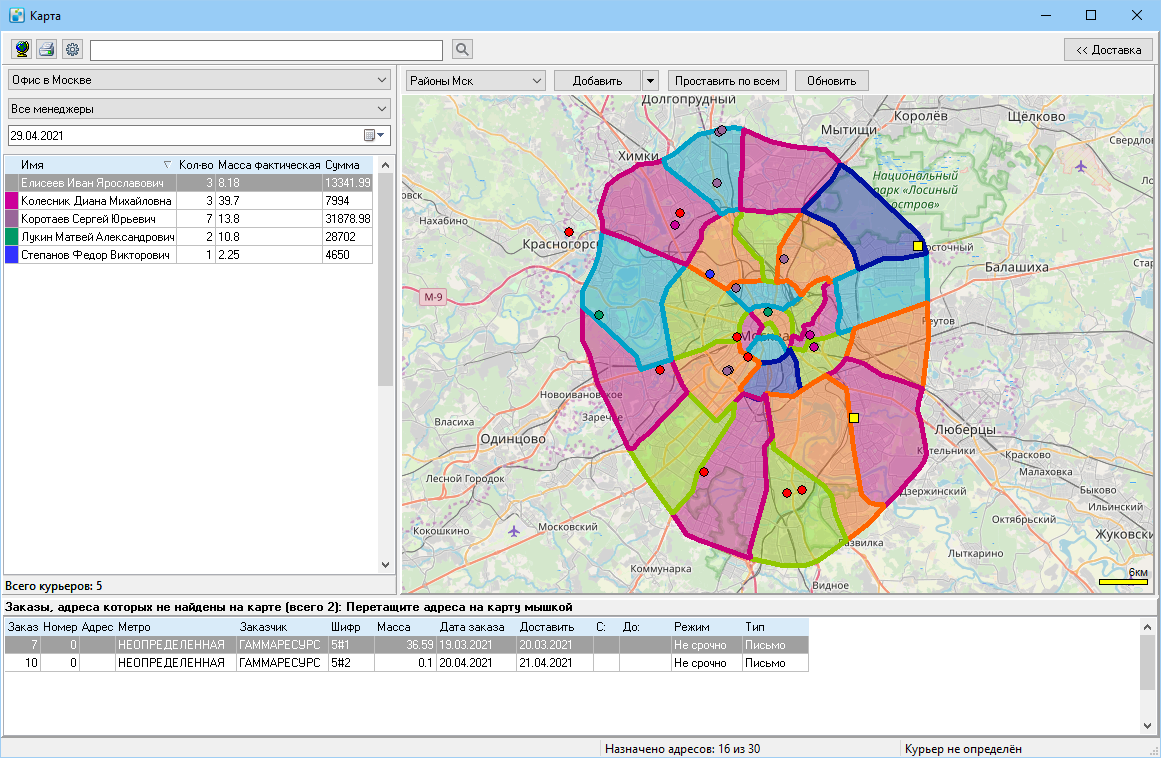
- assign a courier to a specific zone with markers.
Содержание
Planning based on markers
- Select the Orders tab.
- To go to the addresses, choose the correct order and hit Space.
- Go to the delivery map. To do so, click the Show all on map button, icon
 . Select the address and then choose Show on map from the context menu by right-clicking.
 - Choose a courier to allocate the delivery from the list on the left.
- Hover your mouse over the delivery marker you want to schedule, then right-click. The delivery will be allocated to the courier chosen in the list.
- Repeat steps 4 and 5 for each delivery marker on the map.
| Planning based on markers on the map |
Area Planning
- Select the Orders tab.
- To go to the addresses, choose the correct order and hit Space.
- Go to the delivery map. To do so, click the Show all on map button, icon
 . Select the address and then choose Show on map from the context menu by right-clicking.
 - While holding right mouse button, draw a bordered area on the map. Multiple sections can be created simultaneously for future planning. An area cannot be scheduled for a courier if it lacks any delivery markings.
- Choose a courier to allocate the delivery from the list on the left.
- Hover over the selected zone on the map, right-click, and select Schedule. All deliveries in that zone will be assigned to the courier chosen in the list.
- To repeat for each delivery zone, follow steps 5 and 6.
| Scheduling areas on the map |
|
Previous step |
Next step |


