How to add an order and addresses — различия между версиями
Daria (обсуждение | вклад) (Новая страница: «Each order in the system is linked to an existing customer. To add an order, you must first create a customer in the system. С точки зрения сист…») |
Daria (обсуждение | вклад) |
||
| (не показана 1 промежуточная версия этого же участника) | |||
| Строка 1: | Строка 1: | ||
Each order in the system is linked to an existing customer. To add an order, you must first create a customer in the system. | Each order in the system is linked to an existing customer. To add an order, you must first create a customer in the system. | ||
| + | From the point of view of the system, one order is a set of addresses to which shipments must be delivered. To process an order, you need to add recipient addresses to it. For example, an online store can transfer one order for 100 deliveries to different addresses to a courier service. | ||
| − | + | When an order with delivery addresses is added to the system, the address can be assigned to the courier for execution. | |
| − | |||
| − | |||
| − | |||
__TOC__ | __TOC__ | ||
| − | == | + | ==Create an order== |
| − | # | + | #Go to the '''Orders''' tab and press '''F3''' to create a new order. The system opens the '''Order''' window. |
| − | # | + | #Specify the '''Client'''. Autocomplete works in the field: enter part of the value and press '''Tab''' when prompted. The system will automatically fill in some of the fields using information about the client. |
| − | # | + | #Select '''Order Type'''. |
| − | # | + | #Click '''OK''' to create an order. |
<table style="border-style: solid; border-color: grey; border-width: 1px; background-color: #f8f9fa;" cellpadding="3"; > | <table style="border-style: solid; border-color: grey; border-width: 1px; background-color: #f8f9fa;" cellpadding="3"; > | ||
<tr> | <tr> | ||
| − | <td>[[File: add_order_1.png|left|700px]] <p> | + | <td>[[File: add_order_1.png|left|700px]] <p>Order window</p></td> |
</tr> | </tr> | ||
</table> | </table> | ||
| − | == | + | ==Add addresses to the order== |
<ol> | <ol> | ||
| − | <li> | + | <li> Select the '''Orders''' tab, then utilize the window's search bar on the right. For instance, choose '''Client''', '''Order Date''', and '''Show'''.</li> |
| − | <li> | + | <li>Choose the newly created order, then hit the '''Space bar''' to access the list of order addresses.</li> |
| − | <li> | + | <li>To add an address, press '''F3'''. The '''New Shipment''' window is displayed by the system.</li> |
| − | <li> | + | <li>Click on the '''Recipient''' tab.</li> |
| − | <li> | + | <li>Specify the receiving company. If you've already collaborated with this recipient, autocomplete will function. When prompted, enter a portion of the value and hit Tab. The recipient information will be filled up automatically by the system.</li> |
| − | <li> | + | <li> Manually specify if the recipient is a new one: <br /> |
<ol> | <ol> | ||
| − | <li type="a">''' | + | <li type="a">'''Full name''' of the contact person; </li> |
| − | <li type="a"> | + | <li type="a">the location of the recipient. The system automatically interprets delivery as domestic. Turn off the flag with your city's name if the delivery address is in a different city. Then select the locality search option by clicking the magnifying glass icon to the right of the city box. </li> |
| − | <li type="a">''' | + | <li type="a">'''Recipient address'''.</li> |
| − | <li type="a">''' | + | <li type="a">Contact person's '''Phone number'''.</li> |
</ol> | </ol> | ||
</li> | </li> | ||
| − | <li> | + | <li>Complete the '''Order Items''' and '''Instruction''' as necessary.</li> |
| − | <li> | + | <li>Make a list of the order items you want to send: <br /> |
<ol> | <ol> | ||
| − | <li type="a"> | + | <li type="a">Select the '''Order Items''' tab.</li> |
| − | <li type="a"> | + | <li type="a">To add position, press '''F3'''.</li> |
| − | <li type="a"> | + | <li type="a">Indicate the '''Price''' and '''Quantity''' for each item.</li> |
| − | <li type="a"> | + | <li type="a">If necessary, include more details. '''Weight''' and '''Notes''', as two examples.</li> |
</ol> | </ol> | ||
</li> | </li> | ||
| − | <li> | + | <li> Using the list of order items, the system will automatically determine the cash on delivery amount. You won't be able to manually modify the '''Amount''' field's value.</li> |
| − | <li> | + | <li> Indicate how many packages are included in the shipment. The number of stickers the system will produce for the current shipment is determined by the field. Go to the Places page to view a list of the locations in a shipment.</li> |
| − | </li> | + | <li>Choose shipment type and urgency mode.</li> |
| − | <li> | + | <li>Modify the '''Declared Value''' under the '''Finance''' tab if necessary. The value is identical to '''Shipment Amount''' by default.</li> |
| − | <li> | + | <li>Configure '''Value-added services''' under the '''Services''' tab. Regarding value-added services, check the article on [[Plans]] for more details.</li> |
| − | <li> | + | <li>To save the address, click OK. </li> |
| − | <li> | ||
</ol> | </ol> | ||
<table style="border-style: solid; border-color: grey; border-width: 1px; background-color: #f8f9fa;" cellpadding="3"; > | <table style="border-style: solid; border-color: grey; border-width: 1px; background-color: #f8f9fa;" cellpadding="3"; > | ||
<tr> | <tr> | ||
| − | <td>[[File: add_order_2.png|left|700px]] <p> | + | <td>[[File: add_order_2.png|left|700px]] <p>New Shipment window</p></td> |
</tr> | </tr> | ||
</table> | </table> | ||
| Строка 64: | Строка 61: | ||
<tr> | <tr> | ||
<td> | <td> | ||
| − | <p style="text-align:left"> | + | <p style="text-align:left">Previous step</p> |
| − | [[File:left.png|link= | + | [[File:left.png|link=How_to_add_a_client|left|75px|Назад]] |
</td> | </td> | ||
<td> | <td> | ||
| − | <p style="text-align:right"> | + | <p style="text-align:right">Next step</p> |
| − | [[File:right.png|link= | + | [[File:right.png|link=How_to_schedule_a_delivery|right|75px|Вперед]] |
</td> | </td> | ||
</tr> | </tr> | ||
</table> | </table> | ||
Текущая версия на 09:21, 14 ноября 2022
Each order in the system is linked to an existing customer. To add an order, you must first create a customer in the system.
From the point of view of the system, one order is a set of addresses to which shipments must be delivered. To process an order, you need to add recipient addresses to it. For example, an online store can transfer one order for 100 deliveries to different addresses to a courier service.
When an order with delivery addresses is added to the system, the address can be assigned to the courier for execution.
Содержание
Create an order
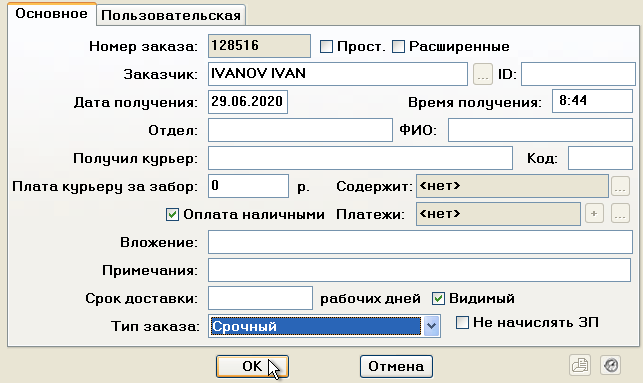
- Go to the Orders tab and press F3 to create a new order. The system opens the Order window.
- Specify the Client. Autocomplete works in the field: enter part of the value and press Tab when prompted. The system will automatically fill in some of the fields using information about the client.
- Select Order Type.
- Click OK to create an order.
| Order window |
Add addresses to the order
- Select the Orders tab, then utilize the window's search bar on the right. For instance, choose Client, Order Date, and Show.
- Choose the newly created order, then hit the Space bar to access the list of order addresses.
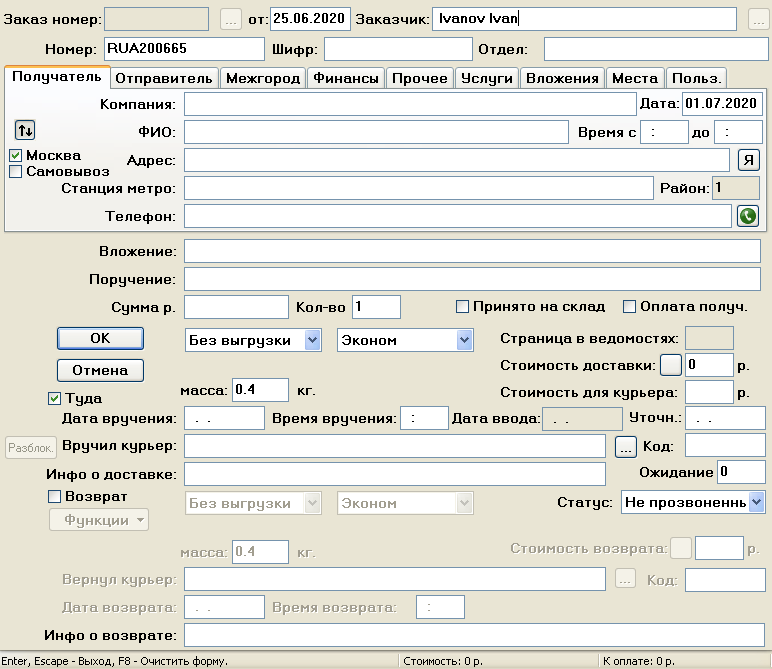
- To add an address, press F3. The New Shipment window is displayed by the system.
- Click on the Recipient tab.
- Specify the receiving company. If you've already collaborated with this recipient, autocomplete will function. When prompted, enter a portion of the value and hit Tab. The recipient information will be filled up automatically by the system.
- Manually specify if the recipient is a new one:
- Full name of the contact person;
- the location of the recipient. The system automatically interprets delivery as domestic. Turn off the flag with your city's name if the delivery address is in a different city. Then select the locality search option by clicking the magnifying glass icon to the right of the city box.
- Recipient address.
- Contact person's Phone number.
- Complete the Order Items and Instruction as necessary.
- Make a list of the order items you want to send:
- Select the Order Items tab.
- To add position, press F3.
- Indicate the Price and Quantity for each item.
- If necessary, include more details. Weight and Notes, as two examples.
- Using the list of order items, the system will automatically determine the cash on delivery amount. You won't be able to manually modify the Amount field's value.
- Indicate how many packages are included in the shipment. The number of stickers the system will produce for the current shipment is determined by the field. Go to the Places page to view a list of the locations in a shipment.
- Choose shipment type and urgency mode.
- Modify the Declared Value under the Finance tab if necessary. The value is identical to Shipment Amount by default.
- Configure Value-added services under the Services tab. Regarding value-added services, check the article on Plans for more details.
- To save the address, click OK.
| New Shipment window |
|
Previous step |
Next step |


