How to add a client — различия между версиями
Daria (обсуждение | вклад) (Новая страница: «To add a client, click the Clients tab in the top menu of the program. In the window that opens, be sure to fill out the '''Main''', '''Company Info''' and '''Fin…») |
Daria (обсуждение | вклад) |
||
| Строка 56: | Строка 56: | ||
</table> | </table> | ||
| − | == | + | ==Fill in Finance tab== |
| − | + | Fill in the basic parameters: | |
| − | # | + | # Select the '''Finance''' tab. |
| − | # | + | # Choose the '''Plan''' that will be utilized to determine how much the services will cost for this client. |
| − | # | + | # If you want to choose the lowest possible invoice amount for this customer, enable the '''Min. invoice amount''' option. The system will generate an invoice for the stated amount if the client's invoice amount is less than that amount. |
| − | # | + | # Activate the client's '''Discount''' if necessary. Indicate the discount's dollar amount as well as the month and year that it is applicable for. |
| − | # | + | # If the client pays for the services before they are finished, turn on the '''Prepayment''' option. In this method, the client adds money to the account, and the system deducts it from the amount as payment for the services provided. |
| − | # | + | # Indicate '''Invoice payment term''' your clients have to pay the bill. The client is regarded as a debtor if the invoice has not been paid during this time. The system alerts the user when placing an order from such customers that there are unpaid invoices. It is not feasible to issue an urgent order for such customers if the system administrator has allowed blocking of them. |
| − | # | + | # Choose the '''Currency''' for client settlements. |
| − | # | + | # Specify the '''Number of invoices''' the client should get from the courier service company each month for the services rendered. |
| − | + | When working with online stores, configure additional settings: | |
| − | # | + | # For the quickest possible return of funds, enable the '''Immediate Refund''' option. How it works: |
| − | #* | + | #* the option is enabled - delivered items from shipments with the status "Delivered" in the Issue or "Delivered" according to the courier are included in the funds transfer certificates (FTC). The system automatically adjusts the amount in the certificate for the previous period; |
| − | #* | + | #* the option is disabled - only shipments with the specified date of delivery are included in the FTC. |
| − | # | + | # If you want to deduct the cost of courier services from the amount of money transmitted, enable the '''Exclude the cost of courier services from the funds transfer certificate''' option. The FTC covers the cost of shipments and courier services if the option is disabled. For payment of the courier services, the client receives a separate invoice. |
| − | # | + | # To allow couriers to modify the payment type through the mobile app, enable the option '''Ask recipient for payment type'''. |
| − | # | + | # Include unpaid intercity shipments in the FTC if necessary. How it works: |
| − | #* | + | #* the option is enabled — the FTC receives items with the specified date and time of delivery and with a responsible branch that is different from the current one. The current system considers the branch specified in the client card; |
| − | #* | + | #* the option is disabled - only delivered items with the mark "Paid" get into the FTC. |
| − | # | + | # Choose default '''FTC Payment Type'''. The payment type can be modified after the FTC creation |
<table style="border-style: solid; border-color: grey; border-width: 1px; background-color: #f8f9fa;" cellpadding="3"; > | <table style="border-style: solid; border-color: grey; border-width: 1px; background-color: #f8f9fa;" cellpadding="3"; > | ||
<tr> | <tr> | ||
| − | <td>[[File: 25 client.png|left|700px]] <p> | + | <td>[[File: 25 client.png|left|700px]] <p>Finance tab</p></td> |
</tr> | </tr> | ||
</table> | </table> | ||
| Строка 87: | Строка 87: | ||
<tr> | <tr> | ||
<td> | <td> | ||
| − | <p style="text-align:left"> | + | <p style="text-align:left">Previous step</p> |
| − | [[File:left.png|link= | + | [[File:left.png|link=Introduction_to_the_system|left|75px|Назад]] |
</td> | </td> | ||
<td> | <td> | ||
| − | <p style="text-align:right"> | + | <p style="text-align:right">Next step</p> |
| − | [[File:right.png|link= | + | [[File:right.png|link=How_to_add_an_order_and_addresses|right|75px|Вперед]] |
</td> | </td> | ||
</tr> | </tr> | ||
</table> | </table> | ||
Текущая версия на 06:28, 14 ноября 2022
To add a client, click the Clients tab in the top menu of the program. In the window that opens, be sure to fill out the Main, Company Info and Finance tabs. Setting up the other tabs is optional and depends on the work processes in your company. This article describes the basic parameters that need to be filled out. For a detailed description of all form fields, see "Clients and Partners".
Fill in the main information
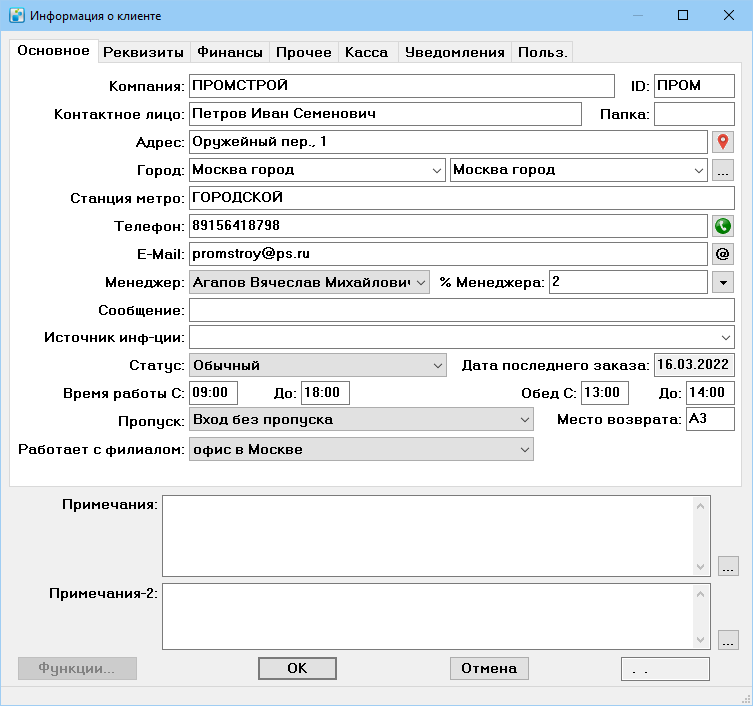
- Go to the Main tab.
- Specify an arbitrary short name of the Company. It should be clear to your colleagues. We do not recommend that you indicate the full name with the form of a legal entity: for example, individual entrepreneur or LLC. This is for the Company Info tab.
- Specify Contact in client's company. This person is responsible for interacting with the courier service company.
- Specify actual company Address. The system will automatically detect the subway station at the specified address. For more information about working with subway stations, see the MetroMetro section.
- Enter the Phone number of the contact person or organization.
- Enter the Email of the contact person or organization.
- Specify the name of the Folder for sorting client documents. The name can be used to label payrolls and invoices. On the printed form, the folder is displayed in the Order No. field. It is also possible to search for client documents by this marking.
- Select client's internal Status.
- Specify Opening hours и Lunchtime.
- Select the method of obtaining a Pass for a courier to enter the client's territory.
- In the Works with Branch field select the service branch of this customer.
- If required, specify additional service information in the Note и Note 2. This information is available only to users of the MeaSoft system.
| Main tab |
Fill in company information
Invoices and funds transfer certificates are created using Company Info. Completion of the fields depends on how you work with customers:
- if payment is received in cash before delivery is completed, it is not necessary to indicate the company info;
- if you work with a client under an agreement and non-cash payment, be sure to specify all the details;
- if payment is received in cash for a certain period of time, be sure to indicate the Contract No. The rest of the fields are optional.
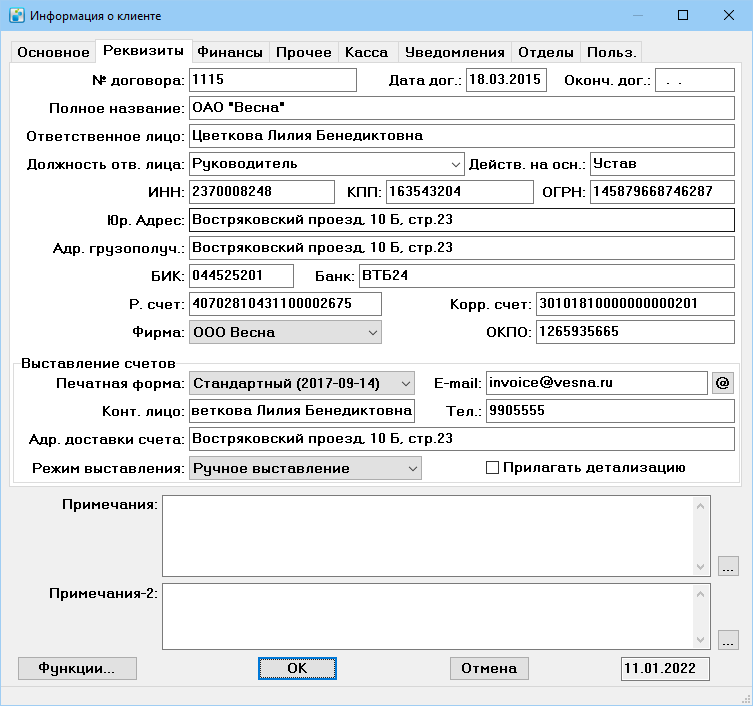
On the Company Info tab, fill in the main fields:
- Specify Contract No.. If the number is not specified, the system will enable the Cash payment option in the order card.
- Specify the Contract Date - the day the contract was signed.
- Specify Contract Expiry Date.
- Specify Full Name of the client's company in accordance with the certificate of incorporation. The system uses this name to generate accompanying documents.
- Specify Person Responsible in the company of the client with whom the contract is concluded.
- Specify Responsible person position.
- In the Acting on the basis of field specify the wording of the basis in accordance with the certificate of registration of the client's company.
- Specify the bank details of the client's legal entity.
- Specify Legal Address of the client in accordance with the certificate of registration of the company.
- Specify Consignee Address for returning shipments to the customer. It may not match the legal address.
- In the Company field select the legal entity to work with this client.
Complete the Invoicing block:
- Select the Print form type for client's invoice.
- Specify Email to send certificates, certificate breakdown, and invoices.
- Specify Contact Person who will be receiving financial documents.
- Specify Phone number of the employee or a department that will be receiving financial documents.
- In the Invoice address specify cleint's address to send original documents.
- Enable the Attach breakdown create the breakdown as an Excel invoice. The information will be on a separate sheet.
| Company Info tab |
Fill in Finance tab
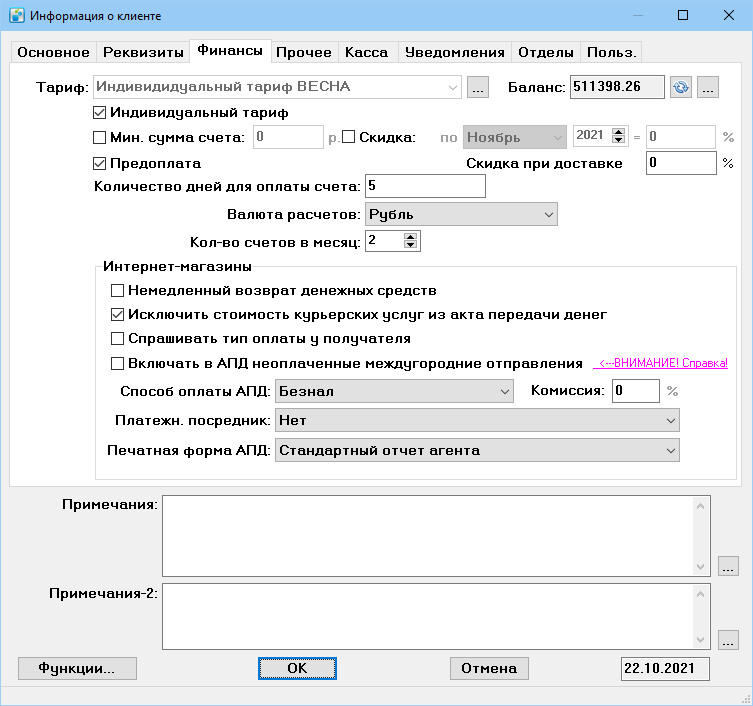
Fill in the basic parameters:
- Select the Finance tab.
- Choose the Plan that will be utilized to determine how much the services will cost for this client.
- If you want to choose the lowest possible invoice amount for this customer, enable the Min. invoice amount option. The system will generate an invoice for the stated amount if the client's invoice amount is less than that amount.
- Activate the client's Discount if necessary. Indicate the discount's dollar amount as well as the month and year that it is applicable for.
- If the client pays for the services before they are finished, turn on the Prepayment option. In this method, the client adds money to the account, and the system deducts it from the amount as payment for the services provided.
- Indicate Invoice payment term your clients have to pay the bill. The client is regarded as a debtor if the invoice has not been paid during this time. The system alerts the user when placing an order from such customers that there are unpaid invoices. It is not feasible to issue an urgent order for such customers if the system administrator has allowed blocking of them.
- Choose the Currency for client settlements.
- Specify the Number of invoices the client should get from the courier service company each month for the services rendered.
When working with online stores, configure additional settings:
- For the quickest possible return of funds, enable the Immediate Refund option. How it works:
- the option is enabled - delivered items from shipments with the status "Delivered" in the Issue or "Delivered" according to the courier are included in the funds transfer certificates (FTC). The system automatically adjusts the amount in the certificate for the previous period;
- the option is disabled - only shipments with the specified date of delivery are included in the FTC.
- If you want to deduct the cost of courier services from the amount of money transmitted, enable the Exclude the cost of courier services from the funds transfer certificate option. The FTC covers the cost of shipments and courier services if the option is disabled. For payment of the courier services, the client receives a separate invoice.
- To allow couriers to modify the payment type through the mobile app, enable the option Ask recipient for payment type.
- Include unpaid intercity shipments in the FTC if necessary. How it works:
- the option is enabled — the FTC receives items with the specified date and time of delivery and with a responsible branch that is different from the current one. The current system considers the branch specified in the client card;
- the option is disabled - only delivered items with the mark "Paid" get into the FTC.
- Choose default FTC Payment Type. The payment type can be modified after the FTC creation
| Finance tab |
|
Previous step |
Next step |


