Courier Service Account — различия между версиями
Olga (обсуждение | вклад) м |
Olga (обсуждение | вклад) м (→Changing Client Account Link) |
||
| (не показано 35 промежуточных версий этого же участника) | |||
| Строка 1: | Строка 1: | ||
| − | + | Courier service account is intended for configuring client account. | |
| − | |||
| − | |||
| − | |||
| − | |||
| − | |||
| − | + | == Personal Account Functions == | |
| + | There are the following types of the personal account functionality: | ||
| + | * Basic | ||
| + | * Standard | ||
| + | * Premium | ||
| + | * Maximum | ||
| − | {| class="wikitable" | + | Depending on the type, you can use the following functionality: |
| − | ! | + | |
| − | ![[Файл: | + | {|class="wikitable" |
| − | ![[Файл: | + | !Functionality |
| − | ![[Файл: | + | ![[Файл:Basic.png|160px|]] |
| − | ![[Файл: | + | ![[Файл:Standard.png|160px|]] |
| + | ![[Файл:Premium.png|160px|]] | ||
| + | ![[Файл:Maximum.png|160 px]] | ||
|- | |- | ||
| − | | | + | |Place orders manually |
| − | | | + | |Yes |
| − | | | + | |Yes |
| − | | | + | |Yes |
| − | | | + | |Yes |
|- | |- | ||
| − | | | + | |Track by order number, period created, and status |
| − | | | + | |Yes |
| − | | | + | |Yes |
| − | | | + | |Yes |
| − | | | + | |Yes |
|- | |- | ||
| − | | | + | |Print order packing slips and barcodes |
| − | | | + | |Yes |
| − | | | + | |Yes |
| − | | | + | |Yes |
| − | | | + | |Yes |
|- | |- | ||
| − | | | + | |Export order data to Microsoft Excel, export acceptance certificate |
| − | | | + | |Yes |
| − | | | + | |Yes |
| − | | | + | |Yes |
| − | | | + | |Yes |
|- | |- | ||
| − | |[[# | + | |[[#Setting Up Fields and Tabs|Set up tracking data]] |
| − | | | + | |Yes |
| − | | | + | |Yes |
| − | | | + | |Yes |
| − | | | + | |Yes |
|- | |- | ||
| − | | | + | |Warehouse management |
| − | | | + | |Yes |
| − | | | + | |Yes |
| − | | | + | |Yes |
| − | | | + | |Yes |
|- | |- | ||
| − | | | + | |Allow access to partners/agents <br>for specifying delivery statuses and information |
| | | | ||
| − | | | + | |Yes |
| − | | | + | |Yes |
| − | | | + | |Yes |
|- | |- | ||
| − | | | + | |Import orders from Microsoft Excel template |
| | | | ||
| − | | | + | |Yes |
| − | | | + | |Yes |
| − | | | + | |Yes |
|- | |- | ||
| − | | | + | |Different field settings for client groups |
| | | | ||
| | | | ||
| − | | | + | |Yes |
| − | | | + | |Yes |
|- | |- | ||
| − | | | + | |Settlements with online stores (unavailable for department accounts) |
| | | | ||
| | | | ||
| − | | | + | |Yes |
| − | | | + | |Yes |
|- | |- | ||
| − | |[[# | + | |[[#Advanced Settings|Customize design]] |
| | | | ||
| | | | ||
| − | | | + | |Yes |
| − | | | + | |Yes |
|- | |- | ||
| − | |[[# | + | |[[#Changing Client Account Link|Change client account link]] |
| | | | ||
| | | | ||
| − | | | + | |Yes |
| − | | | + | |Yes |
|- | |- | ||
| − | | | + | |Shipment status history |
| | | | ||
| | | | ||
| − | | | + | |Yes |
| − | | | + | |Yes |
|- | |- | ||
| − | | | + | |[[#Setting Up Fields and Tabs|Change or cancel orders]] |
| | | | ||
| | | | ||
| − | | | + | |Yes |
| − | | | + | |Yes |
|- | |- | ||
| − | |[[ | + | |[[#Tracking Orders by Numbers|Subscribe to order status]] |
| | | | ||
| | | | ||
| − | | | + | |Yes |
| − | | | + | |Yes |
|- | |- | ||
| − | | | + | |Data storage period, days |
|45 | |45 | ||
|180 | |180 | ||
| Строка 111: | Строка 113: | ||
|365 | |365 | ||
|- | |- | ||
| − | | | + | |[[#Storage|Storage for images and attachments]] |
|0 | |0 | ||
| − | |500 | + | |500 MB |
| − | | | + | |up to '''1 TB''' |
| − | | | + | |up to '''1 TB''' |
|- | |- | ||
| − | | | + | |Customize delivery fee for recipients |
| | | | ||
| | | | ||
| | | | ||
| − | | | + | |Yes |
|- | |- | ||
| − | | | + | |Check recipient's rating |
| | | | ||
| | | | ||
| | | | ||
| − | | | + | |Yes |
|- | |- | ||
| − | |[[API# | + | |[[API#Fair Usage Policy|Increase query limit]] |
| | | | ||
| | | | ||
| | | | ||
| − | | | + | |5 times |
|- | |- | ||
|} | |} | ||
| − | == | + | == Registering Courier Service Account == |
| − | + | To register a courier service account: | |
| − | # | + | # In MeaSoft, click '''Catalogs''' > '''Additional Modules''', and then click '''Register Account'''. A window with the courier service data appears. |
| − | # | + | # Enter a username in the lower field and click '''Register'''. You will see the message "Successfully registered". Click '''OK'''. The "Manage Additional Modules" window appears:[[Файл:Image 5.png|700px|none]] |
| − | + | In this window, you can see: | |
| − | + | * A link to sign in to [https://home.courierexe.ru courier service account], a username and a password for it. | |
| − | * | + | * A link to sign in to client account. The link looks as follows: https://home.courierexe.ru/X, where X is the unique code of the courier service. |
| − | * | ||
| − | |||
| − | |||
| − | + | To create your client credentials, in MeaSoft, open the client card, click the '''Other''' tab, and create credentials in the '''Website access''' field. Send the credentials to the client. | |
| − | + | Access on behalf of a department is also supported. To provide such access, open the client card, click the '''Departments''' tab, open the department card, and fill in the '''Username''' and '''Password''' fields. The department must have at least one employee. If the client signs in to the personal account on behalf of the department, the '''Finance''' section is unavailable, and the '''Department''' field is filled in automatically when placing a new order. | |
| − | |||
| − | + | == Setting Up Client Account == | |
| + | To set up a client account, sign in to your courier service account and click '''Settings'''. | ||
| − | + | [[Файл:CSA Settings.png|none|1200 px]] | |
| − | |||
| − | |||
| − | |||
| − | |||
| − | |||
| − | + | There are the following columns to manage the fields on all tabs: | |
| + | * '''Display order'''. Shows the fields layout. To change the order, drag the line up or down. | ||
| + | * '''Standard name'''. Shows the default field names. | ||
| + | * '''Custom name'''. The field name to be displayed to your clients. | ||
| + | * '''Allowed'''. Allows you to show or hide fields by switching ON/OFF. | ||
| + | * '''Required'''. The additional column on the '''Pickup Request Fields''' and '''New Order Fields''' tabs. Use it to assign required fields. In the client account, such fields will be marked with a red asterisk. If the client leaves them blank, the system will prompt them and the order will not be created. | ||
| − | + | To save the field settings, click '''Save''' at the bottom of the page. | |
| − | + | To restore the default settings, click '''Reset'''. | |
| − | |||
| − | + | === Setting Up Fields for Client Groups === | |
| − | + | You can show different fields for client groups. The client group is determined by the status in the client card. | |
| − | |||
| − | |||
| − | |||
| − | + | To configure the form fields for a client group: | |
| + | # In the '''Select client type''' drop-down list, select the client group status, and then click '''Copy'''. | ||
| + | # Set up the visibility of the form fields. | ||
| + | # Click '''Save'''. | ||
| + | # To customize the form for another client group, repeat all the steps again. | ||
| − | === | + | === Setting Up Fields and Tabs === |
| − | + | The table below shows the settings of the client account: | |
| − | {|class="wikitable" | + | {|class="wikitable" style="width: 80%" |
| − | ! | + | !style="width: 20%;"|What to set up |
| − | ! | + | !style="width: 20%;"|Where to set up |
| − | + | !style="width: 60%;"|Comment | |
| − | !style="width: | ||
|- | |- | ||
| − | | | + | |Order table fields on the '''Tracking''' tab of the client account||'''Settings''' > '''Order Tracking Fields'''|| |
|- | |- | ||
| − | | | + | |Order card fields in the client account||'''Settings''' > '''Fields in order card'''|| |
|- | |- | ||
| − | | | + | |New order fields||'''Settings''' > '''New Order Fields'''||Set up the fields to be filled in when creating an order manually.<br>Time slots can be specified manually or selected from the list.<br>To enter them manually, enable the '''Delivery time from''' and '''Delivery time to''' fields.<br>To select slots from the list, enable the '''Delivery time slot''' field.<br>You can edit the slots list in <rspoiler text="MeaSoft"> '''Catalogs''' > '''Statuses''' > '''61 Delivery slots'''</rspoiler>.<br><br>To add items to an order, enable the '''Items''' field.<br><br>To add files, enable the '''Attached files''' field. <br>You can view attached files <rspoiler text="in MeaSoft"> shipment card > '''Functions''' > '''Attached Files'''</rspoiler>.<br><br>To set the default value of the '''Delivery mode''' field, click '''Parameters''' and select the value from the '''Urgency mode''' drop-down list.<br><br>To select a pickup point, enable the '''Delivery type''' field. |
|- | |- | ||
| − | | | + | |Pickup request fields|| '''Settings''' > '''Pickup Request Fields'''||You can disable the '''Request Pickup''' tab in the client account. To do this, disable all the form fields.<br>For pickup requests, the shipment card displays sender data on the '''Recipient''' tab and recipient data on the '''Sender''' tab. |
|- | |- | ||
| − | | | + | |Fields on the order tracking page||'''Settings''' > '''Tracking Page Fields'''|| |
|- | |- | ||
| − | | | + | |Label fields||'''Settings''' > '''Label Fields'''|| |
|- | |- | ||
| − | | | + | |Pickup point list||Office application||You can add pickup points in MeaSoft.<br>To enable the client to select a pickup point when creating an order manually, click '''Settings''' > '''New Order Fields''' and enable the '''Delivery type''' field. |
|- | |- | ||
| − | | | + | |Warehouse||Office application||The '''Warehouse''' menu item appears in the client account if the client is a supplier in at least one receipt in MeaSoft.<br><br>If you want the values of the fields '''Item name''', '''Item weight''', '''Item price''', and '''Barcode''' to be filled in automatically when adding an item from a warehouse to an order in the client account, they must be specified in the item card in MeaSoft ('''Warehouse''' > '''Items''').<br><br>To display the current quantity of <rspoiler text="available items">In the client account, this is the '''including reserved''' column on the '''Warehouse''' tab</rspoiler> in the warehouse in the client account, configure the '''Variables''' > '''Warehouse''' > '''Shipment statuses to reserve order items''' variable in MeaSoft .<br><br>You can manage the courier service warehouse using the Warehouse Management module. |
|- | |- | ||
| − | | | + | |Microsoft Excel registry template<br>[[Файл:standard1.png|80px|]] [[Файл:Premium1.png|80px|]] [[Файл:Maximum1.png|80px]]||'''Settings''' > '''Excel Registry Import Fields'''|||Set up a template for a Microsoft Excel file to import orders in the client account.<br>On the tab, the fields are intended for the table rows to be displayed in the template.<br><br>There are the following additional columns:<br> • '''Value cell''' specifies the cell or the <rspoiler text="cell range">The cell range is marked with the ":" character. An Excel file will merge the cells within the specified range.</rspoiler> for entering the value. <rspoiler text="Example">If "D4:G4" is specified in the '''Value cell''' column of the '''Pickup date''' field, the pickup date in a Microsoft Excel document must be specified within the cell range D4:G4</rspoiler>.<br> • '''Header cell''' specifies the cell or the cell range to store the field name. To place the same header in multiple parts of a Microsoft Excel file, specify comma-separated cells or ranges. <rspoiler text="Example">If "A4, А10" is specified in the '''Header cell''' column of the '''Pickup date''' field, two cells of a Microsoft Excel document will store the '''Pickup date''' row name: A4 and А10.</rspoiler><br> • '''Width''' sets the column width in a Microsoft Excel file. The width is the number of characters to be included in the cell.<br><br>The required rows are not highlighted in a Microsoft Excel file. If the client leaves them blank, a notification appears on file import and the orders are not added to the system.<br><br>Note that changing the line display order does not change the position of the rows in a Microsoft Excel file. The '''#''' and '''Recipient company''' fields are always enabled and must be filled in. |
|- | |- | ||
| − | | | + | |Calculator fields<br>[[Файл:standard1.png|80px|]] [[Файл:Premium1.png|80px|]] [[Файл:Maximum1.png|80px]]||'''Settings''' > '''Calculator Fields'''||To hide the "Calculator" menu item, click '''Parameters''' > '''General''' and clear the '''Show the "Calculator" menu item''' check box.<br><br>The calculator makes calculations ising common intercity rates unless the client has individual ones set up. To calculate intra-city rates, specify the same city or town as both sender and recipient. |
|- | |- | ||
| − | | | + | |The '''Incoming Orders''' tab<br>[[Файл:standard1.png|80px|]] [[Файл:Premium1.png|80px|]] [[Файл:Maximum1.png|80px]]||Office application||The '''Incoming Orders''' menu item appears in the client account when the courier service client is an agent.<br>For this, a <rspoiler text="branch card"> '''Catalogs''' > '''Intercity''' > '''Branches'''</rspoiler> must be created for them in MeaSoft. In this case, the username and password for the client account must be recorded in the <rspoiler text="counterparty card"> '''Catalogs''' > '''Intercity''' > '''Branches''' > branch card > '''Other''' > '''Counterparty'''</rspoiler>. |
|- | |- | ||
| − | | | + | |List of cash transfer certificates<br>[[Файл:Premium1.png|80px|]] [[Файл:Maximum1.png|80px]]||Office application||The '''Finance''' tab displays a table of cash transfer certificates.<br><br>By default, the '''Amount due''' column displays the amount that the courier must hand over to the client. To exclude courier services from the calculated amount, in MeaSoft, in the client card, on the '''Finance''' tab, select the '''Exclude the cost of courier services from the cash transfer certificate''' check box. |
|- | |- | ||
| − | | | + | |Order cancelation and change<br>[[Файл:Premium1.png|80px|]] [[Файл:Maximum1.png|80px]]||'''Settings''' > '''Parameters''' > '''Advanced'''|| |
|- | |- | ||
|} | |} | ||
| − | === | + | === Parameters=== |
| − | [[Файл: | + | [[Файл:standard1.png|60px|]] [[Файл:Premium1.png|60px|]] [[Файл:Maximum1.png|60px]]In the '''Parameters''' section, you can access additional settings of the client account: |
| − | |||
| − | |||
| − | + | [[Файл:CSA Parameters.png|none|1200 px]] | |
| − | + | ||
| − | * ''' | + | To get more details about the option, hover the mouse pointer over the question mark at the end of the line. |
| − | * ''' | + | The parameters are grouped into tabs: |
| − | * ''' | + | * '''General''' |
| + | * '''Finance''' | ||
| + | * '''Advanced''' | ||
| − | ==== | + | ==== General Settings ==== |
| − | '''HTML | + | '''HTML code'''. You can specify HTML code or Javascript for displaying parts of the content. Besides, form DOM can be processed and an additional message after clicking '''Send''' can be displayed. The processing is added to the submitCallback method in a Javascript. |
| − | + | Example: | |
<source lang="javascript"> | <source lang="javascript"> | ||
| − | // | + | //Code added to the HTML code parameter |
<script type="text/javascript"> | <script type="text/javascript"> | ||
window.submitCallback = function() { | window.submitCallback = function() { | ||
if (jQuery('#mass').val() >= 100) { | if (jQuery('#mass').val() >= 100) { | ||
| − | return ' | + | return 'Weight specified' + jQuery('#mass').val() + ' kg!'; |
} else { | } else { | ||
return ''; | return ''; | ||
| Строка 241: | Строка 239: | ||
</script> | </script> | ||
</source> | </source> | ||
| − | + | Once you click '''Send''', the '''Weight''' field value is checked. If the value is greater than or equal to 100, a message indicating the weight is displayed besides the question about placing the order. Use this mechanism only to display messages, not to check for new order errors because the system allows you to place the order. | |
| − | ''' | + | '''Company data'''. In this section, you can specify a name, a logo, a phone number, and a link to the courier service website on the following pages: |
| − | * | + | * Client account sign-in page |
| − | * | + | * Order tracking |
| − | * | + | * Calculator |
| − | + | To save the settings, click '''Save'''. | |
| − | ==== | + | ==== Finance ==== |
| − | + | Use this tab to set up payment services: | |
| − | * ''' | + | * '''PimPay Settings'''. To get started with PimPay, enter the PimPay code, token, and a private key in the appropriate fields. |
| − | * ''' | + | * '''Online Payment Settings'''. To accept online payments using Robokassa, in the '''Online Payment Settings''' section, fill in the fields with the merchant data from your Robokassa personal account. |
| − | * ''' | + | * '''ibox Online Payment Settings'''. Allows you to configure the module to get requests from Ibox. Fill in the '''Ibox client ID''' field with the value from the '''Company profile''' section of your ibox personal account, create a username and a password for webhooks and report this data to ibox. |
| − | + | To save the settings, click '''Save'''. | |
| − | ==== | + | ==== Advanced Settings ==== |
| − | [[Файл: | + | [[Файл:Premium1.png|60px|]] [[Файл:Maximum1.png|60px]] On the tab, the settings are grouped into the '''Common Settings''' and '''Appearance Settings''' sections. |
| − | + | In the '''Appearance Settings''' section, you can change the interface of the client account. | |
| − | + | To change the interface of the client account: | |
| − | # | + | # Download a CSS file by clicking '''Example CSS file'''. |
| − | # | + | # Edit the CSS file. |
| − | # | + | # Click '''Select file''' and import the modified CSS file. When the file is imported, the message "CSS imported successfully" appears. |
| − | + | Note that the client account is built using [http://getbootstrap.com Bootstrap]. | |
| − | == | + | == Phones == |
| − | + | Use it to view the list of courier devices connected to the MeaSoft App mobile application. | |
| − | [[Файл: | + | [[Файл:CSA Phones.png|none|1100 px]] |
| − | + | By default, the '''Courier Devices''' tab with a list of connected devices appears. | |
| − | + | To filter the list, click '''Active''', '''Inactive''' or '''All'''. | |
| − | === | + | === Courier Devices === |
| − | + | To configure a courier device, in the '''Courier Devices''' list, click '''Edit''' next to the device name. The device card appears: | |
| − | [[Файл: | + | [[Файл:CSA Phone Card.png|none|600 px]] |
| − | ''' | + | '''Courier'''. The name of the courier the device is registered for. To register the device for another courier, select their name from the drop-down list. |
| − | '''PIN | + | '''POS terminal PIN'''. Use it to set up order payments via the terminal. |
| − | ''' | + | '''Fiscal register number'''. Use it to set up fiscalization. |
| − | + | If the '''Active''' check box is selected, the mobile device is synchronized with the system. To disable synchronization, clear the check box. The check box is cleared automatically if data has not been received from the device within 7 days. You can select it again any time to resume the device in the system. | |
| − | + | The '''GPS tracking''' and '''GSM tracking''' check boxes are selected automatically when the courier device is connected to these services. | |
| − | + | When you finish editing the settings, click '''Save'''. | |
| − | === | + | === Telephony Settings === |
| − | + | Use the tab to configure the mobile application connection to telephony. The telephony server [https://ru.wikipedia.org/wiki/Asterisk Asterisk] and connection via [http://asteriskpbx.ru/display/Asterisk/Asterisk+Managment+Interface+%28AMI%29 AMI] are used. | |
| − | + | You must be an Asterisk server administration expert for the setup. Contact your telephony support. Our technical support team does not have the appropriate qualifications, and most likely we will not be able to support you in this matter. | |
| − | + | Specify connection settings: | |
| − | * ''' | + | * '''Server address'''. IP address or domain name. It is assumed that the Asterisk server has a static external IP address or the AMI port is forwarded. Otherwise, the feature does not function. |
| − | * ''' | + | * '''Server port'''. AMI port. |
| − | * ''' | + | * '''User name'''. AMI username created in manager.conf (or manager_custom.conf). |
| − | * ''' | + | * '''Password'''. User password. |
| − | * ''' | + | * '''Channel'''. The channel to be used for a call. It usually looks like <code>SIP/trunk_name</code>, where <code>trunk_name</code> is the name of the trunk that is usually written in the <code>/etc/asterisk/sip.conf</code> file. For old versions of SIP driver, you can specify <code>SIP/trunk_name</code>. In this case, the caller number is placed at the end: <code>SIP/trunk_name/79001234567</code>. For new versions of SIP driver, specify <code>SIP/{NUMBER}@trunk_name</code>. In this case, the caller number is placed instead of {NUMBER}: <code>SIP/79001234567@trunk_name</code>. |
| − | * ''' | + | * '''Context'''. The query processing context. Usually configured in a dial plan, in the <code>/etc/asterisk/extensions.conf</code> file. <spoiler text="How to configure recording of outgoing calls">In the standard plan, Asterisk does not record outgoing calls from couriers. The solution is to place the custom dial plan file [http://courierexe.ru/download/extensions_custom.conf extensions_custom.conf] in <code>/etc/asterisk</code>. In the file, in line 5, replace the trunk with the one used in your installation. Then in the mobile application connection settings, use the "from-courier" context. If you want courier calls to have the number of the caller courier in CDR, remove <code><COURIER></code> in the second line of the file. This is added so that you can filter all courier calls. To reduce the size of record files, we recommend that you use G.729 codec.</spoiler> |
| − | * ''' | + | * '''Courier prefix'''. A prefix to be added to the caller number. |
| − | * ''' | + | * '''Client prefix'''. A prefix to be added to the callee number. |
| − | * ''' | + | * '''Internal office phone number'''. The number that the call comes to when you select "Call office". We recommend that you specify the manager group number in this field in the Asterisk settings. |
| − | + | Save the settings, and then enter 2 phones and click '''Test''' to check that it is working properly. MeaSoft sends a query to Asterisk, and it must first call the first phone. Once the phone is picked up, a call is made to the second number, and they are connected. | |
| − | ''' | + | '''Note'''. For successful calls from the mobile application, the mobile phone number must be specified in the appropriate field in the courier card. |
| − | === | + | === Parameters === |
| − | + | Use the tab to configure the mobile application parameters. | |
| − | [[Файл: | + | [[Файл:CSA Phone Parameters.png|1100 px|none]] |
| − | ''' | + | '''Recipient name required'''. If the check box is selected, the courier application will not allow courier to save the signature without the '''Delivery info''' field filled in. |
| − | ''' | + | '''Recipient signature required'''. If the check box is selected, the recipient signature is required. |
| − | '' | + | "'Do not show urgent orders with an empty status to a courier'". If the check box is selected, only orders with a non-empty status are available to the courier. In the urgent order card, specify the courier and change delivery status, for example, to '''Out for delivery'''. |
| − | ''' | + | '''Couriers can take unassigned orders'''. If the check box is selected, the courier can take an order that has not been assigned to anyone. |
| − | ''' | + | '''Office landline phone'''. The outside office line number. The courier application will make calls to the office at this number. |
| − | ''' | + | '''FMC prefix'''. The [https://en.wikipedia.org/wiki/Fixed_mobile_convergence service] prefix for digital switches. |
| − | ''' | + | '''Link to regulation'''. Specify a link to the regulations for couriers to be displayed in the mobile application. |
| − | ''' | + | '''Result of the call to the recipient'''. Select whether to ask the courier for the result of the call to the client. Possible values: |
| − | * ''' | + | * '''Always ask'''. Shows a menu that prompts courier to select the result. The application is blocked until the result is selected. |
| − | * ''' | + | * '''Ask'''. Shows a menu that prompts courier to select the result. Courier can refuse to answer. |
| − | * ''' | + | * '''Do not ask'''. Shows no menu. |
| − | ''' | + | '''Request photo'''. If the check box is selected, the courier must attach a photo to the order. |
| − | == | + | == Integrations == |
| − | + | Use the section to set up the integration of MeaSoft with other systems. | |
| − | == | + | == Tickets == |
| − | + | Use the section to reach the technical support service. | |
| − | + | By default, the '''Answer Received''' tab appears with tickets that contain new messages. | |
| − | + | On the left, you can also see the '''In Progress''' and '''Closed''' tabs. They contain tickets with the appropriate statuses. | |
| − | + | All tabs display two tables. The left-side table contains filtered tickets. The right-side table contains messages of the selected ticket, author, and time created. To view a message, click the table row. To ask an additional question or reply to a message, enter the text in the empty field and click '''Reply'''. | |
| − | |||
| − | + | To create a ticket, on the left side, click '''New'''. In the "Create Ticket" window, enter a subject and a message, and click '''Save'''. The request will be added to the ticket list on the '''In Progress''' tab with the '''New''' status. | |
| − | + | To stop works on a ticket, click '''Close'''. | |
| − | + | To search for tickets by word, phrase, or ticket number, fill in the '''Search''' or '''Ticket number''' field and click '''Filter'''. | |
| − | + | To restore the default list of tickets, click '''Reset'''. | |
| − | == | + | == Information == |
| − | [[Файл: | + | [[Файл:Premium1.png|60 px]] [[Файл:Maximum1.png|60 px]] Use this section to create messages to your clients. They are displayed in the client account on the '''Information''' menu item. |
| − | [[Файл: | + | [[Файл:CSA Info.png|none|1200 px]] |
| − | + | There are the following types of information messages: | |
| − | * | + | * Standard. The client can read such information messages on the '''Information''' tab. |
| − | * | + | * Reading required. The information messages pop up when the client signs in to their account and block the client's operations until they click '''Yes, I see'''. |
| − | + | To create a message, click '''Create Message'''. Enter the text and title, select the message date and type, and then click '''Submit'''. | |
| − | + | The table of information messages is displayed in the '''Information''' menu item. To view, delete or update a message, or open the view log, click the appropriate button at the end of the table row. | |
| − | + | Note that the client does not see notifications that the message has been edited. If you want to add some important information, it is better to create a new message. | |
| − | == | + | == Call Center == |
| − | + | Use this section to create tasks (projects) to call clients. Projects include orders that meet the specified condition, and a call task queue is created automatically. The operator receives tasks via the external Staff interface. | |
| − | + | To open the call center settings, in the main menu of the courier service account, click '''Call Center'''. This opens a page where you can view, edit or disable created projects, or create a new project. Disabled projects are shown in blue. | |
| − | + | To add a project: | |
| − | # | + | # Click '''Create Project'''. The Create Project window appears: |
| − | # | + | # Fill in the project fields: |
| − | #* ''' | + | #* '''Name'''. The project name. |
| − | #* ''' | + | #* '''Operator script'''. The text instruction for the operator. |
| − | #* ''' | + | #* '''Filter'''. The SQL query part that sets conditions for adding orders to a project. |
| − | #* ''' | + | #* '''Status for the "Did not get through" button'''. The status assigned to the order if the operator clicks '''Did not get through'''. Select a status from the drop-down list. |
| − | #* ''' | + | #* '''Display statuses'''. Orders with the specified statuses will be added to a project. Select one or more statuses from the drop-down list. |
| − | #* ''' | + | #* '''Operator statuses'''. Statuses that the operator can set for the order based on the call result. Select one or more statuses from the drop-down list. |
| − | # | + | # On the right side of the page, configure the order fields display for the operator. You can: |
| − | #* | + | #* Specify visible fields and their sequence. |
| − | #* | + | #* Specify editable fields. |
| − | #* | + | #* Map client field names with default names. |
| − | # | + | # When you are done, click '''Create''' on the bottom left. |
| − | + | The created project is added to the project table in the '''Call Center''' menu item. | |
| − | == | + | == Changing Client Account Link == |
| − | [[Файл: | + | [[Файл:Premium1.png|60 px]] [[Файл:Maximum1.png|60 px]] By default, the client account link looks as follows https://home.courierexe.ru/XX, where XX is the company number in Measoft. You can change the address to any name formatted as https://your_subdomain.your_domain.ru. |
| − | + | To change the address: | |
| − | : 1. | + | : 1. Create a subdomain in your DNS. Assign it with the IP address of our server: 82.202.165.93 (or better CNAME at home.courierexe.ru). |
| − | : 2. | + | : 2. Buy an SSL certificate for the subdomain. The certificate must be valid for at least a year. <spoiler text="More about certificates"> |
| − | + | You can buy a certificate, for example, here: [http://www.thawte.su/ http://www.thawte.su/]. | |
| − | + | After the purchase, you will have a private key file with the KEY extension and several public key files with the CRTS extension, one of them is a file for your domain and the rest are certificates from certification authorities. | |
| − | + | Open the keys with Notepad. The private key might look as follows: | |
-----BEGIN RSA PRIVATE KEY----- | -----BEGIN RSA PRIVATE KEY----- | ||
| Строка 425: | Строка 422: | ||
-----END RSA PRIVATE KEY----- | -----END RSA PRIVATE KEY----- | ||
| − | + | The public key might look as follows: | |
-----BEGIN CERTIFICATE----- | -----BEGIN CERTIFICATE----- | ||
| Строка 439: | Строка 436: | ||
-----END CERTIFICATE----- | -----END CERTIFICATE----- | ||
| − | + | If you have access to a Unix-like system, you can verify the convergence of the keys using the following commands: | |
openssl x509 -in server.crt -noout -modulus | openssl x509 -in server.crt -noout -modulus | ||
openssl rsa -in server.key -noout -modulus | openssl rsa -in server.key -noout -modulus | ||
| − | + | Modulus output by the commands must converge. You can also verify the convergence at https://www.sslshopper.com/certificate-key-matcher.html. | |
</spoiler> | </spoiler> | ||
| − | : 3. | + | : 3. Send all the specified files to our technical support. Within a couple of days, we will register your subdomain on our server and install the certificates to it. |
| − | <!--# | + | <!--# In the web service control panel, click "Other settings" and select "Personal account address" in the left-side menu. |
| − | # | + | # In the opened form, specify the DNS name formatted as "your_subdomain.your_domain.ru", and upload the certificate files (1 or 2 files) and the private key. |
| − | # | + | # Save the form by clicking Save. In a minute, the keys will be activated on our server, and your clients will be able to access their personal account by entering your address.--> |
| + | |||
| + | == Storage == | ||
| + | [[Файл:Premium1.png|60 px]] [[Файл:Maximum1.png|60 px]] Use the storage to automatically move files from your office application database to the storage up to 1 TB. | ||
| + | |||
| + | By default, files from orders are transferred from the office application to the client account database. When it is filled in, the old data is automatically deleted to make way for new data. In the storage, you can store all files that go through your personal account, as well as any files from the office application, such as email files, contracts, document copies. If a file is uploaded to the storage, it becomes small and takes up almost no space. | ||
| − | + | To start using the storage, in the courier service account, click '''Options''' > '''Advanced''' and select the '''Use storage''' check box. | |
| − | |||
| − | + | Note that the storage can be accessed only if you are connected to the Internet. | |
| − | + | == Other Web Services == | |
| − | + | === Tracking Orders by Numbers === | |
| + | Courier service clients and agents can track shipments by order numbers. Tracking is available at https://home.courierexe.ru/XX/tracking, where XX is the courier service code. | ||
| − | + | To track an order, enter the order number in the search bar and click '''Find'''. A window with the order details appears: | |
| − | + | In this window, you can: | |
| − | + | * Subscribe to order status notifications in the Telegram channel or browser. To subscribe, click [[Файл:Telegram.png|25px]] or [[Файл:Browser push.png|25px]] respectively. | |
| − | + | * Make payment for the order. The option is available if the courier service uses online payments. | |
| − | + | '''Note'''. Before making a payment, make sure you entered the correct order number. | |
| − | + | To pay for an order, click '''Pay by card''', select a payment method, enter and confirm the information for the payment system. | |
| − | |||
| − | |||
| − | |||
| − | + | In the tracking window, in the '''Cash on delivery''' field, the order status will change to '''Order paid'''. The transaction receipt will be sent to the email specified when ordering. | |
| − | === | + | === Calculator === |
| − | + | The delivery fee calculator is available without authorization at https://home.courierexe.ru/XX/calculator, where XX is the code of your courier service. | |
| − | === | + | === Collecting Feedback === |
| − | + | The system has a special form for collecting feedback. | |
| − | + | The link is the address https://home.courierexe.ru/8/opinions with parameters. | |
| − | + | Parameters: | |
| − | * '''code''' | + | * '''code'''. Internal entity code in the system. Required parameter. |
| − | * '''rate''' | + | * '''rate'''. Rating. For orders, the parameter must be equal to the code from the Complaints catalog. For other types, it must be an integer from 1 to 5. |
| − | * '''type''' | + | * '''type'''. Entity type. The default value is 3. |
| − | * '''note''' | + | * '''note'''. Shows whether there is a comment. The default value is 1. |
| − | * '''star''' | + | * '''star'''. Shows whether rating is shown as stars. The default value is 1. |
| − | * '''hash''' | + | * '''hash'''. Link hash value. The hash is generated by the SignatureUrl function. Required parameter. |
| − | + | If the '''rate''' parameter is present, the feedback is filled in immediately and is not requested in the form. | |
| − | + | Sample requests (without hash): | |
| − | https://home.courierexe.ru/8/opinions?code=123456 | + | https://home.courierexe.ru/8/opinions?code=123456. The request for rating in the form of stars and a comment for the address (type = 3, note = 1, star = 1). |
| − | https://home.courierexe.ru/8/opinions?code=123456&rate=1 | + | https://home.courierexe.ru/8/opinions?code=123456&rate=1. The request for a comment for the address (already rated). |
| − | https://home.courierexe.ru/8/opinions?code=123456&star=0 | + | https://home.courierexe.ru/8/opinions?code=123456&star=0. The request for rating in the form of a list and a comment for the address. |
| − | https://home.courierexe.ru/8/opinions?code=123456&type=12 | + | https://home.courierexe.ru/8/opinions?code=123456&type=12. The request for an employee's rating in the form of stars with a comment. |
| − | https://home.courierexe.ru/8/opinions?code=123456&rate=1¬e=0 | + | https://home.courierexe.ru/8/opinions?code=123456&rate=1¬e=0. Already rated, no comment is requested, a message about the rating is immediately displayed. |
| − | + | To reduce the URL length, you can use a short form of writing the method and parameters: https://home.courierexe.ru/8/o?c=123456&r=1&n=1&t=3 | |
| − | https://home.courierexe.ru/8/o?c=123456&r=1&n=1&t=3 | ||
| − | + | Usage in script: | |
<source lang="javascript"> | <source lang="javascript"> | ||
savetofile('d:\hash.txt', | savetofile('d:\hash.txt', | ||
| Строка 513: | Строка 511: | ||
); | ); | ||
</source> | </source> | ||
| − | + | You can see the result in the Opinions table. | |
| − | == | + | == Calculating the Nearest Possible Delivery Date == |
| − | + | Client account can control whether delivery on the scheduled delivery date specified by the user is possible. Here's how it works: | |
| − | # | + | # The calculator asks for the minimum number of workdays it takes to deliver the order to the city of receipt, considering the urgency mode selected by the user. |
| − | # | + | # The system calculates the current time of the courier service server to correct the time zone, and compares the time with the value of the '''End of business day''' variable. If the current time of the courier service is greater than the time specified in the variable, 1 workday is added to the delivery time. |
| − | # | + | # The produced number of workdays is added to the current date. By default, the system considers the days listed in '''Variables''' > '''Defaults''' > '''Holidays and Weekends for Calculations''' as days off, and then it applies unscheduled workdays and days off (holidays) entered in the catalog to them. |
| − | + | This algorithm allows you to completely set up the control of the date entered by the user not to allow them to schedule delivery for tomorrow from New York to Las Vegas at economy rate, or to submit intra-city delivery for online stores for tomorrow after 8:00 p.m. | |
| − | + | At the moment, manual order placement and import from Microsoft Excel follow these rules. In the API, the system only calculates the minimum dates and if the scheduled delivery/pickup date is less than the nearest possible date, the date automatically changes to the earliest possible one. | |
Текущая версия на 11:30, 11 апреля 2022
Courier service account is intended for configuring client account.
Содержание
Personal Account Functions
There are the following types of the personal account functionality:
- Basic
- Standard
- Premium
- Maximum
Depending on the type, you can use the following functionality:
| Functionality | ||||
|---|---|---|---|---|
| Place orders manually | Yes | Yes | Yes | Yes |
| Track by order number, period created, and status | Yes | Yes | Yes | Yes |
| Print order packing slips and barcodes | Yes | Yes | Yes | Yes |
| Export order data to Microsoft Excel, export acceptance certificate | Yes | Yes | Yes | Yes |
| Set up tracking data | Yes | Yes | Yes | Yes |
| Warehouse management | Yes | Yes | Yes | Yes |
| Allow access to partners/agents for specifying delivery statuses and information |
Yes | Yes | Yes | |
| Import orders from Microsoft Excel template | Yes | Yes | Yes | |
| Different field settings for client groups | Yes | Yes | ||
| Settlements with online stores (unavailable for department accounts) | Yes | Yes | ||
| Customize design | Yes | Yes | ||
| Change client account link | Yes | Yes | ||
| Shipment status history | Yes | Yes | ||
| Change or cancel orders | Yes | Yes | ||
| Subscribe to order status | Yes | Yes | ||
| Data storage period, days | 45 | 180 | 365 | 365 |
| Storage for images and attachments | 0 | 500 MB | up to 1 TB | up to 1 TB |
| Customize delivery fee for recipients | Yes | |||
| Check recipient's rating | Yes | |||
| Increase query limit | 5 times |
Registering Courier Service Account
To register a courier service account:
- In MeaSoft, click Catalogs > Additional Modules, and then click Register Account. A window with the courier service data appears.
- Enter a username in the lower field and click Register. You will see the message "Successfully registered". Click OK. The "Manage Additional Modules" window appears:
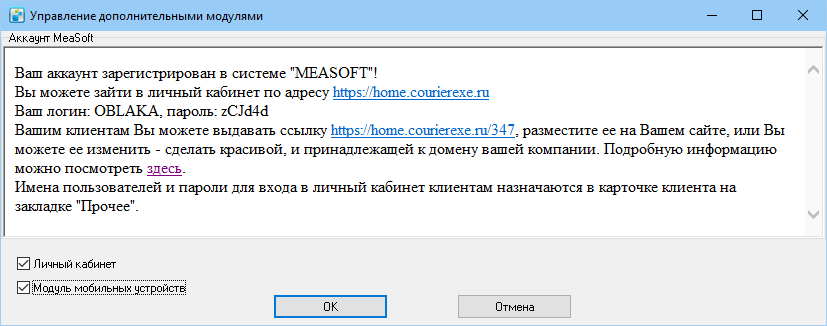

In this window, you can see:
- A link to sign in to courier service account, a username and a password for it.
- A link to sign in to client account. The link looks as follows: https://home.courierexe.ru/X, where X is the unique code of the courier service.
To create your client credentials, in MeaSoft, open the client card, click the Other tab, and create credentials in the Website access field. Send the credentials to the client.
Access on behalf of a department is also supported. To provide such access, open the client card, click the Departments tab, open the department card, and fill in the Username and Password fields. The department must have at least one employee. If the client signs in to the personal account on behalf of the department, the Finance section is unavailable, and the Department field is filled in automatically when placing a new order.
Setting Up Client Account
To set up a client account, sign in to your courier service account and click Settings.

There are the following columns to manage the fields on all tabs:
- Display order. Shows the fields layout. To change the order, drag the line up or down.
- Standard name. Shows the default field names.
- Custom name. The field name to be displayed to your clients.
- Allowed. Allows you to show or hide fields by switching ON/OFF.
- Required. The additional column on the Pickup Request Fields and New Order Fields tabs. Use it to assign required fields. In the client account, such fields will be marked with a red asterisk. If the client leaves them blank, the system will prompt them and the order will not be created.
To save the field settings, click Save at the bottom of the page.
To restore the default settings, click Reset.
Setting Up Fields for Client Groups
You can show different fields for client groups. The client group is determined by the status in the client card.
To configure the form fields for a client group:
- In the Select client type drop-down list, select the client group status, and then click Copy.
- Set up the visibility of the form fields.
- Click Save.
- To customize the form for another client group, repeat all the steps again.
Setting Up Fields and Tabs
The table below shows the settings of the client account:
| What to set up | Where to set up | Comment |
|---|---|---|
| Order table fields on the Tracking tab of the client account | Settings > Order Tracking Fields | |
| Order card fields in the client account | Settings > Fields in order card | |
| New order fields | Settings > New Order Fields | Set up the fields to be filled in when creating an order manually. Time slots can be specified manually or selected from the list. To enter them manually, enable the Delivery time from and Delivery time to fields. To select slots from the list, enable the Delivery time slot field. You can edit the slots list in MeaSoft . To add items to an order, enable the Items field. To add files, enable the Attached files field. You can view attached files in MeaSoft . To set the default value of the Delivery mode field, click Parameters and select the value from the Urgency mode drop-down list. To select a pickup point, enable the Delivery type field. |
| Pickup request fields | Settings > Pickup Request Fields | You can disable the Request Pickup tab in the client account. To do this, disable all the form fields. For pickup requests, the shipment card displays sender data on the Recipient tab and recipient data on the Sender tab. |
| Fields on the order tracking page | Settings > Tracking Page Fields | |
| Label fields | Settings > Label Fields | |
| Pickup point list | Office application | You can add pickup points in MeaSoft. To enable the client to select a pickup point when creating an order manually, click Settings > New Order Fields and enable the Delivery type field. |
| Warehouse | Office application | The Warehouse menu item appears in the client account if the client is a supplier in at least one receipt in MeaSoft. If you want the values of the fields Item name, Item weight, Item price, and Barcode to be filled in automatically when adding an item from a warehouse to an order in the client account, they must be specified in the item card in MeaSoft (Warehouse > Items). To display the current quantity of available items in the warehouse in the client account, configure the Variables > Warehouse > Shipment statuses to reserve order items variable in MeaSoft . You can manage the courier service warehouse using the Warehouse Management module. |
| Microsoft Excel registry template |
Settings > Excel Registry Import Fields | Set up a template for a Microsoft Excel file to import orders in the client account. On the tab, the fields are intended for the table rows to be displayed in the template. There are the following additional columns: • Value cell specifies the cell or the cell range for entering the value. Example . • Header cell specifies the cell or the cell range to store the field name. To place the same header in multiple parts of a Microsoft Excel file, specify comma-separated cells or ranges. Example • Width sets the column width in a Microsoft Excel file. The width is the number of characters to be included in the cell. The required rows are not highlighted in a Microsoft Excel file. If the client leaves them blank, a notification appears on file import and the orders are not added to the system. Note that changing the line display order does not change the position of the rows in a Microsoft Excel file. The # and Recipient company fields are always enabled and must be filled in. |
| Calculator fields |
Settings > Calculator Fields | To hide the "Calculator" menu item, click Parameters > General and clear the Show the "Calculator" menu item check box. The calculator makes calculations ising common intercity rates unless the client has individual ones set up. To calculate intra-city rates, specify the same city or town as both sender and recipient. |
| The Incoming Orders tab |
Office application | The Incoming Orders menu item appears in the client account when the courier service client is an agent. For this, a branch card must be created for them in MeaSoft. In this case, the username and password for the client account must be recorded in the counterparty card .
|
| List of cash transfer certificates |
Office application | The Finance tab displays a table of cash transfer certificates. By default, the Amount due column displays the amount that the courier must hand over to the client. To exclude courier services from the calculated amount, in MeaSoft, in the client card, on the Finance tab, select the Exclude the cost of courier services from the cash transfer certificate check box. |
| Order cancelation and change |
Settings > Parameters > Advanced |
Parameters
![]()
![]()
![]() In the Parameters section, you can access additional settings of the client account:
In the Parameters section, you can access additional settings of the client account:

To get more details about the option, hover the mouse pointer over the question mark at the end of the line. The parameters are grouped into tabs:
- General
- Finance
- Advanced
General Settings
HTML code. You can specify HTML code or Javascript for displaying parts of the content. Besides, form DOM can be processed and an additional message after clicking Send can be displayed. The processing is added to the submitCallback method in a Javascript.
Example:
//Code added to the HTML code parameter
<script type="text/javascript">
	window.submitCallback = function() {
		if (jQuery('#mass').val() >= 100) {
			return 'Weight specified' + jQuery('#mass').val() + ' kg!';
		} else {
			return '';
		}
	};
</script>
Once you click Send, the Weight field value is checked. If the value is greater than or equal to 100, a message indicating the weight is displayed besides the question about placing the order. Use this mechanism only to display messages, not to check for new order errors because the system allows you to place the order.
Company data. In this section, you can specify a name, a logo, a phone number, and a link to the courier service website on the following pages:
- Client account sign-in page
- Order tracking
- Calculator
To save the settings, click Save.
Finance
Use this tab to set up payment services:
- PimPay Settings. To get started with PimPay, enter the PimPay code, token, and a private key in the appropriate fields.
- Online Payment Settings. To accept online payments using Robokassa, in the Online Payment Settings section, fill in the fields with the merchant data from your Robokassa personal account.
- ibox Online Payment Settings. Allows you to configure the module to get requests from Ibox. Fill in the Ibox client ID field with the value from the Company profile section of your ibox personal account, create a username and a password for webhooks and report this data to ibox.
To save the settings, click Save.
Advanced Settings
![]()
![]() On the tab, the settings are grouped into the Common Settings and Appearance Settings sections.
On the tab, the settings are grouped into the Common Settings and Appearance Settings sections.
In the Appearance Settings section, you can change the interface of the client account.
To change the interface of the client account:
- Download a CSS file by clicking Example CSS file.
- Edit the CSS file.
- Click Select file and import the modified CSS file. When the file is imported, the message "CSS imported successfully" appears.
Note that the client account is built using Bootstrap.
Phones
Use it to view the list of courier devices connected to the MeaSoft App mobile application.

By default, the Courier Devices tab with a list of connected devices appears.
To filter the list, click Active, Inactive or All.
Courier Devices
To configure a courier device, in the Courier Devices list, click Edit next to the device name. The device card appears:

Courier. The name of the courier the device is registered for. To register the device for another courier, select their name from the drop-down list.
POS terminal PIN. Use it to set up order payments via the terminal.
Fiscal register number. Use it to set up fiscalization.
If the Active check box is selected, the mobile device is synchronized with the system. To disable synchronization, clear the check box. The check box is cleared automatically if data has not been received from the device within 7 days. You can select it again any time to resume the device in the system.
The GPS tracking and GSM tracking check boxes are selected automatically when the courier device is connected to these services.
When you finish editing the settings, click Save.
Telephony Settings
Use the tab to configure the mobile application connection to telephony. The telephony server Asterisk and connection via AMI are used.
You must be an Asterisk server administration expert for the setup. Contact your telephony support. Our technical support team does not have the appropriate qualifications, and most likely we will not be able to support you in this matter.
Specify connection settings:
- Server address. IP address or domain name. It is assumed that the Asterisk server has a static external IP address or the AMI port is forwarded. Otherwise, the feature does not function.
- Server port. AMI port.
- User name. AMI username created in manager.conf (or manager_custom.conf).
- Password. User password.
- Channel. The channel to be used for a call. It usually looks like
SIP/trunk_name, wheretrunk_nameis the name of the trunk that is usually written in the/etc/asterisk/sip.conffile. For old versions of SIP driver, you can specifySIP/trunk_name. In this case, the caller number is placed at the end:SIP/trunk_name/79001234567. For new versions of SIP driver, specifySIP/{NUMBER}@trunk_name. In this case, the caller number is placed instead of {NUMBER}:SIP/79001234567@trunk_name. - Context. The query processing context. Usually configured in a dial plan, in the
/etc/asterisk/extensions.conffile. How to configure recording of outgoing calls
- Courier prefix. A prefix to be added to the caller number.
- Client prefix. A prefix to be added to the callee number.
- Internal office phone number. The number that the call comes to when you select "Call office". We recommend that you specify the manager group number in this field in the Asterisk settings.
Save the settings, and then enter 2 phones and click Test to check that it is working properly. MeaSoft sends a query to Asterisk, and it must first call the first phone. Once the phone is picked up, a call is made to the second number, and they are connected.
Note. For successful calls from the mobile application, the mobile phone number must be specified in the appropriate field in the courier card.
Parameters
Use the tab to configure the mobile application parameters.

Recipient name required. If the check box is selected, the courier application will not allow courier to save the signature without the Delivery info field filled in.
Recipient signature required. If the check box is selected, the recipient signature is required.
"'Do not show urgent orders with an empty status to a courier'". If the check box is selected, only orders with a non-empty status are available to the courier. In the urgent order card, specify the courier and change delivery status, for example, to Out for delivery.
Couriers can take unassigned orders. If the check box is selected, the courier can take an order that has not been assigned to anyone.
Office landline phone. The outside office line number. The courier application will make calls to the office at this number.
FMC prefix. The service prefix for digital switches.
Link to regulation. Specify a link to the regulations for couriers to be displayed in the mobile application.
Result of the call to the recipient. Select whether to ask the courier for the result of the call to the client. Possible values:
- Always ask. Shows a menu that prompts courier to select the result. The application is blocked until the result is selected.
- Ask. Shows a menu that prompts courier to select the result. Courier can refuse to answer.
- Do not ask. Shows no menu.
Request photo. If the check box is selected, the courier must attach a photo to the order.
Integrations
Use the section to set up the integration of MeaSoft with other systems.
Tickets
Use the section to reach the technical support service.
By default, the Answer Received tab appears with tickets that contain new messages.
On the left, you can also see the In Progress and Closed tabs. They contain tickets with the appropriate statuses.
All tabs display two tables. The left-side table contains filtered tickets. The right-side table contains messages of the selected ticket, author, and time created. To view a message, click the table row. To ask an additional question or reply to a message, enter the text in the empty field and click Reply.
To create a ticket, on the left side, click New. In the "Create Ticket" window, enter a subject and a message, and click Save. The request will be added to the ticket list on the In Progress tab with the New status.
To stop works on a ticket, click Close.
To search for tickets by word, phrase, or ticket number, fill in the Search or Ticket number field and click Filter.
To restore the default list of tickets, click Reset.
Information
![]()
![]() Use this section to create messages to your clients. They are displayed in the client account on the Information menu item.
Use this section to create messages to your clients. They are displayed in the client account on the Information menu item.

There are the following types of information messages:
- Standard. The client can read such information messages on the Information tab.
- Reading required. The information messages pop up when the client signs in to their account and block the client's operations until they click Yes, I see.
To create a message, click Create Message. Enter the text and title, select the message date and type, and then click Submit.
The table of information messages is displayed in the Information menu item. To view, delete or update a message, or open the view log, click the appropriate button at the end of the table row.
Note that the client does not see notifications that the message has been edited. If you want to add some important information, it is better to create a new message.
Call Center
Use this section to create tasks (projects) to call clients. Projects include orders that meet the specified condition, and a call task queue is created automatically. The operator receives tasks via the external Staff interface.
To open the call center settings, in the main menu of the courier service account, click Call Center. This opens a page where you can view, edit or disable created projects, or create a new project. Disabled projects are shown in blue.
To add a project:
- Click Create Project. The Create Project window appears:
- Fill in the project fields:
- Name. The project name.
- Operator script. The text instruction for the operator.
- Filter. The SQL query part that sets conditions for adding orders to a project.
- Status for the "Did not get through" button. The status assigned to the order if the operator clicks Did not get through. Select a status from the drop-down list.
- Display statuses. Orders with the specified statuses will be added to a project. Select one or more statuses from the drop-down list.
- Operator statuses. Statuses that the operator can set for the order based on the call result. Select one or more statuses from the drop-down list.
- On the right side of the page, configure the order fields display for the operator. You can:
- Specify visible fields and their sequence.
- Specify editable fields.
- Map client field names with default names.
- When you are done, click Create on the bottom left.
The created project is added to the project table in the Call Center menu item.
Changing Client Account Link
![]()
![]() By default, the client account link looks as follows https://home.courierexe.ru/XX, where XX is the company number in Measoft. You can change the address to any name formatted as https://your_subdomain.your_domain.ru.
By default, the client account link looks as follows https://home.courierexe.ru/XX, where XX is the company number in Measoft. You can change the address to any name formatted as https://your_subdomain.your_domain.ru.
To change the address:
- 1. Create a subdomain in your DNS. Assign it with the IP address of our server: 82.202.165.93 (or better CNAME at home.courierexe.ru).
- 2. Buy an SSL certificate for the subdomain. The certificate must be valid for at least a year. More about certificates
- 3. Send all the specified files to our technical support. Within a couple of days, we will register your subdomain on our server and install the certificates to it.
Storage
![]()
![]() Use the storage to automatically move files from your office application database to the storage up to 1 TB.
Use the storage to automatically move files from your office application database to the storage up to 1 TB.
By default, files from orders are transferred from the office application to the client account database. When it is filled in, the old data is automatically deleted to make way for new data. In the storage, you can store all files that go through your personal account, as well as any files from the office application, such as email files, contracts, document copies. If a file is uploaded to the storage, it becomes small and takes up almost no space.
To start using the storage, in the courier service account, click Options > Advanced and select the Use storage check box.
Note that the storage can be accessed only if you are connected to the Internet.
Other Web Services
Tracking Orders by Numbers
Courier service clients and agents can track shipments by order numbers. Tracking is available at https://home.courierexe.ru/XX/tracking, where XX is the courier service code.
To track an order, enter the order number in the search bar and click Find. A window with the order details appears:
In this window, you can:
- Subscribe to order status notifications in the Telegram channel or browser. To subscribe, click
 or
or  respectively.
 - Make payment for the order. The option is available if the courier service uses online payments.
Note. Before making a payment, make sure you entered the correct order number.
To pay for an order, click Pay by card, select a payment method, enter and confirm the information for the payment system.
In the tracking window, in the Cash on delivery field, the order status will change to Order paid. The transaction receipt will be sent to the email specified when ordering.
Calculator
The delivery fee calculator is available without authorization at https://home.courierexe.ru/XX/calculator, where XX is the code of your courier service.
Collecting Feedback
The system has a special form for collecting feedback.
The link is the address https://home.courierexe.ru/8/opinions with parameters.
Parameters:
- code. Internal entity code in the system. Required parameter.
- rate. Rating. For orders, the parameter must be equal to the code from the Complaints catalog. For other types, it must be an integer from 1 to 5.
- type. Entity type. The default value is 3.
- note. Shows whether there is a comment. The default value is 1.
- star. Shows whether rating is shown as stars. The default value is 1.
- hash. Link hash value. The hash is generated by the SignatureUrl function. Required parameter.
If the rate parameter is present, the feedback is filled in immediately and is not requested in the form.
Sample requests (without hash):
https://home.courierexe.ru/8/opinions?code=123456. The request for rating in the form of stars and a comment for the address (type = 3, note = 1, star = 1).
https://home.courierexe.ru/8/opinions?code=123456&rate=1. The request for a comment for the address (already rated).
https://home.courierexe.ru/8/opinions?code=123456&star=0. The request for rating in the form of a list and a comment for the address.
https://home.courierexe.ru/8/opinions?code=123456&type=12. The request for an employee's rating in the form of stars with a comment.
https://home.courierexe.ru/8/opinions?code=123456&rate=1¬e=0. Already rated, no comment is requested, a message about the rating is immediately displayed.
To reduce the URL length, you can use a short form of writing the method and parameters: https://home.courierexe.ru/8/o?c=123456&r=1&n=1&t=3
Usage in script:
savetofile('d:\hash.txt',
 SignatureUrl('https://home.courierexe.ru/8/opinions?code=1&type=2&rate=1')
);
You can see the result in the Opinions table.
Calculating the Nearest Possible Delivery Date
Client account can control whether delivery on the scheduled delivery date specified by the user is possible. Here's how it works:
- The calculator asks for the minimum number of workdays it takes to deliver the order to the city of receipt, considering the urgency mode selected by the user.
- The system calculates the current time of the courier service server to correct the time zone, and compares the time with the value of the End of business day variable. If the current time of the courier service is greater than the time specified in the variable, 1 workday is added to the delivery time.
- The produced number of workdays is added to the current date. By default, the system considers the days listed in Variables > Defaults > Holidays and Weekends for Calculations as days off, and then it applies unscheduled workdays and days off (holidays) entered in the catalog to them.
This algorithm allows you to completely set up the control of the date entered by the user not to allow them to schedule delivery for tomorrow from New York to Las Vegas at economy rate, or to submit intra-city delivery for online stores for tomorrow after 8:00 p.m.
At the moment, manual order placement and import from Microsoft Excel follow these rules. In the API, the system only calculates the minimum dates and if the scheduled delivery/pickup date is less than the nearest possible date, the date automatically changes to the earliest possible one.