Clients and Partners — различия между версиями
Daria (обсуждение | вклад) (→Основное) |
Daria (обсуждение | вклад) (→Реквизиты) |
||
| (не показано 5 промежуточных версий этого же участника) | |||
| Строка 49: | Строка 49: | ||
'''Folder'''. The value of the field is for <rspoiler text="marking">The value is specified in the "Order N" field on the printed form. Marking is used to store client documents in folders, trays, shelves. By the marking, manager finds the necessary customer documents.</rspoiler> [[Print delivery slips and labels|delivery slips and labels]] simplified, extended or custom forms. | '''Folder'''. The value of the field is for <rspoiler text="marking">The value is specified in the "Order N" field on the printed form. Marking is used to store client documents in folders, trays, shelves. By the marking, manager finds the necessary customer documents.</rspoiler> [[Print delivery slips and labels|delivery slips and labels]] simplified, extended or custom forms. | ||
| − | '''Manager'''. | + | '''Manager'''. The name of the manager who supervises/brought in the client. To specify the manager, click on the button to the right of the '''Manager %''' field [[Файл:Кнопка вниз.png|20px]], select the context menu item '''Add''' in the opened window, specify the employee and select the checkbox '''Primary'''. |
| − | '''% | + | '''Manager %'''. This field is used if the manager receives a percentage of the client's payments. The percentage is calculated from the cost of services rendered and is taken into account when calculating the employee [[Payroll|wage]]. To assign multiple managers to a client, click on the button [[Файл:Кнопка вниз.png|20px]], select the context menu item '''Add''' in the opened window and specify the employee in the '''Manager''' field, <rspoiler text="set a percentage">The percentage can be zero, then the manager will not receive pay raises</rspoiler>. Only employees of the '''Agent''' [[Employees#Employee type|type]] are displayed in the drop-down list. Repeat the steps if you want to add another manager. To set the date until which the manager will receive the percentage, specify a value in the '''Until date''' field. |
| − | ''' | + | '''Message'''. This text is displayed to the manager as a prompt when placing a new order from a customer. |
| − | ''' | + | '''Source'''. Specify how the customer found out about the courier service company. For example, the courier service company has a call center that calls customers and finds out from which sources the customer learned about the courier service. The source can be entered manually or you can specify one of the values in the drop-down list. To create or change a list of values, open '''References''' > '''Statuses''' > '''14 Customer Information Sources'''. |
| − | ''' | + | '''Status'''. Internal client classification. The statuses are created in '''References''' > '''Statuses''' > '''Customer Types'''. You can assign a color to the status, then the client's lines in the lists will be highlighted by it. |
| − | ''' | + | '''Last order date'''. The date of the last order of the client is automatically set. |
| − | ''' | + | '''Working Hours From — Until''' and '''Lunch From — Until'''. Information from these fields is entered into the urgent order card automatically. Data <rspoiler text="affect">The manager sees the data on the client's schedule and takes it into account when assigning the urgent orders.</rspoiler> the work of couriers who fulfill urgent orders of a courier service company client. |
| − | ''' | + | '''Pass'''. Select from the drop-down list the method of obtaining a pass to the client's territory. It is used to work with urgent orders. If you choose to order the pass by e-mail or by phone, the operator needs to notify the client about the courier's arrival, so that the pass can be prepared. Pass statuses are added, edited and deleted in '''References''' > '''Statuses''' > '''Pass Statuses'''. |
| − | ''' | + | '''Works with a branch'''. Select the branch of the courier service company the customer is assigned to from the drop-down list. |
| − | ''' | + | '''Return location'''. Specify an alphanumeric code that will be displayed on the courier service label. According to this code the storekeepers complete the goods for return from one customer. On the '''Customers''' tab you can filter records by this code. |
| − | ''' | + | '''Notes''' and '''Notes-2'''. These fields are intended for additional service information that the system users can see. To view the ''Notes-2'' field the user must have certain [[Users|rights]]. |
| − | + | Information on the operation of the standard buttons is described in «[[Introduction_to_the_system##Hotkeys|Hotkeys]]». | |
| − | + | Clicking the '''Functions''' button opens a list of functions. Some of them are: | |
| − | * '''[[ | + | * '''[[Invoices]]'''. A list of issued invoices. |
| − | * '''[[ | + | * '''[[Invoices#Payments|Payments]]'''. A list of customer payments. |
| − | * ''' | + | * '''Shipment Statuses'''. Additional statuses, are set up at the request of the client in case you use your own set of statuses. To create a status, select '''Create''' in the context menu and fill out the '''Status name''' and '''Status code''' fields. As a result, a drop-down list of additional statuses will appear in the shipment card next to the '''Delivery info''' field. When filling out delivery information, user should specify the additional status of the item, otherwise it's impossible to save the data in the shipment card. Statuses are returned to the client when requesting them via API [[API#Fields_Description|in the clientstatecode tag]], the client will receive the code of the shipment status in a separate box. To make a script to automatically put the internal status of shipment, contact our technical support. |
| − | == | + | == Company Info == |
| − | + | The tab is intended for storing data of the organization. The information is used to work with the courier service company clients on the basis of the contract. Information from the tab goes to invoices, funds transfer certificates and other documents. | |
[[Файл:22_client.png|600px|none]] | [[Файл:22_client.png|600px|none]] | ||
| − | '''№ | + | '''Contract №'''. Specify the number of a valid contract with the courier service company. If the contract number is not specified, the '''Cash payment''' checkbox will be checked in the order card. <spoiler text="Ways to work with the client">*When working with individuals and legal entities, when the services are paid in cash before delivery - the tab '''Details''' is not filled, the field "Contract No." remains empty. |
| − | * | + | * When working with the client on the contract and non-cash payment basis - fill in the '''Details''' tab. |
| − | * | + | * When working with clients, that pay for services in cash for a certain period of time, fill in the "Contract No." field, other details are optional.</spoiler> |
| − | ''' | + | '''Contract Date'''. Indicate the date of the current contract. |
| − | ''' | + | '''Valid until'''. Укажите дату <rspoiler text="окончания действия договора">При достижении даты договор считается закрытым, а клиент перемещается в «неработающие» и не может оформить заказы. Чтобы вернуть клиента в «работающие», измените дату окончания договора.</rspoiler>. |
| − | ''' | + | '''Full Company Name'''. The official name of the company, which will be inserted in the documents. |
| − | ''' | + | '''Person responsible'''. The name of the employee with whom the contract is signed. |
| − | ''' | + | '''Position of the responsible person'''. The position of the the said employee. |
| − | ''' | + | '''Acting on the basis of'''. Contains the wording of the grounds from the certificate of the legal entity. |
'''ИНН, КПП, ОГРН, БИК, Банк, Р.счет, Корр.счет, ОКПО'''. Регистрационные данные юридического лица клиента. | '''ИНН, КПП, ОГРН, БИК, Банк, Р.счет, Корр.счет, ОКПО'''. Регистрационные данные юридического лица клиента. | ||
| Строка 224: | Строка 224: | ||
'''№ секции (отдела)'''. Возможность группировки номера секции для печати чека. Например, для типа оказываемых услуг или по номенклатуре. | '''№ секции (отдела)'''. Возможность группировки номера секции для печати чека. Например, для типа оказываемых услуг или по номенклатуре. | ||
| − | == | + | == Notifications == |
| − | + | The tab is designed to enable automatic mailing for urgent orders in the system. | |
[[Файл:36_client.png|600px|none]] | [[Файл:36_client.png|600px|none]] | ||
| − | ''' | + | '''Send reports from «Urgent»'''. If the checkbox is selected, reports are sent from the '''Urgent''' tab to the client at the address that is specified in the client card in the '''E-Mail''' field. The printing form from '''References''' > '''Print forms''' > '''Email templates''' > '''Notification template from urgent''' is used. For this function to work, the mail server must be configured; the settings are located on <mparam code="Почтовый Сервер"/>. |
| − | + | Conditions for sending a report: | |
| − | * | + | * If the order is sent to the recipient, the meеssage is sent when the status '''Delivered''' is set; |
| − | * | + | * if the order is delivered to the recipient and a notice is brought back, the message is sent when the status is set to '''Delivered (there)'''; |
| − | * | + | * If you pick up at the client's office with subsequent delivery, the message is sent when the status '''Picked up''' is set; |
| − | * | + | * If the "To office" checkbox is selected, the mailing will not work with any status. |
| − | + | If you want to send reports when no shipping information is specified, turn on the <mparam code="SendBaseWOMessage"/>. | |
| − | ''' | + | '''Send an email notification when a courier is waiting'''. If the checkbox is selected, from the '''Urgent''' tab, the customer is notified by email when the courier starts waiting. In the urgent order card, after the information about the recipient, there is a special field for entering the time, next to it there is a button [[Файл:Таймер ожидания.png|20px]]. To send a notification to the customer, click the button and save the card. Please note that the waiting time is indicated by the operator after the courier receives the order. Waiting time for the courier [[Client rates#Other|is rated]] separately. |
| − | == | + | == Departments == |
| − | + | Allows to specify and track the department or employee on whose behalf the order was created, and specify <rspoiler text="department or employee">In the order card, specify the client's department, so that the order is assigned to it</rspoiler> while invoicing. | |
| − | + | You can give departments independent access to [[Client_Account|a client account]] to place orders online. | |
[[Файл:Инфо отделы.png|600px|none]] | [[Файл:Инфо отделы.png|600px|none]] | ||
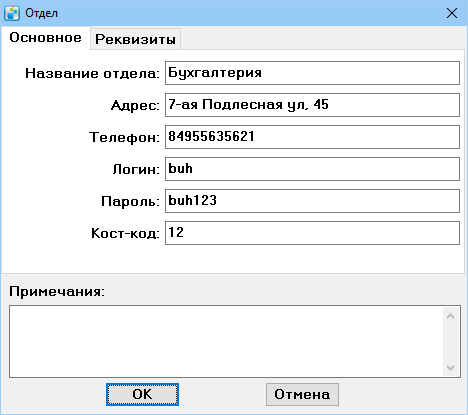
| − | + | To create a department, select the '''Create''' context menu item on the left side of the window. This will open the department card: | |
[[Файл:Карточка отдела.png|none]] | [[Файл:Карточка отдела.png|none]] | ||
| − | ''' | + | '''Login''' and '''Password''' — department employees' login details to their personal account. |
| − | ''' | + | '''Cost code''' — the customer's department ID, used in reports and helps to track the department's shipping costs. The code is reported by the customer. |
| − | + | If the department details differ from those specified in the client card, fill in the fields on the "Details" tab. | |
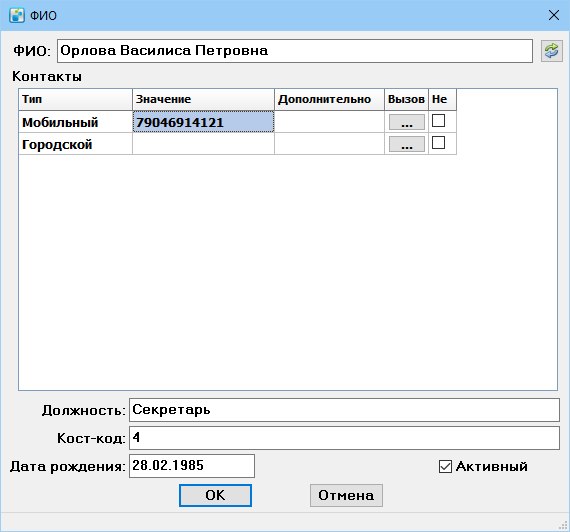
| − | + | The created department will appear in the left part of the tab. To add an employee to the department, select the department and in the right part of the window select the '''Create''' context menu item. The employee's card will open: | |
[[Файл:Карточка сотрудника отдела.png|none]] | [[Файл:Карточка сотрудника отдела.png|none]] | ||
| − | ''' | + | '''Full Name''' — employee's full name. |
| − | ''' | + | '''Type''' — drop-down list for selecting the type of contact data. Possible values: '''Mobile''', '''City''', '''Email''', '''Skype'''. |
| − | ''' | + | '''Additional''' — a field for additional notes to the contact information. This can be a area code, contact time, etc. |
| − | ''' | + | '''Call''' — allows you to dial an employee's number if you use Skype or IP telephony programs. |
| − | ''' | + | '''Not''' — is the abbreviation for "Not in use". If it is checked, the contact is obsolete. |
| − | ''' | + | '''Cost code''' — employee identifier, is used for reporting and helps to track shipping costs for a specific employee. If the employee's code is not filled out, the department's code will be listed. |
| − | ''' | + | '''Date of birth''' — is designed to notify the responsible employee of the customer's employee's birthday. |
| − | ''' | + | '''Active''' — if the checkbox is selected, the name of the employee is inserted automatically in the "Contact person" field of the rush order card.. |
== Custom == | == Custom == | ||
Текущая версия на 13:44, 15 марта 2023
Содержание
Purpose
The Clients tab is designed for storing the list of clients, recording new and changing the data of existing partners and counterparties. You can also form documents, issue invoices, post payments from the client, create funds and shipment transfer certificates, reconciliation statements, form funds transfer certificates to the client.
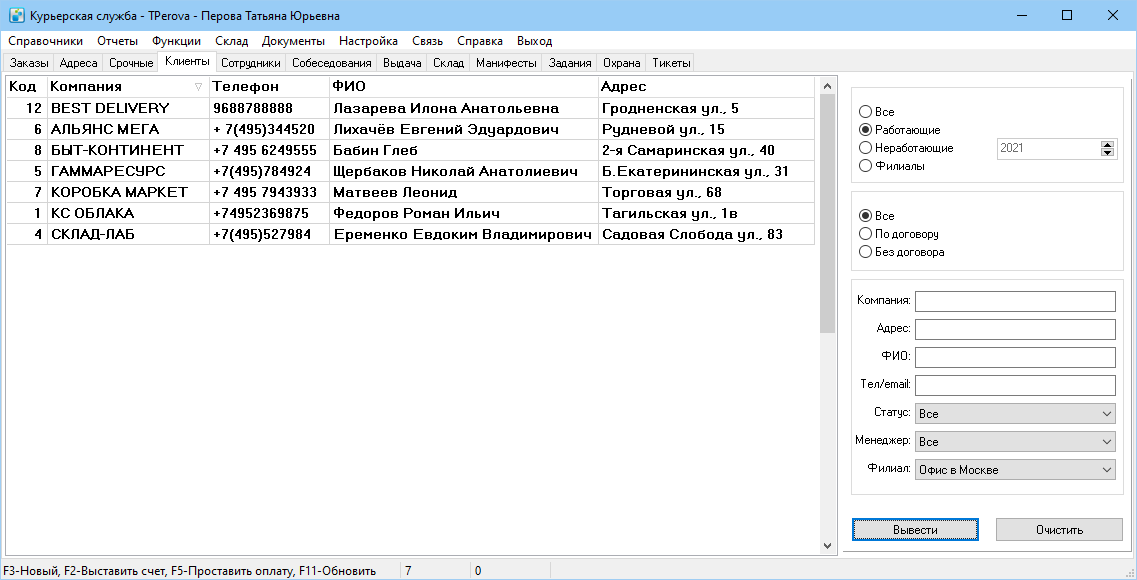
Client list
To view the client list, go to the Clients tab.The clients table stores:
- customers to whom the courier service company provides its services;
- their own legal entities, which are units of the courier service company. More information about creating and setting up in «Companies»;
- branch offices of the courier service. Creating and setting up branches is described in «Branches»;
- other contractorsof the courier service company.
In the right part of the window there is a filter that can be used to sort the list of clients.
Client card
The availability of a client card is one of the main criteria for the system, because the data from it is used for almost all business processes. If the courier service company has a list of customers in tabular format (Excel, CSV), we can help you load the data into the system. If customer data is stored differently, then the courier service employees will have to create customers in the system manually.
Each tab of the card is for configuring business processes between the courier service company and the customer. The user always has access to the tabs of the client card, which allows you to change the settings.
Tabs include:
Main
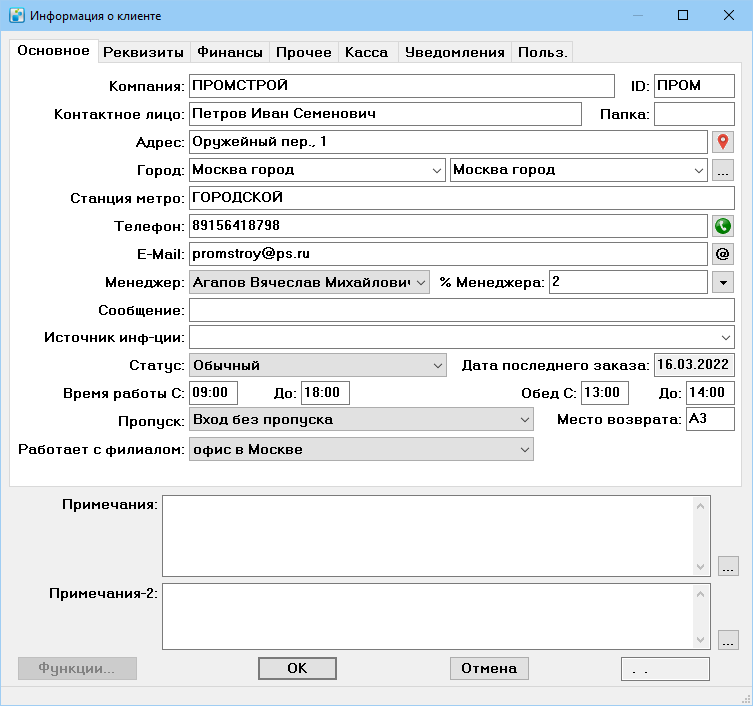
The tab is designed to store basic information about the client.
Company. A short, understandable name of the client's company. It is not recommended to use the legal entity's form of ownership - "IE" or "LLC", as it complicates the process of autofilling the Company field in the order form. The full name of the company is indicated on the tab Company info.
Contact. A representative of the organization responsible for interaction with the courier service.
Address. Actual address of the organization. Fill in the field according to address format.
Subway station. It is detected automatically by the entered address. For more information about creating and working with subway stations, see «Subway station».
Phone. The phone number of the organization or contact person. You can include more than one phone number, separated by commas.
E-mail. The email address of the organization or contact person. You can include more than one address, separated by commas.
ID. The unique identifier of the client. Used to distinguish clients with similar names when working with urgent orders. You can write, for example, the number of the contract concluded with this client, and when a new urgent order is placed by the client, this number is filled in instead of the name of the company. The field can contain an alphanumeric code.
Folder. The value of the field is for markingManager. The name of the manager who supervises/brought in the client. To specify the manager, click on the button to the right of the Manager % field ![]() , select the context menu item Add in the opened window, specify the employee and select the checkbox Primary.
, select the context menu item Add in the opened window, specify the employee and select the checkbox Primary.
Message. This text is displayed to the manager as a prompt when placing a new order from a customer.
Source. Specify how the customer found out about the courier service company. For example, the courier service company has a call center that calls customers and finds out from which sources the customer learned about the courier service. The source can be entered manually or you can specify one of the values in the drop-down list. To create or change a list of values, open References > Statuses > 14 Customer Information Sources.
Status. Internal client classification. The statuses are created in References > Statuses > Customer Types. You can assign a color to the status, then the client's lines in the lists will be highlighted by it.
Last order date. The date of the last order of the client is automatically set.
Working Hours From — Until and Lunch From — Until. Information from these fields is entered into the urgent order card automatically. Data affectPass. Select from the drop-down list the method of obtaining a pass to the client's territory. It is used to work with urgent orders. If you choose to order the pass by e-mail or by phone, the operator needs to notify the client about the courier's arrival, so that the pass can be prepared. Pass statuses are added, edited and deleted in References > Statuses > Pass Statuses.
Works with a branch. Select the branch of the courier service company the customer is assigned to from the drop-down list.
Return location. Specify an alphanumeric code that will be displayed on the courier service label. According to this code the storekeepers complete the goods for return from one customer. On the Customers tab you can filter records by this code.
Notes and Notes-2. These fields are intended for additional service information that the system users can see. To view the Notes-2 field the user must have certain rights.
Information on the operation of the standard buttons is described in «Hotkeys».
Clicking the Functions button opens a list of functions. Some of them are:
- Invoices. A list of issued invoices.
- Payments. A list of customer payments.
- Shipment Statuses. Additional statuses, are set up at the request of the client in case you use your own set of statuses. To create a status, select Create in the context menu and fill out the Status name and Status code fields. As a result, a drop-down list of additional statuses will appear in the shipment card next to the Delivery info field. When filling out delivery information, user should specify the additional status of the item, otherwise it's impossible to save the data in the shipment card. Statuses are returned to the client when requesting them via API in the clientstatecode tag, the client will receive the code of the shipment status in a separate box. To make a script to automatically put the internal status of shipment, contact our technical support.
Company Info
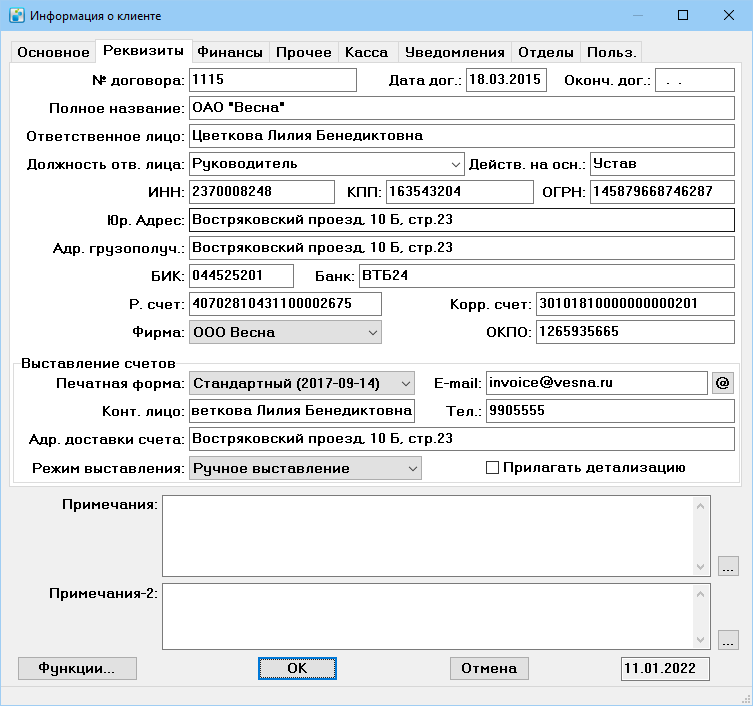
The tab is intended for storing data of the organization. The information is used to work with the courier service company clients on the basis of the contract. Information from the tab goes to invoices, funds transfer certificates and other documents.
Contract №. Specify the number of a valid contract with the courier service company. If the contract number is not specified, the Cash payment checkbox will be checked in the order card. Ways to work with the client
Contract Date. Indicate the date of the current contract.
Valid until. Укажите дату окончания действия договораFull Company Name. The official name of the company, which will be inserted in the documents.
Person responsible. The name of the employee with whom the contract is signed.
Position of the responsible person. The position of the the said employee.
Acting on the basis of. Contains the wording of the grounds from the certificate of the legal entity.
ИНН, КПП, ОГРН, БИК, Банк, Р.счет, Корр.счет, ОКПО. Регистрационные данные юридического лица клиента.
Юр. Адрес. Юридический адрес клиента, указанный в свидетельстве.
Адрес грузополучателя. Адрес клиента для возврата товаров. Этот адрес может не совпадать с юридическим адресом.
Фирма. В выпадающем списке выберите юридическое лицо, с которым работает клиент.
Блок «Выставление счетов»
Печатная форма. В выпадающем списке выберите тип печатной формы счета для клиента. Формы добавляются в Справочники > Печатные формы.
E-mail. Адрес электронной почты для отправки счетов, актов, детализации к акту и счетов-фактур. Чтобы отправлять счета на указанный адрес, включите переменную При отправке акта по email использовать адрес получ. счетаКонтактное лицо. ФИО сотрудника клиента для получения финансовых документов.
Телефон. Телефон сотрудника или отдела клиента для получения финансовых документов.
Адрес доставки счета. Адрес клиента для отправки оригиналов документов.
Режим выставления. В выпадающем списке выберите периодичность выставления счета. Возможные значения: Ручное выставление, 1 раз в месяц, 2 раза в месяц. Таким образом, для каждого клиента можно указать собственный режим выставления счетовПрилагать детализацию. Если флажок установлен, к счету прикладывается детализация. В форме счета в документе Microsoft Excel будет отдельная вкладка с детализацией. Чтобы просмотреть или изменить настройки детализации, откройте Справочники > Переменные > Финансы > Счета > Детализация.
Финансы
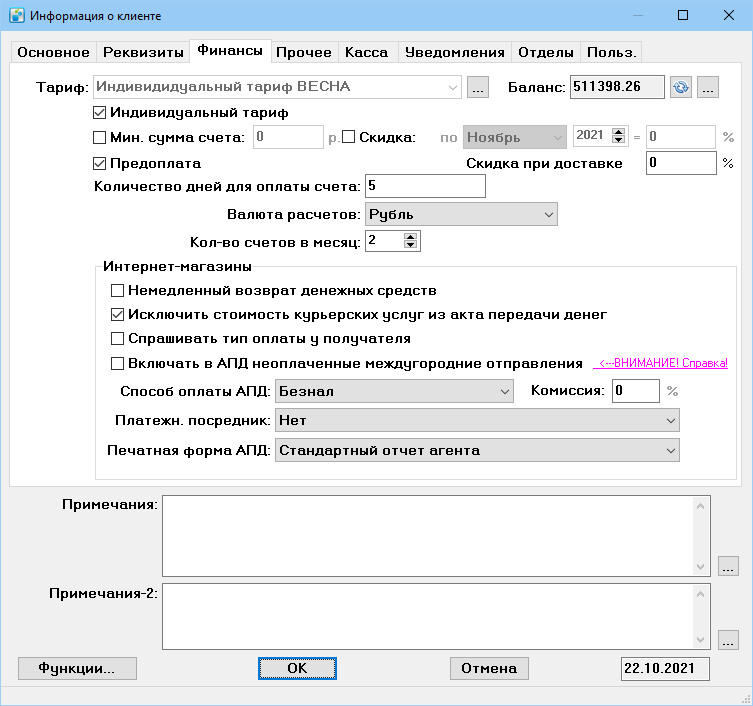
Вкладка предназначена для настройки финансовых взаимоотношений клиента и курьерской службы.Тариф. Выберите из списка тариф для работы с клиентом. Для просмотра тарифа нажмите на кнопку ![]() . Откроется новое окно с возможностью редактирования. Подробнее см. раздел «Тарифы».
. Откроется новое окно с возможностью редактирования. Подробнее см. раздел «Тарифы».
Индивидуальный тариф. Если флажок установлен, в тариф клиента копируется выбранный общий тариф и привязывается к карточке клиента. Чтобы отредактировать выбранный тариф, нажмите на кнопку ![]() . Изменения тарифа клиента сохраняются только для него, не влияя на общий тариф.
. Изменения тарифа клиента сохраняются только для него, не влияя на общий тариф.
Баланс. Отображает текущий баланс клиента. Чтобы сформировать текущий баланс, нажмите на кнопку ![]() . Чтобы посмотреть детализацию, нажмите на кнопку
. Чтобы посмотреть детализацию, нажмите на кнопку ![]() . В таблице детализации по двойному щелчку на строке доступен переход к соответствующему разделу программы. Отрицательное значение означает, что клиент должен курьерской службе.Алгоритм расчета баланса
. В таблице детализации по двойному щелчку на строке доступен переход к соответствующему разделу программы. Отрицательное значение означает, что клиент должен курьерской службе.Алгоритм расчета баланса
Минимальная сумма счета. Если флажок установлен, включается возможность ввода суммы в одноименное поле. Поле актуально для работы с небольшими клиентами, которые гарантируют большой объем заказов взамен на выгодные условия. Если клиент проведет заказов по системе на сумму меньшую, чем указано в поле, то счет будет выставлен эту сумму.
Скидка по. Если флажок установлен, включается выбор месяца, года и ввод процента скидки от общей суммы оказываемых услуг. Скидка действует на общую сумму счета, выставляемого курьерской службой клиенту.
Предоплата. Если флажок установлен, клиент оплачивает услуги доставки заранее. Клиентом на баланс вносится установленная сумма предоплаты, из этой суммы списываются средства за оказанные услуги. Настройка оповещений о снижении баланса.
Скидка при доставке. Процент скидки, которая применяется к полной стоимости доставки после расчета всех дополнительных услуг. Размер скидки отображается в карточке корреспонденции на вкладке Услуги. Расчет скидки — это системная дополнительная услуга, ее можно отключить в справочнике Дополнительные услуги.
Количество дней для оплаты счета. Период в календарных днях, в течение которого система ожидает подтверждения оплаты счета клиентом. По истечении срока клиент считается должником, при создании заказа отображается сообщение о наличии неоплаченных счетов. Если включена блокировкаЧтобы настроить автоматическую рассылку e-mail или смс-уведомлений о задолженности, обратитесь в службу поддержки MeaSoft для настройки модулей автоматизации и смс-рассылки. Текст сообщения рассылки задается в Справочники > Печатные формы.
Валюта расчета. Валюта, с которой работает клиент курьерской службы.
Количество счетов в месяц. Количество счетов, которое необходимо выслать курьерской службе клиенту в счет оказания услуг.
- Блок «Интернет-магазины»
Немедленный возврат денежных средств. Предназначен для максимально быстрого возврата денежных средств клиентам. Если флажок установлен, то в акты передачи денег попадают следующие отправления:
- помеченные как доставленные в карточке корреспонденции,
- со статусом в выдаче Доставлено,
- со статусом со слов курьера Доставлено.
При этом автоматически учитывается коррекция суммы актов за предыдущий период.
Если флажок не установлен, то в акты попадут только те отправления, в карточках которых проставлена дата вручения. Подробнее о работе с актами см. в разделе «Акты передачи денег». Дополнительная информация
Исключить стоимость курьерских услуг из акта передачи денег. Если флажок установлен, стоимость курьерских услуг можно удержать из суммы передаваемых денег при формировании АПД. Если флажок не установлен, то в АПД клиенту попадает вся суммаСпрашивать тип оплаты у получателя. Если флажок установлен, курьер может менять тип оплаты в мобильном приложении на Android и на IOS, исходя из ситуации. Если флажок не установлен, тип оплаты в мобильном приложении изменить нельзя. Если у получателя указан безналичный способ оплаты, но на счету нет средств, курьеру придется связываться с менеджером, чтобы изменить тип оплаты отправления. Флажок неактивен, если на вкладке Касса в поле Режим печати кассовых чеков запрещена безналичная оплата.
Включать в АПД неоплаченные междугородние отправления. Механизм работы флажка схож с работой флажка Немедленный возврат денежных средств, только действует для междугородних отправлений. Если флажок установлен, в АПД попадают отправления, в которых проставлена дата и время вручения и ответственный филиал отличается от текущего. Текущем филиалом считается филиал, указанный в карточке клиента, а также все филиалы в Справочники > Межгород > Филиалы, в карточке которых установлен флажок Наш филиал. Если флажок не установлен, то в акты попадают только доставленные отправления с установленным флажком Оплачено.
Способ оплаты АПД. Выберите из выпадающего списка вариант по умолчанию для оплаты актов передачи денег. Возможные значения: Безнал, Наличными курьером, Наличными в офисе, Перевод на карту. Способ оплаты акта можно изменить в самом акте после его создания. Вы можете создать новый тип оплаты, подробнее см. раздел «Типы оплат АПД».
Комиссия. Размер комиссии, удерживаемой курьерской службой с полученных при доставке заказов денежных средств, подлежащих передаче интернет-магазину.. Размер комиссии учитывается в сформированных АПД, а также в стандартных отчетах для этих актов, при формировании выгрузок в банк-клиент и учете наличных по бухгалтерии.
Платежный посредник. Выберите из выпадающего списка посредника при проведении платежей. Возможные значения: Pimpay, Нет. Подробнее см. в разделе «PimPay».
Печатная форма АПД. Выберите форму, которая будет использоваться для печати отчета для этого клиента.
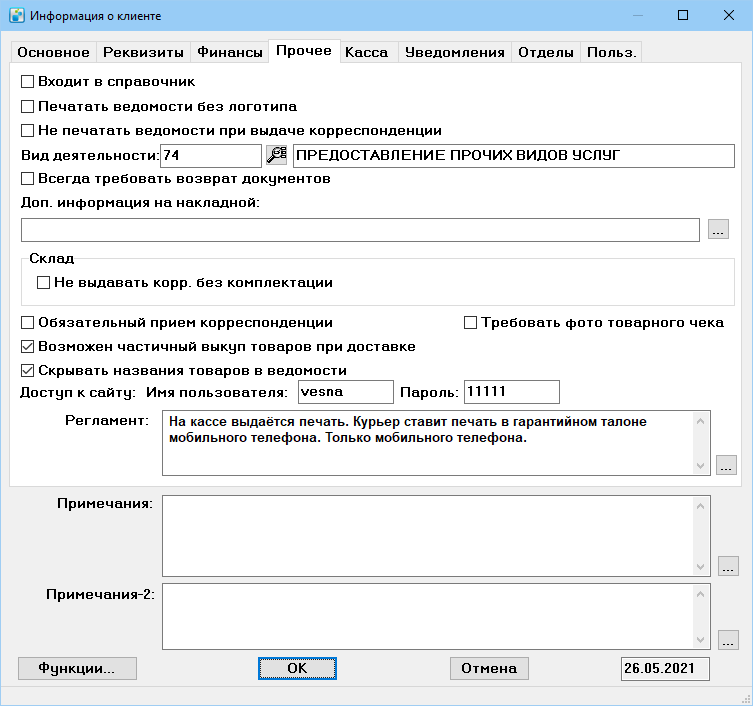
Прочее
Вкладка предназначена для дополнительных настроек работы с клиентом.
Входит в справочник. Для работы со срочными заказами. Если флажок установлен, в справочнике содержится информация о географическом расположении клиента. Информация представлена в виде типографского буклета, который отдается курьеру. Справочник клиентов формируется с помощью дополнительного скрипта в меню Отчеты > Дополнительные возможности. Чтобы установить скрипт, обратитесь в службу поддержки MeaSoft.
Печатать ведомости без логотипа. Если флажок установлен, ведомости не содержат логотип курьерской службы. Используется, когда курьерская служба выступает подрядчиком для другой организации.
Не печатать ведомости при выдаче корреспонденции. Если флажок установлен, бумажные ведомости исключены из бизнес-процессов курьерской службы. Получатель расписывается в электронной ведомости на планшете или телефоне курьера.
Вид деятельности. Введите код деятельности по ОКВЭД. В соседнем поле код расшифровывается. Чтобы программа нашла и добавила расшифровку кода по базе ОКВЭД, нажмите на кнопку ![]() .
.
Всегда требовать возврат документов. Для клиентов, которые сами упаковывают заказы и вкладывают внутреннюю ведомость в отправления. Без возврата внутренней ведомости клиент будет считать, что отправление не доставлено, даже если за него были перечислены деньги. Если флажок установлен, при приеме работы от курьера менеджер увидит сообщение о необходимости получения от курьера внутренней ведомости клиента. Затем ведомость передается клиенту с помощью акта возврата корреспонденции.
Доп. информация на накладной. Поле предназначено для вывода на печать дополнительной информации. Можно указать любое полезное для получателя сообщение. Поле располагается ниже табличной печатной формы документа «Накладная».
Не выдавать корреспонденцию без комплектации. Относится к модулю складского учета. Если флажок установлен, заказ не может быть выдан курьеру, если во вложениях корреспонденции нет ни одного товара со склада. Это помогает избежать ситуаций, когда пользователи создают вложения, не привязанные к складу, или не создают их вообще. Ограничение не действует на заборную корреспонденцию (номер 0 или снята галка Туда).
Обязательный прием корреспонденции. Если флажок установлен, фактически прибывшую корреспонденцию от клиента нужно сверять с данными из системы. Подробнее процесс приема описан в статье «Прием корреспонденции на склад». Без полной сверки/приемки будет невозможно выдать курьеру заказы, в которые входит непринятая корреспонденция.
Возможен частичный выкуп товаров при доставке. Если флажок установлен, получатель может частично принять заказ. По умолчанию флажок установлен. Если флажок снят, получатель сможет принять заказ только целиком или отказаться от всего заказа.
Скрывать названия товаров в ведомости. Если флажок установлен, в печатной форме расширенной ведомости названия товаров заменяются на «Товар 1», «Товар 2» и т. д. При этом в системе и в мобильном приложении курьера названия товаров видны.
Требовать фото товарного чека. Если флажок установлен, курьер не может закрыть заказ клиента, пока не прикрепит к нему фото товарного чека.
Имя пользователя и Пароль — данные для входа в личный кабинет клиента.
Регламент. Поле предназначено для хранения правил работы с клиентом и индивидуальных условий доставки заказов. Текст регламента отображается в мобильном приложении курьера в карточке заказа.
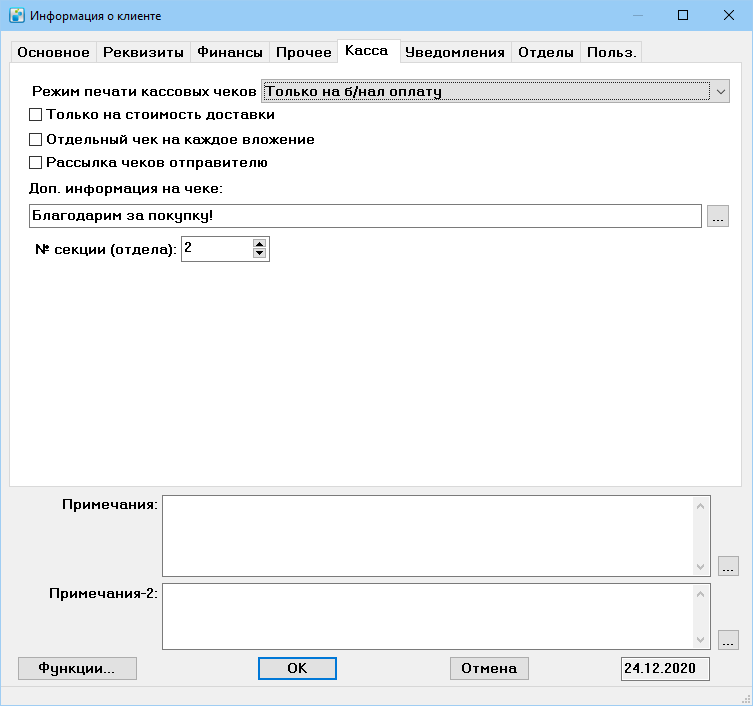
Касса
Вкладка предназначена для настройки печати чеков. Доступна в карточке клиента, если есть хотя бы один зарегистрированный в системе фискальный регистратор. Подробнее об установке и настройке чековой службы см. раздел «Настройка модуля печати кассовых чеков».
Режим печати кассовых чеков. Выберите, в каком случае нужно печатать кассовые чеки. Возможные значения выпадающего списка: Никогда, запрещать б/нал оплату, Только на б/нал оплату, Всегда.
Только на стоимость доставки. Если флажок установлен, кассовые чеки печатаются только на стоимость доставки корреспонденции для этого клиента.
Отдельный чек на каждое вложение. Если флажок установлен, на каждое вложение карточки корреспонденции печатается отдельный чек. Актуально при частичном возврате. Если флажок не установлен, формируется один чек на весь заказ.
Рассылка чеков отправителю. Если флажок установлен, чек отправляется на номер телефона отправителя, а не получателя.
Доп. информация на чеке. Позволяет расположить дополнительную информацию на чеке. Например, контактную информацию клиента. Также в поле можно ввести скрипт, который будет создавать условия для печатной формы чека. Для создания необходимого скрипта обратитесь к нашим специалистам.
№ секции (отдела). Возможность группировки номера секции для печати чека. Например, для типа оказываемых услуг или по номенклатуре.
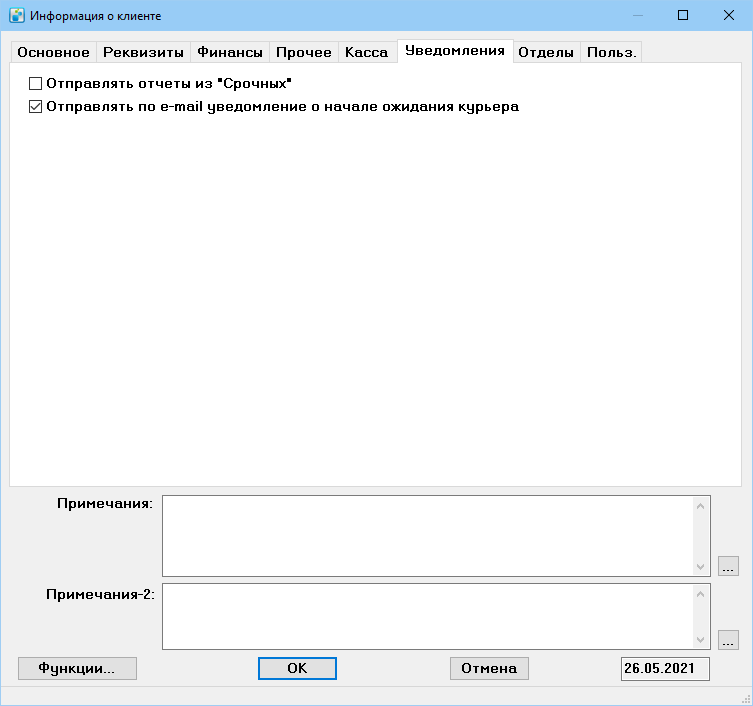
Notifications
The tab is designed to enable automatic mailing for urgent orders in the system.
Send reports from «Urgent». If the checkbox is selected, reports are sent from the Urgent tab to the client at the address that is specified in the client card in the E-Mail field. The printing form from References > Print forms > Email templates > Notification template from urgent is used. For this function to work, the mail server must be configured; the settings are located on Почтовый серверConditions for sending a report:
- If the order is sent to the recipient, the meеssage is sent when the status Delivered is set;
- if the order is delivered to the recipient and a notice is brought back, the message is sent when the status is set to Delivered (there);
- If you pick up at the client's office with subsequent delivery, the message is sent when the status Picked up is set;
- If the "To office" checkbox is selected, the mailing will not work with any status.
Send an email notification when a courier is waiting. If the checkbox is selected, from the Urgent tab, the customer is notified by email when the courier starts waiting. In the urgent order card, after the information about the recipient, there is a special field for entering the time, next to it there is a button ![]() . To send a notification to the customer, click the button and save the card. Please note that the waiting time is indicated by the operator after the courier receives the order. Waiting time for the courier is rated separately.
. To send a notification to the customer, click the button and save the card. Please note that the waiting time is indicated by the operator after the courier receives the order. Waiting time for the courier is rated separately.
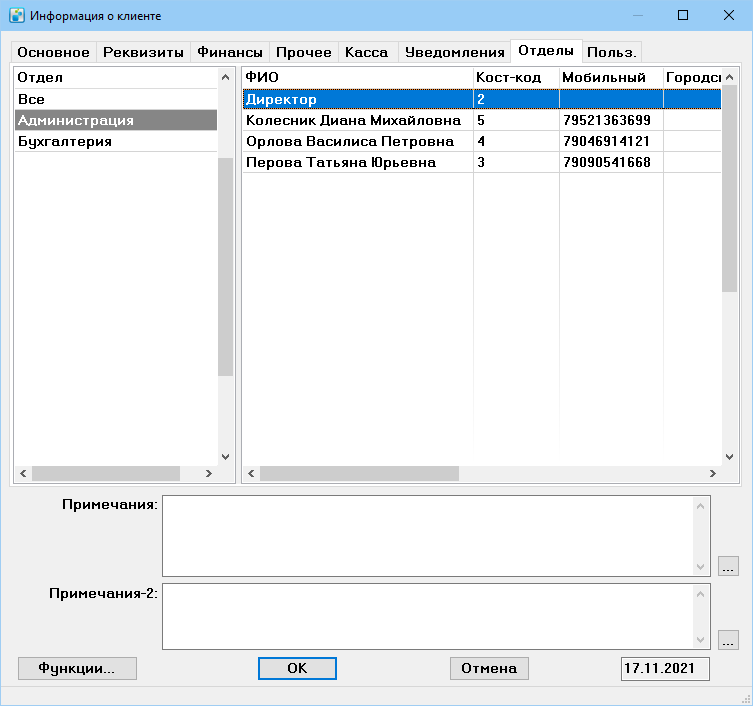
Departments
Allows to specify and track the department or employee on whose behalf the order was created, and specify department or employeeYou can give departments independent access to a client account to place orders online.
To create a department, select the Create context menu item on the left side of the window. This will open the department card:
Login and Password — department employees' login details to their personal account.
Cost code — the customer's department ID, used in reports and helps to track the department's shipping costs. The code is reported by the customer.
If the department details differ from those specified in the client card, fill in the fields on the "Details" tab.
The created department will appear in the left part of the tab. To add an employee to the department, select the department and in the right part of the window select the Create context menu item. The employee's card will open:
Full Name — employee's full name.
Type — drop-down list for selecting the type of contact data. Possible values: Mobile, City, Email, Skype.
Additional — a field for additional notes to the contact information. This can be a area code, contact time, etc.
Call — allows you to dial an employee's number if you use Skype or IP telephony programs.
Not — is the abbreviation for "Not in use". If it is checked, the contact is obsolete.
Cost code — employee identifier, is used for reporting and helps to track shipping costs for a specific employee. If the employee's code is not filled out, the department's code will be listed.
Date of birth — is designed to notify the responsible employee of the customer's employee's birthday.
Active — if the checkbox is selected, the name of the employee is inserted automatically in the "Contact person" field of the rush order card..
Custom
It is intended for client-specific functions and is not standardized. More information about the features of the tab is described in the article Custom fields.
Client card creation
To create a client card:
- On the Clients tab press F3 or choose the Create context menu item. This will open a client card.
- Fill in the customer data on all tabs of the card. For more information see «Client cаrd».
- To save the card, click ОК.
Client card copy
Creating a copy of the client is designed to save information about the client's previous orders, contract number, and company departments. It is used, for example, when changing the company name.
To copy client card:
- On the Clients tab, select Create copy from the context menu of the client line.
- Check the Copy with departments checkbox if you want to copy the company structure, employees' names and phone numbers.
As a result, on the Clients tab a record with the name Copy of <customer name> is created with settings identical to the original client card.
Client removal
It is not possible to delete a customer because the data can be used in different sections of the system. You can change the card or move the client to Non-working. A client becomes non-working when the contract expires.
When a customer can not place orders
By default, customers cannot create orders if the contract with the courier service company has expired.
You can set the following restrictions on creating new orders:
- if the balance is negative in the prepaid system
- if there are overdue invoices
- if the waiting time for signing the UTD has expired
Invoice issue
Designed to create an invoice for the client to pay for the courier services.
To issue an invoice, on the Clients tab, select the client record and select the Invoice context menu item.
To see the issued invoices, select the context menu item Invoices. For more information see «Invoices».
Payments from client
To enter payment data, on the Clients tab, select the client's record and select the Enter payment context menu item.
To view payments, select the Payments context menu item.
For more information see «Enter payment».
Funds and Shipment transfer certificates
The funds tranfer certificate (FTC) records the fact of money transfer by the courier service to the client. To create a Funds Transfer Certificate, on the Clients tab select an entry and select the Create Funds Transfer Certificate context menu item.
The Shipment Transfer Certificate (STC) allows you to return undelivered shipment or transfer client statements. To create a shipment transfer certificate, on the Clients tab, highlight an entry and select Create Shipment Transfer Certificate.
For more information see «Funds/Shipment Transfer Certificates».
Transfer Funds to Client
To transfer funds, on the Clients tab, select the entry and select the context menu item Transfer funds to a client. For more information see «Payments to partners».
Reconciliation Statement
A document that reflects works, services and money between organizations for a certain period, as well as the presence or absence of debts of one party to another on a certain date.
To create a reconciliation statement, on the Clients tab select the client's record and select the context menu item Reconciliation Statement.
