Client Account — различия между версиями
Daria (обсуждение | вклад) (→Import an Excel Registry) |
Daria (обсуждение | вклад) (→Создание заказа с параметрами) |
||
| (не показано 25 промежуточных версий этого же участника) | |||
| Строка 97: | Строка 97: | ||
=== Create order by copying === | === Create order by copying === | ||
| − | + | You can create an order by copying an existing order. In this case, you only need to specify the desired date and time of pickup or delivery. This allows you to speed up the ordering process. | |
| − | + | To copy an existing order: | |
| − | # | + | # In the '''Main''' or '''Tracking''' find the desired order, open its card, and click '''Copy'''. The '''New Order''' window will open. |
| − | # | + | # Specify the desired time and date of delivery or pickup, change other details if necessary, and click '''Submit'''. |
| − | === | + | === Add item === |
| − | + | You can add an item when creating orders manually or when placing a pickup order. | |
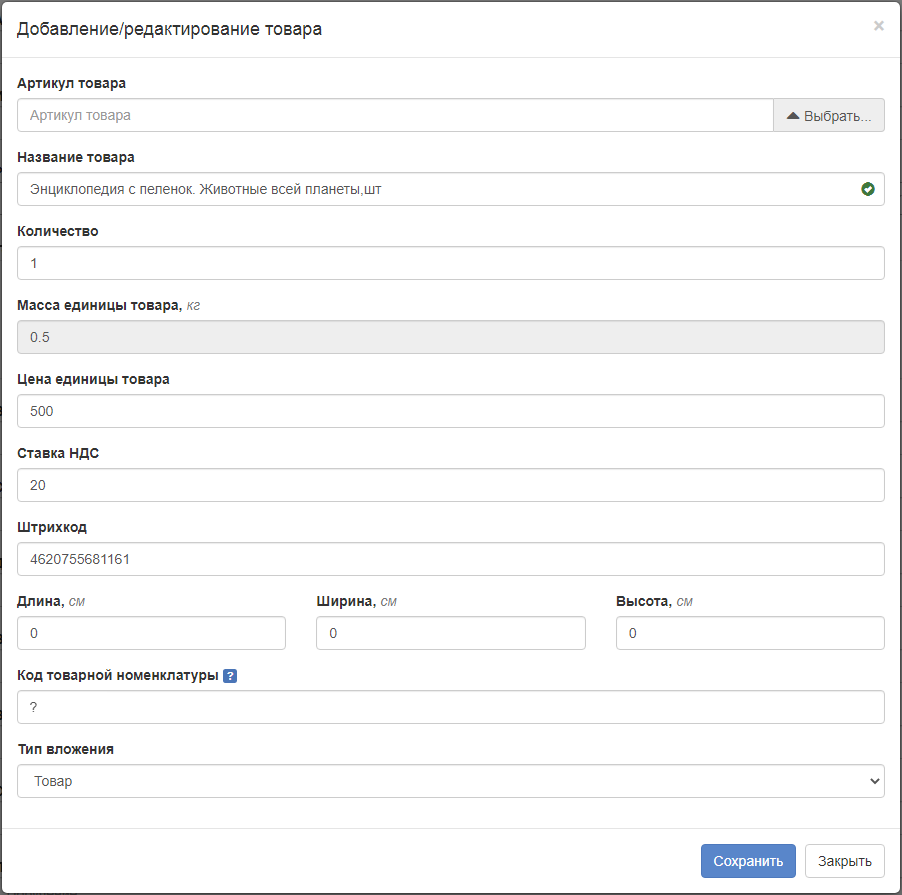
| − | + | To add an item, on the New Order page in the '''Items''' field, click the button [[Файл:ЛК Добавить.png]]. The Add or Edit Item window will open: | |
[[Файл:AddEdit.png|none|650px]] | [[Файл:AddEdit.png|none|650px]] | ||
| − | + | Items can be added the following ways: | |
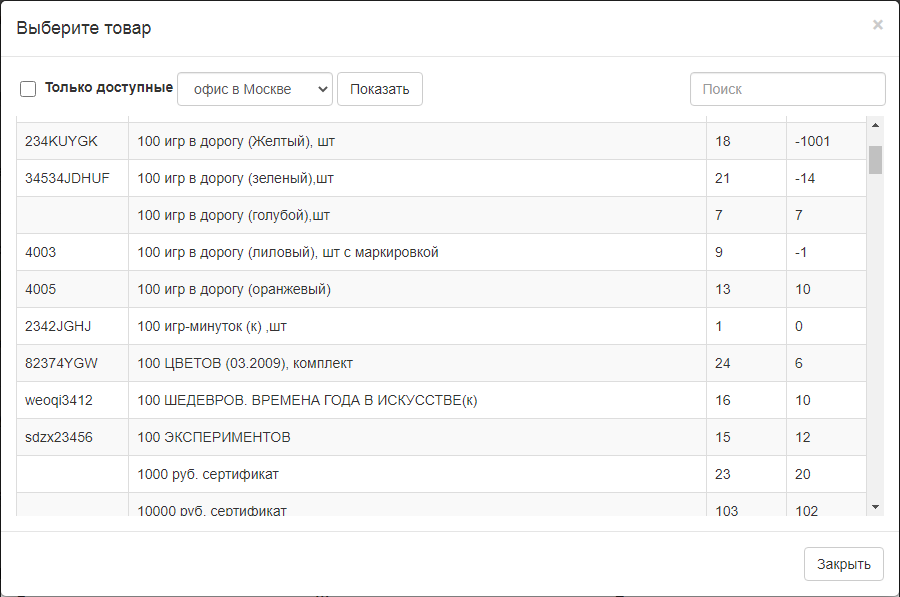
| − | * | + | * by supplier SKU ID, if the order is assembled in the warehouse of the courier service company. To do this, click on the '''Select''' button in the Item description field. The '''Select product''' window will open:[[Файл:Select by article.png|none|700px]] |
| − | *: | + | *: To filter items by warehouse, select the desired warehouse from the drop-down list and click the '''Show''' button. |
| − | *: | + | *: To filter items by availability, select the '''Only available''' checkbox and click the '''Show''' button. |
| − | *: | + | *: You can start typing a supplier SKU ID or name in the search bar and select an item from the filtered list. |
| − | *: | + | *: The '''Item Name''', '''Item Weight''', '''Item Price''' and '''Barcode''' fields will be filled in automatically. The '''Item Name''' field will indicate the presence or absence of goods in stock. |
| − | * | + | * Manually, if the order is assembled in the warehouse of the online store. To do this, in the Add/Edit Item window, fill in the fields except for the '''Supplier SKU ID''' field. |
| − | |||
| − | + | For more information about the types of order items, see the [[Shipment card#Order items|«Order items»]]. | |
| − | + | To add an item to your order, click '''Save'''. To cancel, click '''Close'''. | |
| − | ''' | + | '''Note.''' A value of "0" when selecting the VAT rate means the '''No VAT rate'''. The "0%" rate is not supported. |
| − | + | After adding items in the '''Items''' section, a list of items is generated: | |
[[Файл:ЛК Товары.png|none]] | [[Файл:ЛК Товары.png|none]] | ||
| − | + | You can edit or delete items using the [[Файл:ЛК Редактировать.png]] and [[Файл:Delete.png]] respectively. You can add, edit and delete items only before clicking on the '''Submit''' button. | |
| − | === | + | === Add file === |
| − | + | To attach a file to your order, in the '''Attached files''' field, click on the button [[Файл:ЛК Добавить.png]]. Select the file on your computer and press '''Open'''. A line with the name of the file appears. | |
| − | + | The size of the uploaded file must not exceed 1 MB. | |
| − | + | To delete a downloaded file, in the line with the file name, click on the [[Файл:Delete.png]]. | |
| − | + | You can add and delete files only before you press the '''Submit''' button. | |
| − | === | + | === Add package === |
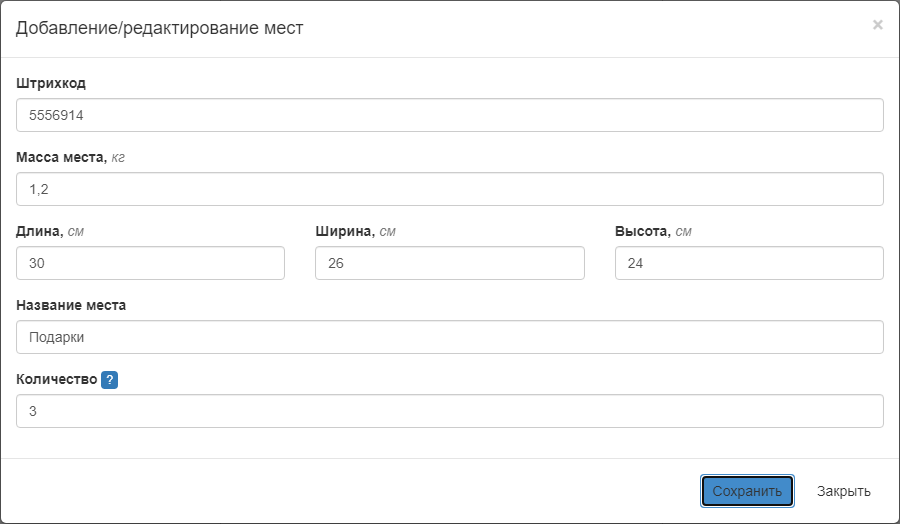
| − | + | To add a package to your order, in the '''Package''' field, click on the button [[Файл:ЛК Добавить.png]]. The "Add/Edit Package" window opens: | |
[[Файл:ЛК Места.png|none|700 px]] | [[Файл:ЛК Места.png|none|700 px]] | ||
| − | # | + | # Fill in the fields. To create several packages with the same parameters, specify the number of such packages in the '''Amount''' field. |
| − | # | + | # Click the '''Save''' button. |
| − | === | + | === Delivery fee conditions === |
| − | + | You can configure delivery fee depending on the total amount of buyout in the order: | |
| − | * | + | * for a specific order - when placing an order, specify the conditions in the '''Delivery fee conditions''' field block. This setting has priority over customer billing rules; |
| − | * | + | * for orders that meet your specific conditions - configure the rules in the main menu item '''[[#Custom Delivery Rates|Custom Delivery Rates]]'''. |
| − | + | To configure the delivery fee of a specific order: | |
| − | # | + | # When placing an order in the field block '''Delivery fee conditions''' click on '''Add condition'''. |
| − | # | + | # In the '''Purchase amount less than''' field specify the buyout threshold amount, and in the field '''Delivery fee''' — the appropriate delivery fee. |
| − | # | + | #To add the next value range, click on the button '''Add condition''' and specify the amount of buyout and the delivery fee. The number of conditions is unlimited. |
| − | # | + | # Fill in the '''Full return fee''' field. |
[[Файл:ЛК Настройка стоимости.png|800 px|none]] | [[Файл:ЛК Настройка стоимости.png|800 px|none]] | ||
| − | === | + | === Checking the trustworthiness of customers === |
| − | + | When you place an order [[#Creating an order manually|manually]] you can see the customer's trustworthiness score. It is made up of the ratio of orders that were bought out and returned without buyout using different courier services. Orders with cash on delivery have higher value. | |
| − | + | The score is displayed in the '''New Order''' main menu item in the '''Recipient phone''' field as a colored circle. Color scheme: | |
| − | * | + | * green - high rating; |
| − | * | + | * yellow - neutral rating; |
| − | * | + | * red - low rating. |
| − | + | When you hover over the colored circle, the rating percentage is displayed. Neutral is considered a value of 40-60%, values below fall into the red zone, above - into the green zone. | |
| − | ''' | + | '''Notes'''. |
| − | * | + | * Rating of 50% may be the customer's real rating or an indicator of lack of data. |
| − | * | + | * Rating depends on the order status (delivered/cancelled), type of payment/prepayment, number of attempts of delivery by courier. Each of the factors has a different value, so a cancelled order has a stronger effect on the negative rating than the same delivered order - on the positive rating. |
| − | == | + | == Tracking outgoing orders == |
| − | + | Tracking of outgoing orders is designed to get information on orders created by customers of the courier service company integrated with the MeaSoft system. The order creation method is not significant in that case. | |
| − | + | To track orders, select the '''Tracking''' tab in the main menu. The '''Tracking''' page will open. Set the search parameters and click the '''Show''' button. A date interval of no more than 60 days is supported. | |
| − | ''' | + | '''Note'''. When searching by number or name, the date interval is not taken into account. |
| − | + | As a result, a table of orders that meet the specified criteria will open: | |
[[Файл:Отслеживаемые.png|none|1100px]] | [[Файл:Отслеживаемые.png|none|1100px]] | ||
| − | + | Order tracking status highlighting is configured in the [[Shipment accounting#Адреса|office system]]. | |
| − | + | On this page you can: | |
| − | * | + | * view order information. For more information, see. «[[#View order information|View order information]]»; |
| − | * | + | * edit the order. To do this, click the button [[Файл:Pencil.png]]. The Edit Order window will open. |
| − | * | + | * change the search conditions for tracked orders. To do this, click the button [[Файл:Arrow.png]] in the title of the '''Tracking''' page. The selection area for tracked orders will open; |
| − | * | + | * print delivery slips, labels, acceptance and delivery certificates or inventory for selected orders. For more information, see «[[Client Account#Print documents|Print documents]]»; |
| − | * | + | * save the information on the orders into a Microsoft Excel document. To do this, check the boxes to the left of the desired orders and click '''Export to Excel''' > '''Orders'''; |
| − | + | * cancel selected orders. o do this, check the boxes to the left of the desired orders and click '''Cancel Orders'''. | |
| − | * | ||
| − | |||
| − | === | + | === View order information === |
| − | + | To see your order information, click anywhere on the order line. The Order Details window will open. In this window you can: | |
| − | * | + | * subscribe to order status notifications in your Telegram channel or browser. Click on [[Файл:Telegram.png|25 px]] or [[Файл:Browser push.png|25 px]] respectively; |
| − | * | + | * view and print delivery slips for your order. To do this, click the '''Delivery Slip''' button. |
| − | === | + | === Print documents === |
| − | + | To print documents, check the boxes to the left of the orders and click the appropriate button at the bottom of the page, then click the '''Print''' button in the document preview window. | |
| − | + | If no order is checked, documents will be generated for all orders displayed in the table. | |
| − | + | Labels (stickers) available by default: | |
| − | * '''[[ | + | * '''[[Hardware#Thermal printer|Zebra]]''' — for printing on a thermal printer. Zebra expects to print labels one at a time per sheet. Label size is 58×40 mm. |
| − | * '''А4''' — | + | * '''А4''' — for printing on an A4 sheet. Labels are printed on one or more sheets. The size of stickers is 62×30 mm. |
| − | + | In addition, the shape of the label can be changed by changing the <mparam code="StickerForm"/>. | |
| − | ''' | + | '''Note'''. Print forms for labels 5 and 6 are relatively old and are not customizable in the courier service account.. |
| − | ''' | + | '''Note'''. Print forms for pickups are not generated. |
| − | <spoiler text=" | + | <spoiler text="How barcodes are generated">The Code128 standard barcode is formed in the Client Account. In this case, 3 characters are added to the barcode of the delivery slip, which indicates the number of packages in the order. |
| + | </spoiler> | ||
| − | == | + | == Tracking incoming orders == |
| − | + | Incoming Order Tracking is for shipments that are delivered to a courier service agent's city. | |
| − | + | A courier service agent is a warehouse, a pickup point, a contractor or a branch of a courier service company. For the agent [[Clients and partners|client]] and [[Branches|branch]] cards must be created in the backoffice, and the agent's branch must be specified in the '''Responsible branch''' field in the transferred order. In the client card set [[Clients and partners#Other|login and password]] to log in to the client account and pass them to the agent. | |
| − | + | To track incoming orders, log in to the Client Account under the agent's credentials, select the '''Incoming''' tab in the main menu, set the search parameters and click the '''Show''' button. The table of orders that meet the specified criteria will open: | |
[[Файл:ЛК Входящие таблица.png|none|1100 px]] | [[Файл:ЛК Входящие таблица.png|none|1100 px]] | ||
| − | + | On this page you can: | |
| − | * | + | * view order information. To do this, click anywhere in the order line. The "Order details" window will open. See «[[Client Account#Actions with incoming orders|Actions with incoming orders]]»; |
| − | * | + | * change search criteria for tracked orders. To do this, click the [[Файл:Arrow.png]] button in '''Tracking'''. This will open a selection area for tracked orders; |
| − | * | + | * print delivery slips and labels for selected orders. See «[[Client Account#Print documents|Print documents]]»; |
| − | * | + | * save order information to a Microsoft Excel document. To do this, check the boxes to the left of the desired orders and click the '''Export to Excel''' button. |
| − | === | + | === Actions with incoming orders === |
| − | + | To start working with an incoming order, on the Tracking page, click anywhere on the order line. The Order Details window will open. In this window you can: | |
| − | * | + | * view and print a delivery slip; |
| − | * | + | * change order status; |
| − | * | + | * set date and time of delivery, add delivery information; |
| − | * | + | * attach files on the order; |
| − | * | + | * view and download attached files, including photos from <rspoiler text="courier devices">[[Courier mobile app for Android]] and [[Courier mobile app for iOS]]</rspoiler>; |
| − | * | + | * view <rspoiler text="the current position of the courier">The information is updated every 5 minutes.</rspoiler>. |
| − | + | After making changes, click '''Save''', then '''Close'''. | |
| − | === | + | === Order Receipt === |
| − | + | The courier service agent can accept orders received at the branch. | |
| − | + | To do this, select '''Receipt''' in the main menu item Inbox on the left panel and successively scan the barcodes of accepted shipments. | |
| − | == | + | == Pickup points == |
| − | + | To view the list of pickup points, choose the main menu item '''Pickup Points'''. On the top right you can filter pickup points by city. By default the city in which the customer is located is selected. | |
[[Файл:ЛК ПВЗ.png|1100 px|none]] | [[Файл:ЛК ПВЗ.png|1100 px|none]] | ||
| − | + | The information in the table is read only. | |
| − | + | To hide a branch office, open the drop-down list of the '''Any subordination''' field and click on the [[Файл:Отключить пвз.png]] button to the right of the company name. All branch pickup points will be disabled and hidden in all sections and API-requests. | |
| − | + | To see the location of the pickup point on the map, click the '''On the Map''' button. The following window will open: | |
[[Файл:pvz026.png|none|600px]] | [[Файл:pvz026.png|none|600px]] | ||
| − | + | To select pickup point when placing an order[[#Creating an order manually|manually]], specify the recipient's city and select a pickup point from the drop-down list in the '''Delivery type''' field. It will display pickup points for the selected city. | |
| − | + | For details, see the section «[[Work with pickup points|Work with pickup points]]». | |
| − | |||
| − | |||
| − | |||
| − | |||
| − | |||
| − | |||
| − | |||
| + | == Warehouse == | ||
| + | Using the '''Warehouse''' main menu tab you can: | ||
| + | * create a new Goods List card - click on the '''Create''' button; | ||
| + | *view the movement of the Goods List - click in the row of the corresponding item. The Item History window will open. You can view the details of orders that include this item and print delivery slips; | ||
| + | * print a label - click on the [[Файл:ЛК Печать.png]] button; | ||
| + | * export the goods list to a Microsoft Excel document — click on the '''Export to Excel''' button. | ||
[[Файл:ЛК Склад.png|1100 px|none]] | [[Файл:ЛК Склад.png|1100 px|none]] | ||
| − | + | The warehouse is presented in the form of a table with the number of remaining goods and balances including [[Warehouse Module#Reserved items|reserved items]]. The information in the table is read only. | |
| − | + | On the top right, you can filter items by availability, article, name and branch. | |
| − | + | Goods are added to the warehouse by the courier service after the goods are placed in stock. | |
| − | |||
| − | |||
| − | |||
| + | == Finance == | ||
| + | The section is designed for displaying [[Funds transfer certificates|the funds transfer certificates (FTC)]]. | ||
[[Файл:ЛК Финансы.png|1000 px|none]] | [[Файл:ЛК Финансы.png|1000 px|none]] | ||
| − | + | To view the information, specify a date period and click the '''Show''' button. The table with the FTC will be displayed. | |
| − | + | To view a list of the orders included in the FTC, click in the certificate row. The '''funds transfer certificate''' window will open. In this window you can: | |
| − | * | + | * view order details - click on the order line; |
| − | * | + | * unload the FTC table into an Excel document - click the '''Export to Excel''' button. |
| − | == | + | == Calculator == |
| − | + | Designed to calculate the cost and delivery time. | |
| − | + | To calculate the cost and delivery time: | |
| − | # | + | # In the '''Calculator''' main menu tab fill out the calculation form:[[Файл:ЛК Калькулятор.png|1100 px|none]] |
| − | # | + | # To display the calculation cost for your company, check the checkbox '''Apply custom delivery rates'''. To calculate the price for the final recipient, uncheck the box. The calculation will take into account the billing rules set in the «[[#Custom Delivery Rates|Custom Delivery Rates]]». |
| − | # | + | # Click the '''Calculate''' button. |
| − | + | The calculation of delivery time and cost for the configured urgency modes will be displayed. | |
| − | == | + | == Tickets == |
| − | + | Intended for communication with the customer support. | |
| − | + | By default, it opens the '''Answer Received''' tab with tickets that have new messages. | |
| − | + | On the left are two more tabs: '''In Process''' and '''Closed''' with tickets of corresponding statuses. | |
| − | + | All tabs display two tables. The table on the left shows the tickets selected by the filter. The table on the right shows a list of messages of the selected ticket with the author and time of creation. | |
| − | + | To see the text of a message, click on the corresponding row in the table. To ask an additional question or reply to a message, enter text in an empty field and click the '''Reply''' button. | |
| − | + | To create a ticket, click the '''New''' button on the left. In the window that opens, enter the subject and text of the request and click '''Save'''. The request will appear in the list of tickets on the '''In Process''' tab with the status '''New'''. | |
| − | + | To stop working on the ticket, click the '''Close''' button. | |
| − | + | To search for tickets by word, phrase, or ticket number, fill in the '''Search''' or '''Ticket Number''' field and click '''Filter'''. | |
| − | + | To return to the default list of tickets, click '''Reset'''. | |
| − | == | + | == Settings == |
| − | === | + | === Custom Delivery Rates === |
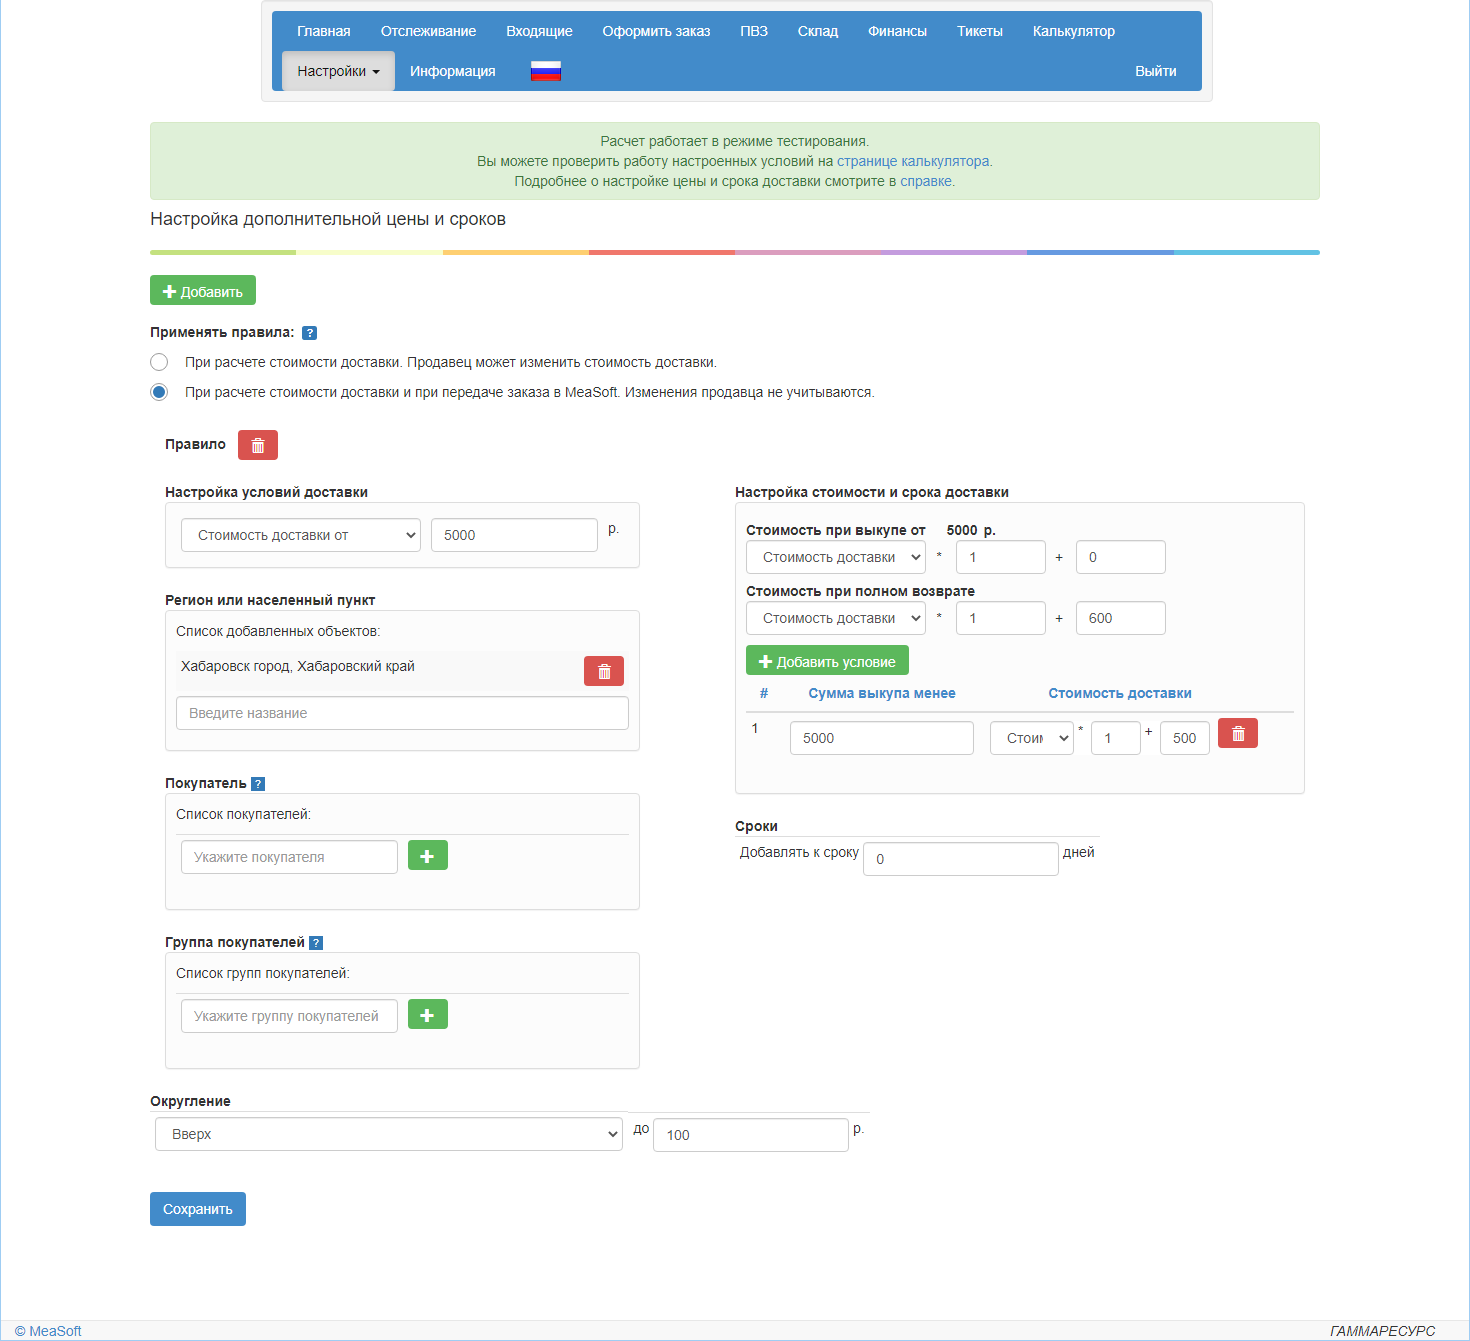
| − | + | The functionality is designed to customize the cost and time of delivery depending on the delivery terms and buyout amount of the order. The rules work as follows: | |
| − | # | + | # The delivery cost is determined by the courier service rate. |
| − | # | + | # If the order falls under a rule, a set markup or discount is added to the delivery cost and the delivery time is extended by the specified number of days. |
| − | # | + | <br>To qualify for the rule, the order must meet the specified criteria: cost of delivery, region or city, customer name or customer group name. |
| − | # | + | <br>If the order meets the conditions of several rules, priority is given to the rule for a customer, then for a customer's group. |
| − | #* | + | # Customer sees the calculated price based on the rules and places the order. |
| − | #* | + | # The final delivery price depends on the '''Apply the rules''' switch: |
| + | #* If the switch is set to '''On delivery''' fee calculation, the customer pays the delivery fee calculated at checkout or manually specified in the order by the store administrator. For example, the administrator has made a discount for a large order and manually changed the delivery cost in the order; | ||
| + | #* if the switch is set to '''On delivery''' fee calculation and when transferring the order to MeaSoft the delivery cost is calculated anew with account of the rule settings. Changes in price by the seller are not taken into account. | ||
| − | <!-- | + | <!--Custom delivery rates apply: |
| − | * | + | * when placing an order - automatically, if the order meets the conditions specified in the rule. If the checkbox ''Apply fee settings on delivery'' is selected, the order transmits [[Conditional delivery fee|сonditional delivery fee]]. Delivery fee may change depending on the additional price and time settings-->; |
| − | + | You can check how the rule works when calculating the cost and delivery time in the '''[[#Calculator|Calculator]]''' with the '''Apply custom delivery rates''' box unchecked. This changes the delivery time and price. | |
| − | + | The rules of price formation for the recipient have no effect on the cost of courier service. | |
[[Файл:Тарификация клиентов.png|1220 px|none]] | [[Файл:Тарификация клиентов.png|1220 px|none]] | ||
| − | + | To add a new rule: | |
| − | # | + | # Click the '''Add''' button.. |
| − | # | + | # Set the '''Apply the rules''' radio button.. |
| − | # | + | # In the '''Delivery Conditions''' block select the type of delivery fee that is taken into account by the rule: |
| − | #* ''' | + | #* '''Minimum delivery fee from''' - takes into account delivery cost with surcharges and additional services; |
| − | #* ''' | + | #* '''Base delivery fee from''' - the base delivery cost without extra charges is taken into account. |
| − | # | + | # In the text field specify the minimum value of the selected type of delivery fee for which the rule applies. |
| − | # | + | # In the '''Region or Location''' box, specify the cities or regions for which the rule applies. |
| − | # | + | # In the '''Client''' block specify the clients from your system for which the rule applies. This field is available only for API-requests for [[API#Creating Order|creating order]] and [[API#Delivery Fee Calculation|delivery fee calculation]]. |
| − | # | + | # In the '''Client group''' box specify groups of customers from your system for which the rule applies. This field is available for API-requests of order creation and delivery fee calculation only. |
| − | # | + | # In the '''External service''' block specify the desired external services for which the rule is valid. |
| − | # | + | # In the '''Rounding shipping cost and delivery time''' block: |
| − | #* | + | #* select whether the condition applies to the base or full delivery fee; |
| − | #* | + | #* set the delivery fee depending on the buyout amount; |
| − | #* | + | #* specify the number of days to add to the estimated delivery time. |
| − | #: | + | #: To add a buyout threshold, click '''Add Condition''' and enter the amount. |
| − | #: | + | #: To delete the condition line, click [[Файл:Delete.png]] button. |
| − | # | + | # In the '''Rounding''' block, adjust the rounding of the delivery amount calculated by the rule. Possible values: |
| − | #* ''' | + | #* '''Do not round'''; |
| − | #* ''' | + | #* '''Up'''. For example, if rounded to 10, 12 dollars and 17 dollars will be rounded to 20 dollars; |
| − | #* ''' | + | #* '''Down'''. For example, if rounded to 10, 12 dollars and 17 dollars are rounded to 10 dollars; |
| − | #* ''' | + | #* '''Conventional'''. For example, when rounded to 10:<br>12 dollars is rounded to 10 dollars,<br>17 dollars is rounded to 20 dollars. |
| − | # | + | # Click the '''Save''' button. |
| − | + | You can add an unlimited number of rules. | |
| − | === | + | === Integration === |
| − | + | This main menu tab is designed to manage [[API]]. | |
| − | API | + | API allows online retailers and other delivery companies to automate the transfer of orders to courier service companies that use the MeaSoft system. |
| − | + | The '''Integration''' menu tab contains the following tabs: | |
| − | * ''' | + | * '''Integrations''' — a list of integration modules with popular CMSs. To configure the module you need to specify [[Client account setting#Connection|courier service code]] as well as the username and password from your client account; |
| − | * ''' | + | * '''Integration Settings''' — lists of all available integrations and your configured integrations. Integration settings are different for each module and are described in the [[API#CMS_Integrations|installation instructions]]; |
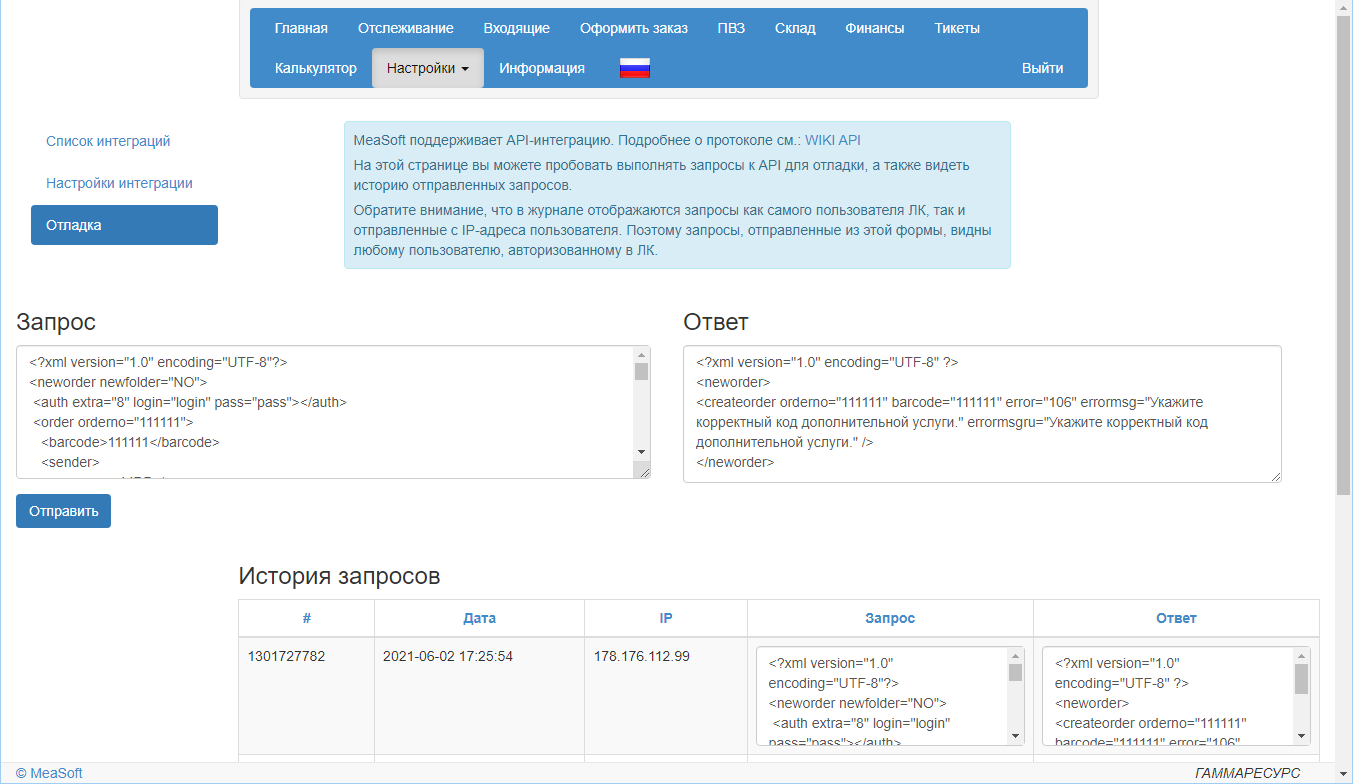
| − | * ''' | + | * ''' Debug''' — on this page you can try to run requests to the API for debugging, as well as see the history of requests sent from your account and from the current IP address. |
[[Файл:Интеграция отладка.png|1000px|none]] | [[Файл:Интеграция отладка.png|1000px|none]] | ||
| − | === | + | === Changing the password === |
| − | + | To change the password from your client account in the '''Password''' tab, enter the old password, new password and confirm it by re-entering it. | |
| + | |||
| + | === General settings === | ||
| + | This section contains settings that are valid for all orders. | ||
| − | + | '''Default instuction'''. Default instuction that will be added to the '''Instruction''' field in all new delivery orders created in any way in the Client Account and via API. Auto-text is added when the order is saved. If the user filled out the Instruction field when placing the order, the AutoText will be added before the customer text. | |
| − | |||
| − | + | == Information == | |
| + | Contains messages from the courier service company. | ||
| − | + | There are two types of these messages: | |
| − | |||
| − | + | * Standard - displayed as a counter of unread messages in the Information tab; | |
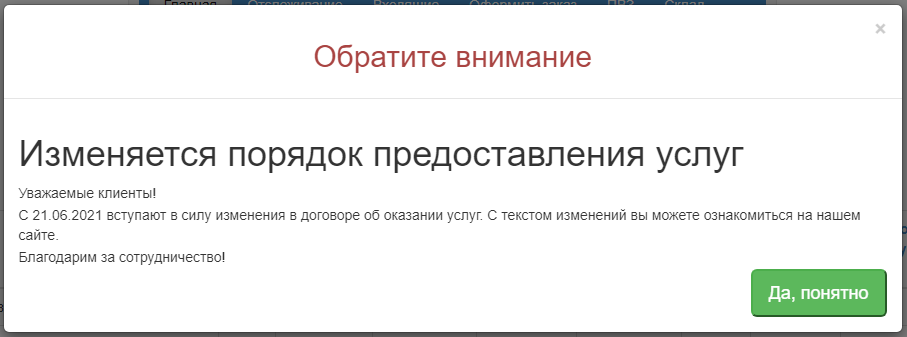
| + | * Must-read - an information window is displayed when you enter the CA. To close it, click the '''Got It''' button. This is how you let the courier service company know that you have read the news. | ||
| − | |||
| − | |||
[[Файл:Срочная новость.png|none|600px]] | [[Файл:Срочная новость.png|none|600px]] | ||
| − | == | + | == Creating an order with parameters == |
| − | + | You can create a link to an order with predefined parameters that will be passed to the corresponding fields of the form. | |
| − | + | For example, if you follow the link <code><nowiki>https://home.courierexe.ru/8/order/new?order[receiver][person]=Smith&order[receiver][town]=Chicago&order[sender][town]=Miami</nowiki></code> откроется форма создания заказа с заполненными полями: | |
| − | * ''' | + | * '''Recipient name''' — Smith; |
| − | * ''' | + | * '''Sender city/town''' — Chicago; |
| − | * ''' | + | * '''Recipient city/town''' — Miami. |
| − | + | If the user changes the field filled in the parameter, the value entered by the user will be in the field after the order is saved. | |
Вид ссылки: | Вид ссылки: | ||
| − | https://home.courierexe.ru/< | + | https://home.courierexe.ru/<extra-code>/order/new?Parameter1=Value1&Parameter2=Value2 |
| − | + | The maximum link length is not defined, look for information for your browser. If the limit is exceeded, not all of the submitted data will appear in the form. | |
| − | + | Correspondence of form fields and query parameters: | |
{|class=wikitable | {|class=wikitable | ||
| − | ! | + | !Order form field |
| − | ! | + | !Request parameter in the URL |
|- | |- | ||
| − | | | + | |Order number||order[@attr][orderno] |
|- | |- | ||
| − | | | + | |Order items||order[enclosure] |
|- | |- | ||
| − | | | + | |Barcode||order[barcode] |
|- | |- | ||
| − | | | + | |Sender company||order[sender][company] |
|- | |- | ||
| − | | | + | |Sender name||order[sender][person] |
|- | |- | ||
| − | | | + | |Sender city/town||order[sender][town] |
|- | |- | ||
| − | | | + | |Sender address||order[sender][address] |
|- | |- | ||
| − | | | + | |Sender phone||order[sender][phone] |
|- | |- | ||
| − | | | + | |Pickup date||order[sender][date] |
|- | |- | ||
| − | | | + | |Pickup time from||order[sender][time_min] |
|- | |- | ||
| − | | | + | |Pickup time until||order[sender][time_max] |
|- | |- | ||
| − | | | + | |Recipient TIN||order[receiver][inn] |
|- | |- | ||
| − | | | + | |Recipient company||order[receiver][company] |
|- | |- | ||
| − | | | + | |Recipient name||order[receiver][person] |
|- | |- | ||
| − | | | + | |Recipient phone||order[receiver][phone] |
|- | |- | ||
| − | | | + | |Recipient city/town||order[receiver][town] |
|- | |- | ||
| − | | | + | |Delivery type||order[pvz] |
|- | |- | ||
| − | | | + | |Recipient address||order[receiver][address] |
|- | |- | ||
| − | | | + | |Recipient postcode||order[receiver][zipcode] |
|- | |- | ||
| − | | | + | |Delivery mode||order[service] |
|- | |- | ||
| − | | | + | |Weight||order[weight] |
|- | |- | ||
| − | | | + | |Amount||order[price] |
|- | |- | ||
| − | | | + | |Delivery date||order[receiver][date] |
|- | |- | ||
| − | | | + | |Delivery time from||order[receiver][time_min] |
|- | |- | ||
| − | | | + | |Delivery time until||order[receiver][time_max] |
|- | |- | ||
| − | | | + | |Declared value|| order[inshprice] |
|- | |- | ||
| − | | | + | |Instruction||order[instruction] |
|- | |- | ||
| − | | | + | |Payment type||order[paytype] |
|- | |- | ||
| − | | | + | |Total volume||order[overall_volume] |
|- | |- | ||
| − | | | + | |Package quantity||order[quantity] |
|- | |- | ||
| − | | | + | |Package type||order[type] |
|- | |- | ||
| − | | | + | |Payment by recipient||order[ReceiverPays] |
|- | |- | ||
| − | | | + | |Attached files||order[attachments] |
|- | |- | ||
| − | | | + | |Department||order[otdel] |
|- | |- | ||
| − | | | + | |Delivery time slot||order[receiver][time_range] |
|- | |- | ||
| − | | | + | |Partial Delivery||order[acceptpartially] |
|- | |- | ||
| − | | | + | |Delivery fee conditions||order[deliveryset] |
|- | |- | ||
| − | | | + | |Weight at return trip||order[return_weight] |
|- | |- | ||
| − | | | + | |Cost code||order[costcode] |
|- | |- | ||
| − | | | + | |Contractor code||order[outstrbarcode] |
|- | |- | ||
| − | | | + | |Return trip required||order[flag] |
|- | |- | ||
| − | | | + | |Return trip mode||order[modev] |
|- | |- | ||
| − | | | + | |Return shipment type||order[typev] |
|- | |- | ||
| − | | | + | |PIN||order[receiver][deliveryPIN] |
|- | |- | ||
| − | |colspan=2|''' | + | |colspan=2|'''Items''' |
|- | |- | ||
| − | | | + | |Supplier SKU ID||order[items][N][@attr][article] (mandatory, can be blank) |
|- | |- | ||
| − | | | + | |Item name||order[items][N][item] |
|- | |- | ||
| − | | | + | |Quantity||order[items][N][@attr][quantity] |
|- | |- | ||
| − | | | + | |Weight, kg||order[items][N][@attr][mass] |
|- | |- | ||
| − | | | + | |Price||order[items][N][@attr][retprice] |
|- | |- | ||
| − | | | + | |VAT rate||order[items][N][@attr][VATrate] |
|- | |- | ||
| − | | | + | |Barcode||order[items][N][@attr][barcode] (mandatory, can be blank) |
|- | |- | ||
| − | | | + | |Length, cm||order[items][N][@attr][length] |
|- | |- | ||
| − | | | + | |Width, cm |
| + | ||order[items][N][@attr][width] | ||
|- | |- | ||
| − | | | + | |Height, cm||order[items][N][@attr][height] |
|- | |- | ||
| − | | | + | |Goods code||order[items][N][@attr][governmentCode] |
|- | |- | ||
| − | | | + | |Item type (numeric code)||order[items][N][@attr][type] |
|- | |- | ||
| − | |colspan=2|''' | + | |colspan=2|'''Packages''' |
|- | |- | ||
| − | | | + | |Name||order[packages][N][package] (mandatory, can be blank) |
|- | |- | ||
| − | | | + | |Weight, kg||order[packages][N][@attr][mass] |
|- | |- | ||
| − | | | + | |Barcode||order[packages][N][@attr][strbarcode] (mandatory, can be blank) |
|- | |- | ||
| − | | | + | |Length, cm||order[packages][N][@attr][length] |
|- | |- | ||
| − | | | + | |Width, cm||order[packages][N][@attr][width] |
|- | |- | ||
| − | | | + | |Height, cm||order[packages][N][@attr][height] |
|- | |- | ||
|} | |} | ||
| − | == | + | == Working with tables == |
| − | + | To apply sorting by any parameter, click on the name of the corresponding column. | |
| − | + | To select a row in the table, check the box to the left of it. To select all rows displayed on the page, check the box on the top left row. | |
| − | + | To change the number of rows displayed on one page, click on the appropriate box at the bottom of the screen and select the desired number from the drop-down list. The page will update automatically. | |
Текущая версия на 14:04, 21 ноября 2022
Client account is designed for clients and partners of the courier service company working in the MeaSoft system.
In the client account you can:
- add and edit orders;
- track orders;
- calculate the cost and delivery time;
- print order documents;
- customize the cost and delivery time depending on delivery terms and buyout amount;
- view settlement information with the courier service company.
Some of the features may not be available or may have different names, depending on the settings and rates of the courier service company. Registering and Setting up of the client account are performed by the courier service administrator.
Содержание
Main page
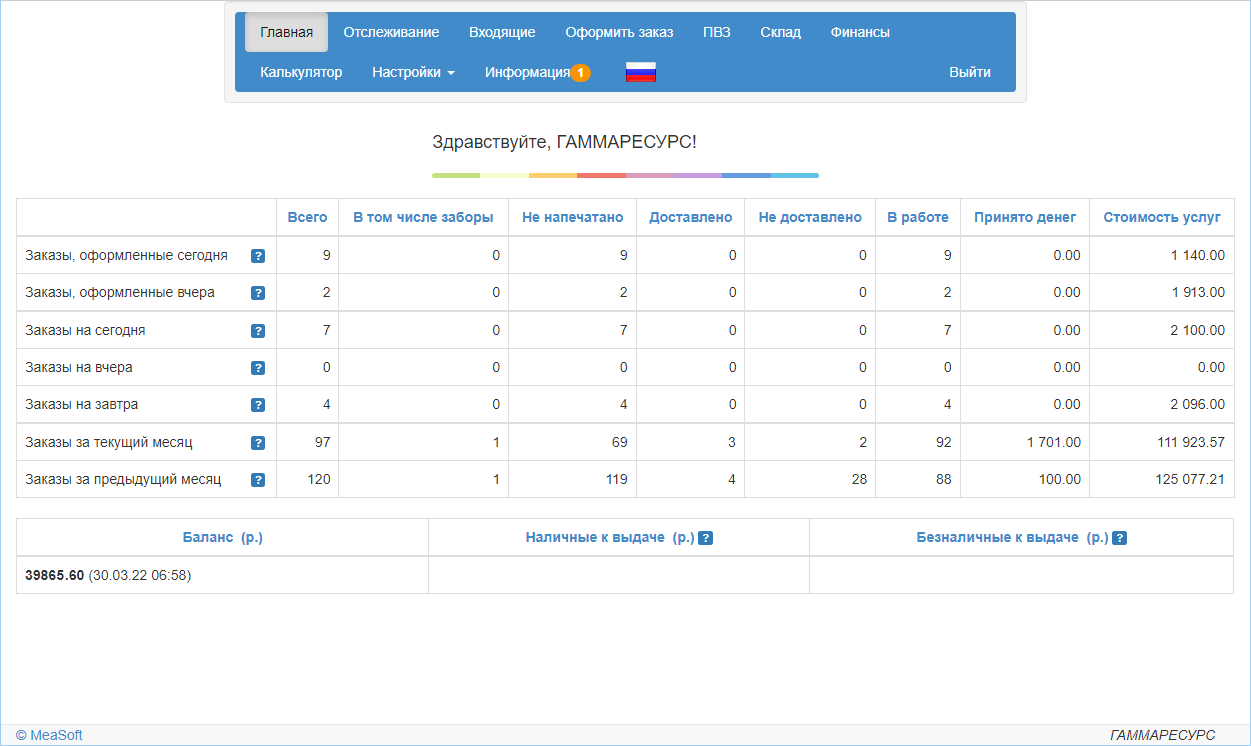
The main page of the client account displays a table with statistics on orders sent to the courier service company.
To see the desired group of orders, click on the corresponding cell of the table. The Tracking tab will open with a table of orders according to the cell filters.
If the selected group contains no orders (the cell value is "0") all the orders of the corresponding row will be displayed.
For more information see «Tracking outgoing orders».
Additionally you can set up a display of client's balances of the courier service:
- customer account balance - displays the customer's currentbalance;
- cash to handover — the amount of money the courier service has accepted from the recipients and has not yet given back to the client;
- non-cash to handover — the amount of money taken on orders when paying by card, but not yet transferred to the client.
Balances are updated at least once a day. The table is displayed if at least one amount is greater than zero.
To set up the display of customer balances on the main page, contact MeaSoft support.
New order
You can place a new order in the following ways:
- create an order manually;
- create a pickup request;
- create a «Deliver to me» request;
- import a Microsoft Excel registry;
- create an order by copying.
You cannot create an order in the following cases:
- if you have a negative balance, if you are working on prepayment;
- if there are overdue invoices for payment;
- your contract with the courier service company has expired.
The corresponding warning is displayed at the top of the personal cabinet page.
External codes and barcodes must be unique within the calendar year. Specify non-repeatable numbers.
If the order number is an optional field, you may not specify it. In this case it will have the format NN#KK, where NN is the sequence number and KK is the internal customer code in the system.
If the order has the order items, the amount of the cost of the items is transmitted as the amount of the cash-on-delivery. User entered value of the Amount field is ignored in this case.
Creating an order manually
- Select the main menu option New Order.
- On the New Order tab, fill in the required fields marked with an asterisk (*) and others, if necessary.
- Add items, packages, files.
- Click the Submit button.
Dependencies of fields displaying in the order form
The Delivery Type field is always displayed before the Recipient Address field, provided the Recipient City field is enabled.
Pickup request
A pickup request is used if you need a courier to come to your location and pick up delivery orders. Access to this functionality is configured by the courier company administrator.
To place a pickup request:
- Select New Order in the main menu and click the Pickup Request tab. The Pickup Request window will open.
- Fill out the request form and click the Submit button..
Deliver to me
The deliver-to-me request is used when the courier picks up the items from the supplier or buyer and delivers them to the customer. This functionality is for delivering items from the supplier or when replacing items from the customer. For more information see «Pickup and Substitution».
To place an order for the third party delivery:
- Select the main menu option New Order.
- Click the Deliver to Me tab, fill in the required fields marked with an asterisk (*) and others if necessary. If you need to add an item, see «Add item».
- Click Submit.
Import an Excel Registry
- Select the New Order main menu tab and click the Excel registry tab. Import Exсel Registry window will open.
- Download the registry template from the link.
- Make sure the registry you are importing matches the template.
- Make sure that each order has its own unique number. For pickups, specify the number 0 and the Barcode field must be blank.
- To add an order item, in the Microsoft Excel document, fill in the fields under Freight.
To add multiple order items to a single order, specify the same order number for all items or specify the order number only for the first one. You can leave the order fields blank. - To add a pickup point to the registry, use one of the following methods:
- In the Address field enter the pickup point code. You can check the code in <ссылка на раздел ПВЗ>.
- In the Address field specify the name of the pickup point with the prefix "PP". For example, if the name is "PP on Viking Drive", then it should be written "PP Viking Drive". Be sure to fill in the Recipient city field because there may be pickup points with the same name in different cities.
- If the Buyout and Cancellation fields are available in the Microsoft Excel template, you can set the dependence of delivery cost on the order buyout amount in the register. To do this, fill in the following fields:
- In case of refusal — the cost of delivery when the shipment is completely rejected;
- Amount — the buyout amount that determines the delivery cost;
- Delivery cost if buyout is less than the amount — delivery cost if the order is bought out for less than the amount specified in the Amount field;
- Delivery cost for buyout of the amount — delivery cost if the order is bought out for the amount that is larger than the amount specified in the Amount field.
- If the Value-added services field is available in the template, you can specify the list of value-added services used in the registry as JSON, for example: [{"code":1, "value":10},{"code":2, "value":"true"}]
- Save the changed register.
- Click the Select File button. In the dialog box that opens, select the registry you want to upload and click the Upload button.
- Check the order data and click the Confirm button. The button becomes available when the cells highlighted in red are filled in correctly.
Create order by copying
You can create an order by copying an existing order. In this case, you only need to specify the desired date and time of pickup or delivery. This allows you to speed up the ordering process.
To copy an existing order:
- In the Main or Tracking find the desired order, open its card, and click Copy. The New Order window will open.
- Specify the desired time and date of delivery or pickup, change other details if necessary, and click Submit.
Add item
You can add an item when creating orders manually or when placing a pickup order.
To add an item, on the New Order page in the Items field, click the button ![]() . The Add or Edit Item window will open:
. The Add or Edit Item window will open:
Items can be added the following ways:
- by supplier SKU ID, if the order is assembled in the warehouse of the courier service company. To do this, click on the Select button in the Item description field. The Select product window will open:
- To filter items by warehouse, select the desired warehouse from the drop-down list and click the Show button.
- To filter items by availability, select the Only available checkbox and click the Show button.
- You can start typing a supplier SKU ID or name in the search bar and select an item from the filtered list.
- The Item Name, Item Weight, Item Price and Barcode fields will be filled in automatically. The Item Name field will indicate the presence or absence of goods in stock.
- Manually, if the order is assembled in the warehouse of the online store. To do this, in the Add/Edit Item window, fill in the fields except for the Supplier SKU ID field.
For more information about the types of order items, see the «Order items».
To add an item to your order, click Save. To cancel, click Close.
Note. A value of "0" when selecting the VAT rate means the No VAT rate. The "0%" rate is not supported.
After adding items in the Items section, a list of items is generated:
You can edit or delete items using the ![]() and
and ![]() respectively. You can add, edit and delete items only before clicking on the Submit button.
respectively. You can add, edit and delete items only before clicking on the Submit button.
Add file
To attach a file to your order, in the Attached files field, click on the button ![]() . Select the file on your computer and press Open. A line with the name of the file appears.
. Select the file on your computer and press Open. A line with the name of the file appears.
The size of the uploaded file must not exceed 1 MB.
To delete a downloaded file, in the line with the file name, click on the ![]() .
.
You can add and delete files only before you press the Submit button.
Add package
To add a package to your order, in the Package field, click on the button ![]() . The "Add/Edit Package" window opens:
. The "Add/Edit Package" window opens:
- Fill in the fields. To create several packages with the same parameters, specify the number of such packages in the Amount field.
- Click the Save button.
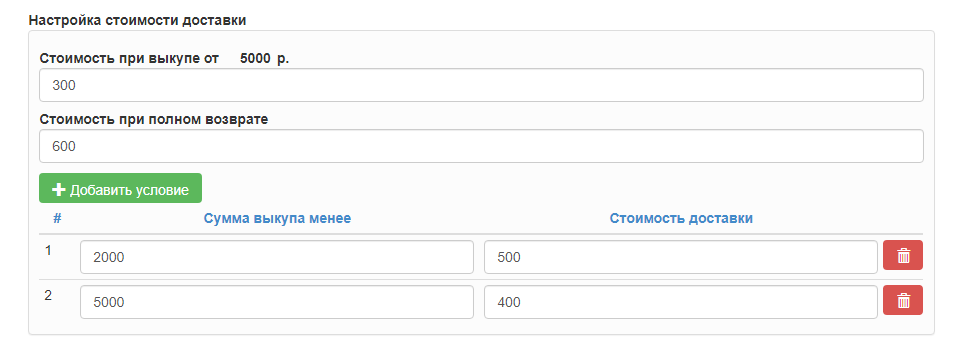
Delivery fee conditions
You can configure delivery fee depending on the total amount of buyout in the order:
- for a specific order - when placing an order, specify the conditions in the Delivery fee conditions field block. This setting has priority over customer billing rules;
- for orders that meet your specific conditions - configure the rules in the main menu item Custom Delivery Rates.
To configure the delivery fee of a specific order:
- When placing an order in the field block Delivery fee conditions click on Add condition.
- In the Purchase amount less than field specify the buyout threshold amount, and in the field Delivery fee — the appropriate delivery fee.
- To add the next value range, click on the button Add condition and specify the amount of buyout and the delivery fee. The number of conditions is unlimited.
- Fill in the Full return fee field.
Checking the trustworthiness of customers
When you place an order manually you can see the customer's trustworthiness score. It is made up of the ratio of orders that were bought out and returned without buyout using different courier services. Orders with cash on delivery have higher value.
The score is displayed in the New Order main menu item in the Recipient phone field as a colored circle. Color scheme:
- green - high rating;
- yellow - neutral rating;
- red - low rating.
When you hover over the colored circle, the rating percentage is displayed. Neutral is considered a value of 40-60%, values below fall into the red zone, above - into the green zone.
Notes.
- Rating of 50% may be the customer's real rating or an indicator of lack of data.
- Rating depends on the order status (delivered/cancelled), type of payment/prepayment, number of attempts of delivery by courier. Each of the factors has a different value, so a cancelled order has a stronger effect on the negative rating than the same delivered order - on the positive rating.
Tracking outgoing orders
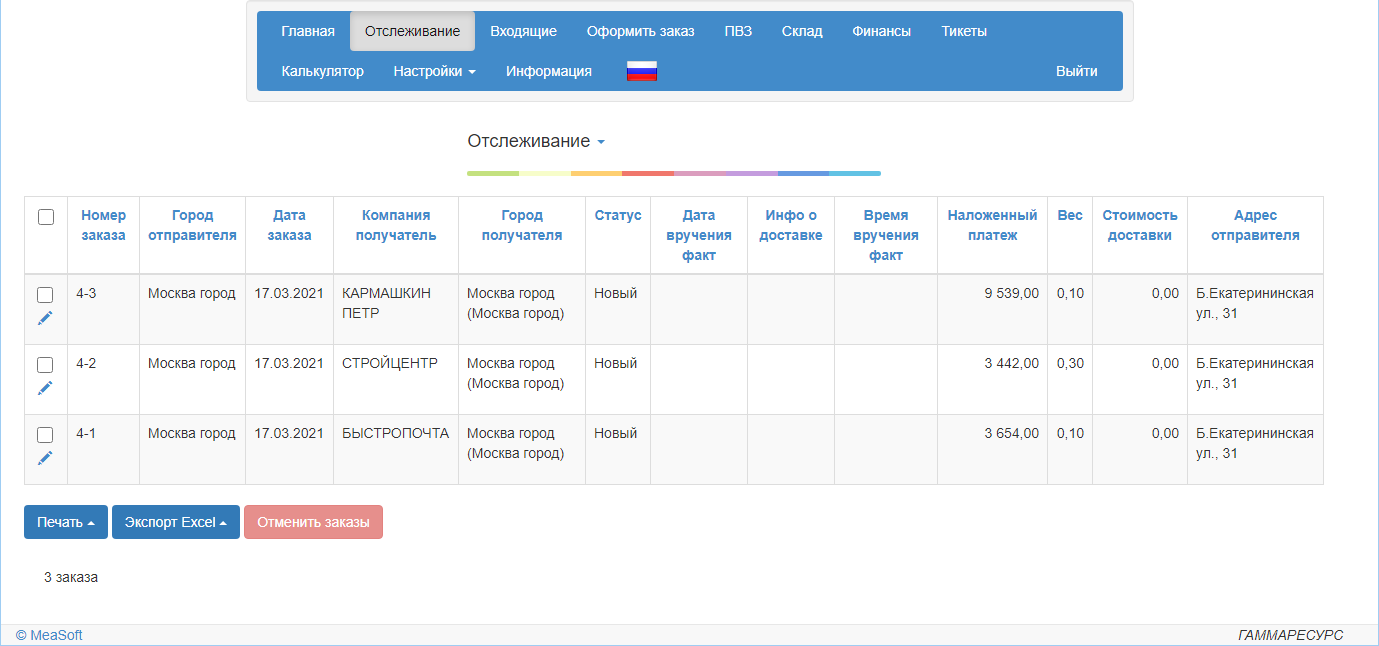
Tracking of outgoing orders is designed to get information on orders created by customers of the courier service company integrated with the MeaSoft system. The order creation method is not significant in that case.
To track orders, select the Tracking tab in the main menu. The Tracking page will open. Set the search parameters and click the Show button. A date interval of no more than 60 days is supported.
Note. When searching by number or name, the date interval is not taken into account.
As a result, a table of orders that meet the specified criteria will open:
Order tracking status highlighting is configured in the office system.
On this page you can:
- view order information. For more information, see. «View order information»;
- edit the order. To do this, click the button
 . The Edit Order window will open.
 - change the search conditions for tracked orders. To do this, click the button
 in the title of the Tracking page. The selection area for tracked orders will open;
 - print delivery slips, labels, acceptance and delivery certificates or inventory for selected orders. For more information, see «Print documents»;
- save the information on the orders into a Microsoft Excel document. To do this, check the boxes to the left of the desired orders and click Export to Excel > Orders;
- cancel selected orders. o do this, check the boxes to the left of the desired orders and click Cancel Orders.
View order information
To see your order information, click anywhere on the order line. The Order Details window will open. In this window you can:
- subscribe to order status notifications in your Telegram channel or browser. Click on
 or
or  respectively;
 - view and print delivery slips for your order. To do this, click the Delivery Slip button.
Print documents
To print documents, check the boxes to the left of the orders and click the appropriate button at the bottom of the page, then click the Print button in the document preview window.
If no order is checked, documents will be generated for all orders displayed in the table.
Labels (stickers) available by default:
- Zebra — for printing on a thermal printer. Zebra expects to print labels one at a time per sheet. Label size is 58×40 mm.
- А4 — for printing on an A4 sheet. Labels are printed on one or more sheets. The size of stickers is 62×30 mm.
Note. Print forms for labels 5 and 6 are relatively old and are not customizable in the courier service account..
Note. Print forms for pickups are not generated.
Tracking incoming orders
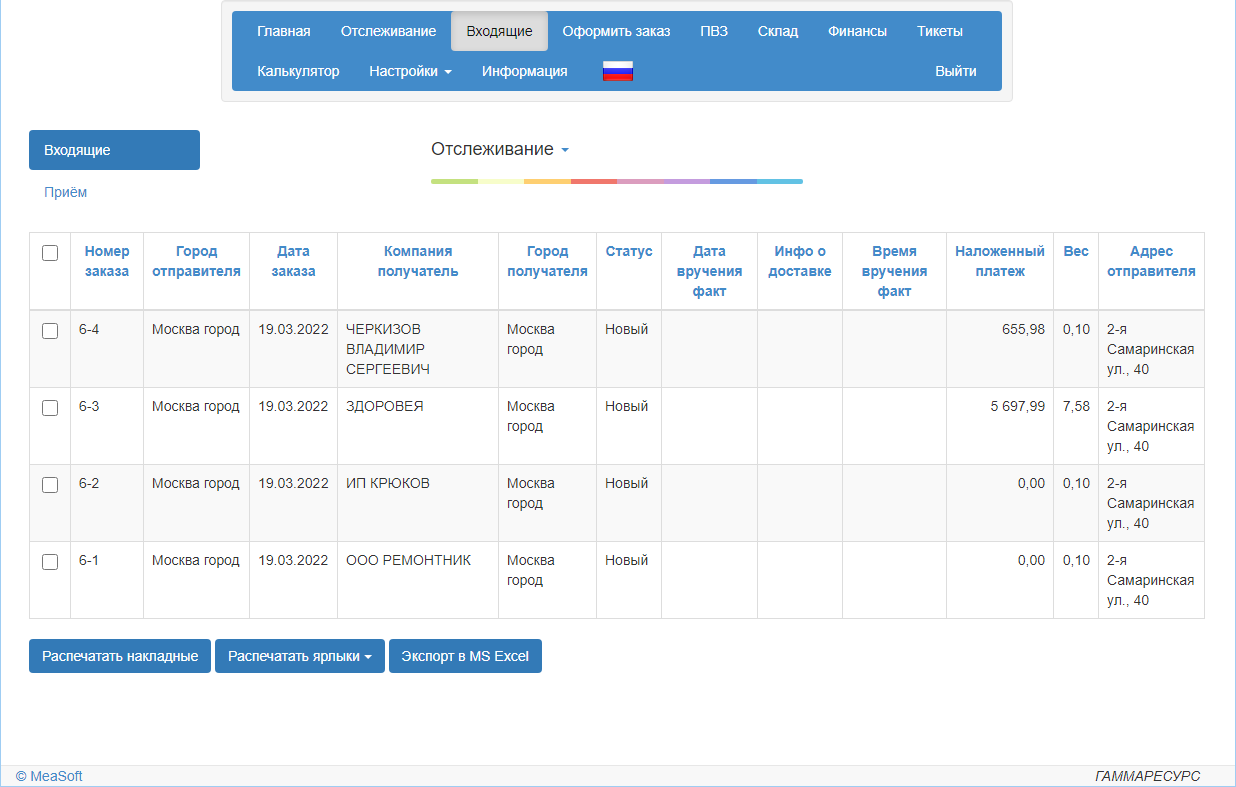
Incoming Order Tracking is for shipments that are delivered to a courier service agent's city.
A courier service agent is a warehouse, a pickup point, a contractor or a branch of a courier service company. For the agent client and branch cards must be created in the backoffice, and the agent's branch must be specified in the Responsible branch field in the transferred order. In the client card set login and password to log in to the client account and pass them to the agent.
To track incoming orders, log in to the Client Account under the agent's credentials, select the Incoming tab in the main menu, set the search parameters and click the Show button. The table of orders that meet the specified criteria will open:
On this page you can:
- view order information. To do this, click anywhere in the order line. The "Order details" window will open. See «Actions with incoming orders»;
- change search criteria for tracked orders. To do this, click the
 button in Tracking. This will open a selection area for tracked orders;
 - print delivery slips and labels for selected orders. See «Print documents»;
- save order information to a Microsoft Excel document. To do this, check the boxes to the left of the desired orders and click the Export to Excel button.
Actions with incoming orders
To start working with an incoming order, on the Tracking page, click anywhere on the order line. The Order Details window will open. In this window you can:
- view and print a delivery slip;
- change order status;
- set date and time of delivery, add delivery information;
- attach files on the order;
- view and download attached files, including photos from courier devices;
- view the current position of the courier.
After making changes, click Save, then Close.
Order Receipt
The courier service agent can accept orders received at the branch.
To do this, select Receipt in the main menu item Inbox on the left panel and successively scan the barcodes of accepted shipments.
Pickup points
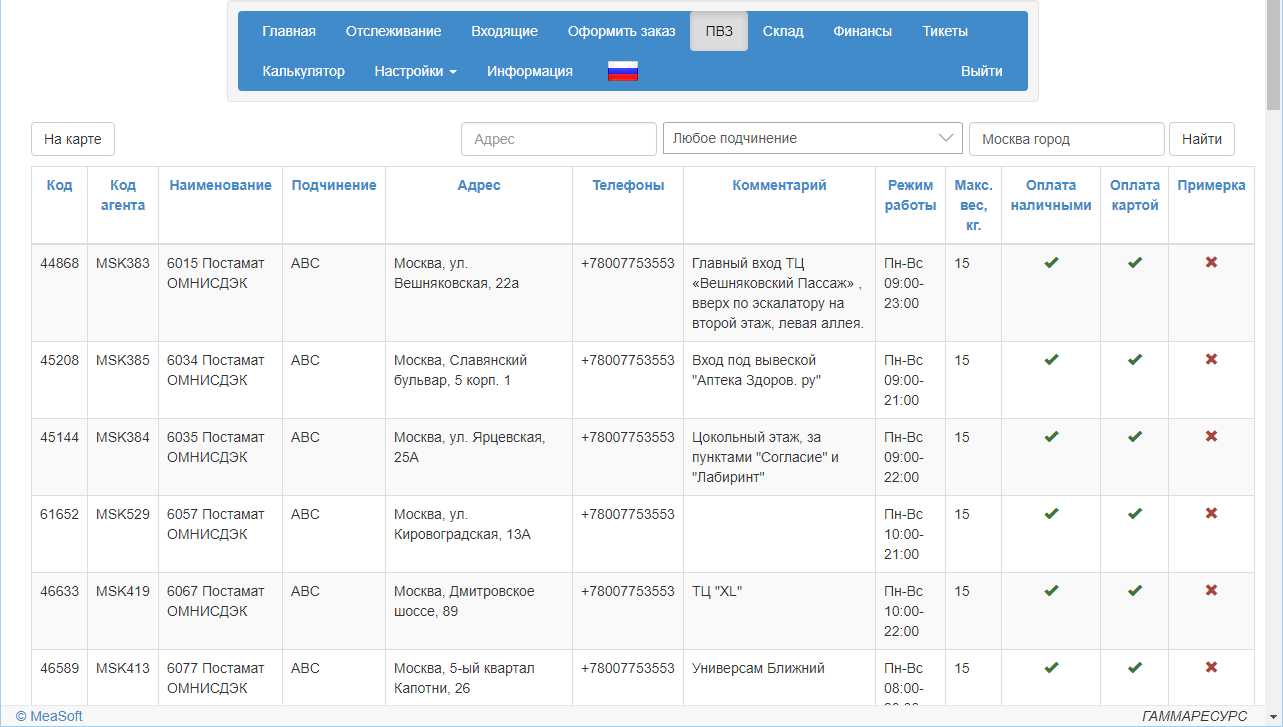
To view the list of pickup points, choose the main menu item Pickup Points. On the top right you can filter pickup points by city. By default the city in which the customer is located is selected.
The information in the table is read only.
To hide a branch office, open the drop-down list of the Any subordination field and click on the ![]() button to the right of the company name. All branch pickup points will be disabled and hidden in all sections and API-requests.
button to the right of the company name. All branch pickup points will be disabled and hidden in all sections and API-requests.
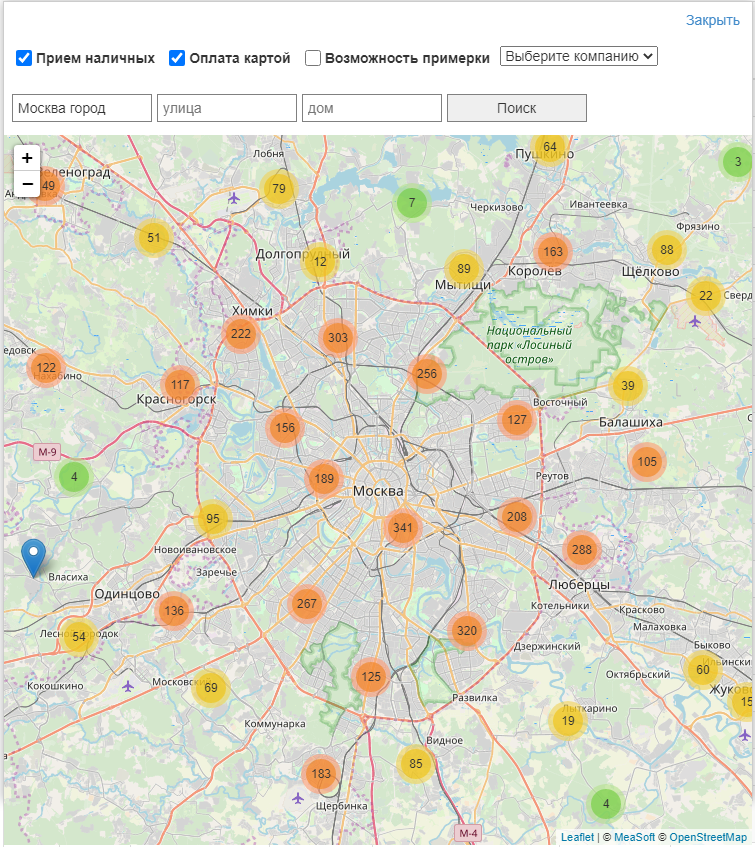
To see the location of the pickup point on the map, click the On the Map button. The following window will open:
To select pickup point when placing an ordermanually, specify the recipient's city and select a pickup point from the drop-down list in the Delivery type field. It will display pickup points for the selected city.
For details, see the section «Work with pickup points».
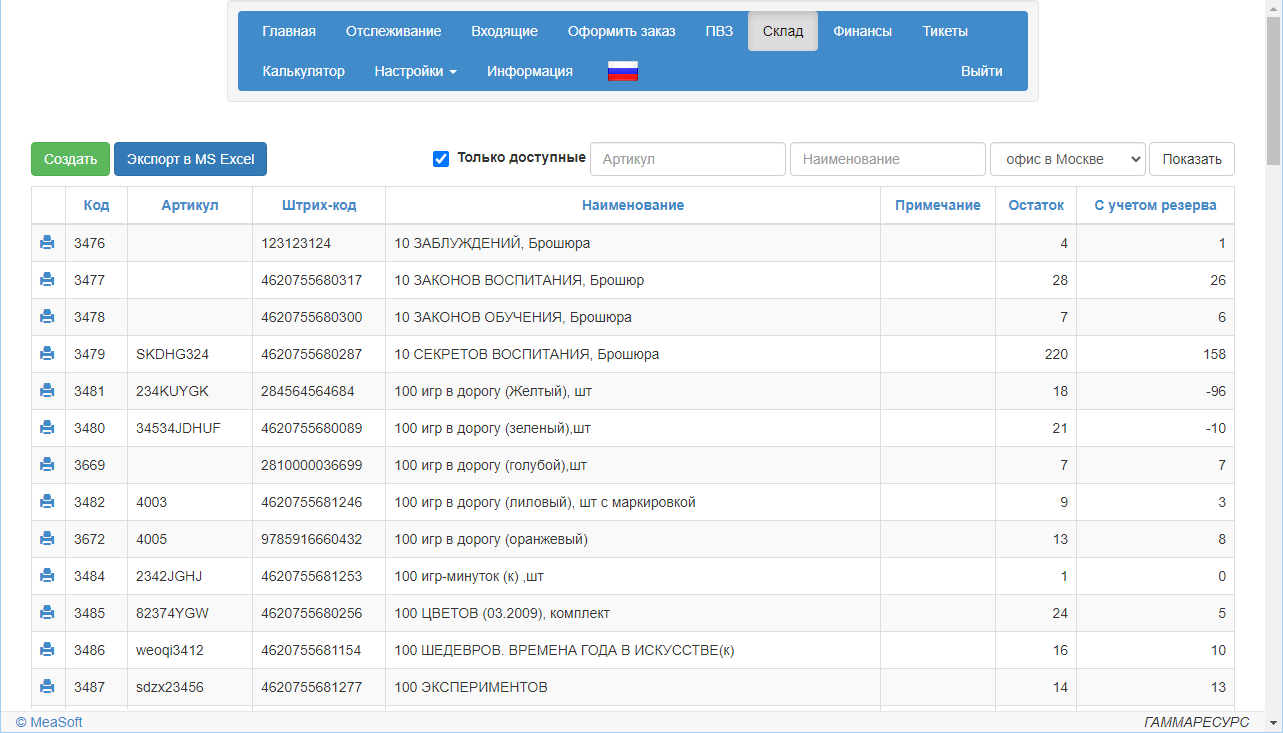
Warehouse
Using the Warehouse main menu tab you can:
- create a new Goods List card - click on the Create button;
- view the movement of the Goods List - click in the row of the corresponding item. The Item History window will open. You can view the details of orders that include this item and print delivery slips;
- print a label - click on the
 button;
 - export the goods list to a Microsoft Excel document — click on the Export to Excel button.
The warehouse is presented in the form of a table with the number of remaining goods and balances including reserved items. The information in the table is read only.
On the top right, you can filter items by availability, article, name and branch.
Goods are added to the warehouse by the courier service after the goods are placed in stock.
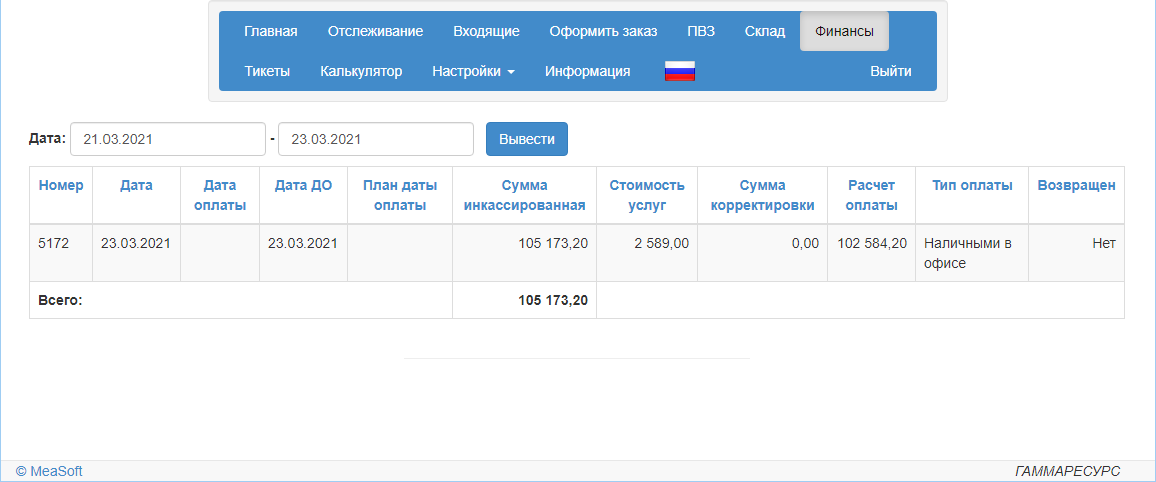
Finance
The section is designed for displaying the funds transfer certificates (FTC).
To view the information, specify a date period and click the Show button. The table with the FTC will be displayed.
To view a list of the orders included in the FTC, click in the certificate row. The funds transfer certificate window will open. In this window you can:
- view order details - click on the order line;
- unload the FTC table into an Excel document - click the Export to Excel button.
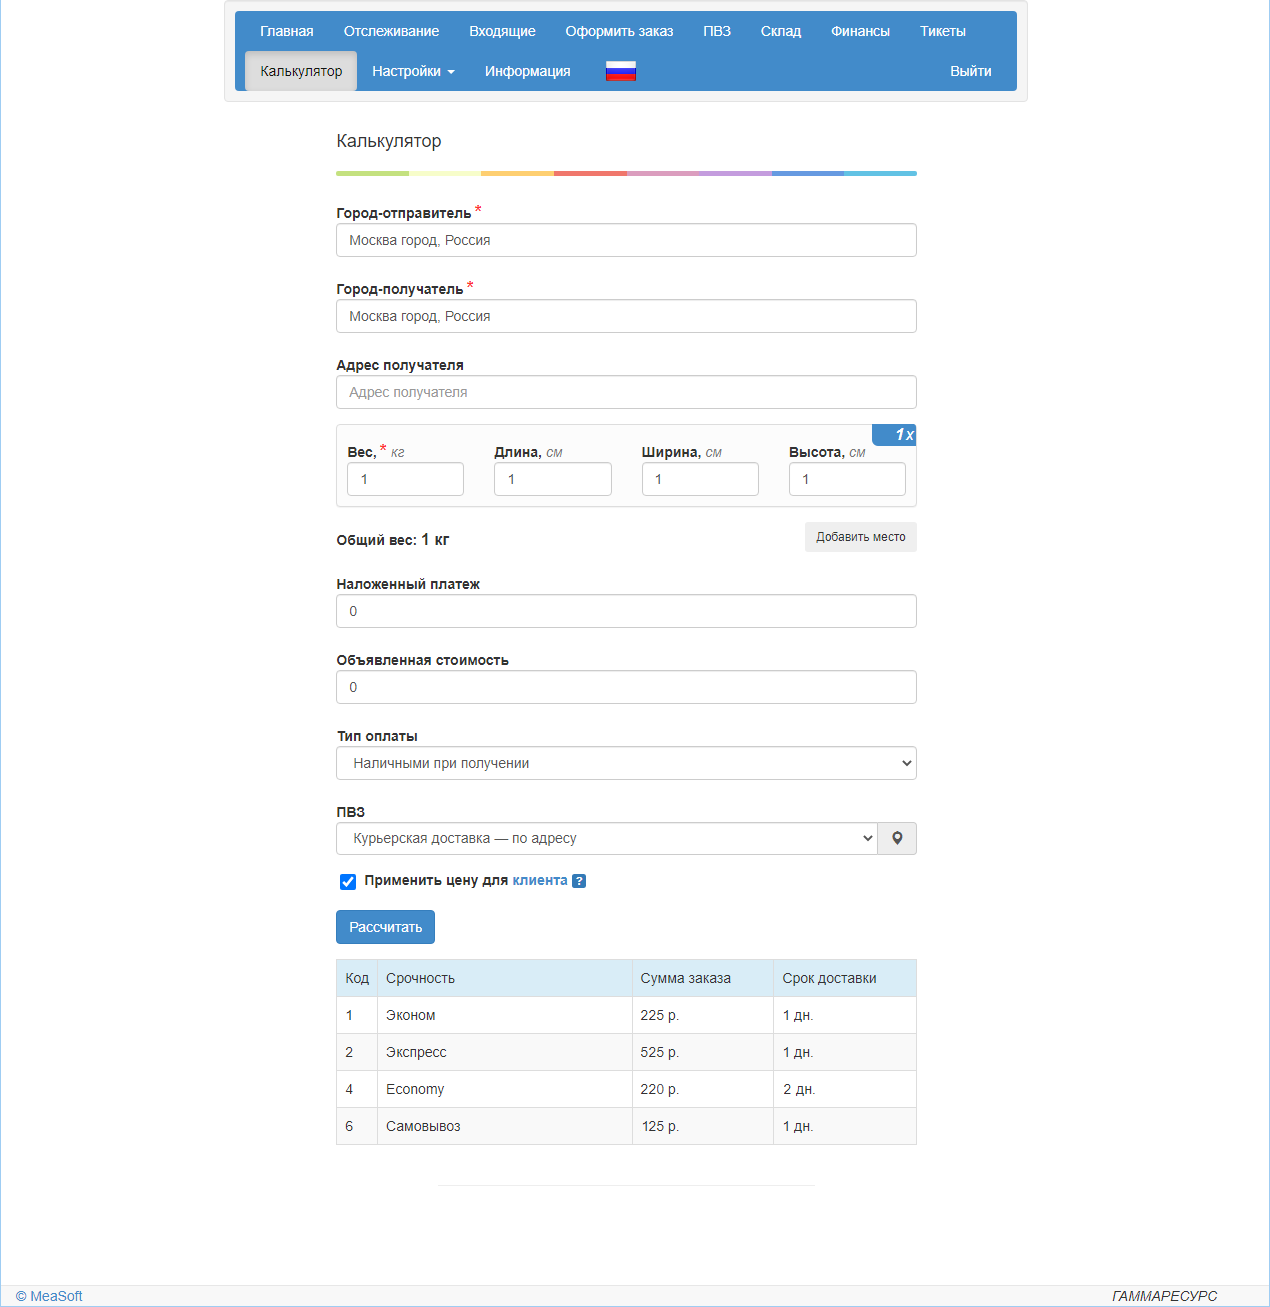
Calculator
Designed to calculate the cost and delivery time.
To calculate the cost and delivery time:
- In the Calculator main menu tab fill out the calculation form:
- To display the calculation cost for your company, check the checkbox Apply custom delivery rates. To calculate the price for the final recipient, uncheck the box. The calculation will take into account the billing rules set in the «Custom Delivery Rates».
- Click the Calculate button.
The calculation of delivery time and cost for the configured urgency modes will be displayed.
Tickets
Intended for communication with the customer support.
By default, it opens the Answer Received tab with tickets that have new messages.
On the left are two more tabs: In Process and Closed with tickets of corresponding statuses.
All tabs display two tables. The table on the left shows the tickets selected by the filter. The table on the right shows a list of messages of the selected ticket with the author and time of creation. To see the text of a message, click on the corresponding row in the table. To ask an additional question or reply to a message, enter text in an empty field and click the Reply button.
To create a ticket, click the New button on the left. In the window that opens, enter the subject and text of the request and click Save. The request will appear in the list of tickets on the In Process tab with the status New.
To stop working on the ticket, click the Close button.
To search for tickets by word, phrase, or ticket number, fill in the Search or Ticket Number field and click Filter.
To return to the default list of tickets, click Reset.
Settings
Custom Delivery Rates
The functionality is designed to customize the cost and time of delivery depending on the delivery terms and buyout amount of the order. The rules work as follows:
- The delivery cost is determined by the courier service rate.
- If the order falls under a rule, a set markup or discount is added to the delivery cost and the delivery time is extended by the specified number of days.
To qualify for the rule, the order must meet the specified criteria: cost of delivery, region or city, customer name or customer group name.
If the order meets the conditions of several rules, priority is given to the rule for a customer, then for a customer's group.
- Customer sees the calculated price based on the rules and places the order.
- The final delivery price depends on the Apply the rules switch:
- If the switch is set to On delivery fee calculation, the customer pays the delivery fee calculated at checkout or manually specified in the order by the store administrator. For example, the administrator has made a discount for a large order and manually changed the delivery cost in the order;
- if the switch is set to On delivery fee calculation and when transferring the order to MeaSoft the delivery cost is calculated anew with account of the rule settings. Changes in price by the seller are not taken into account.
You can check how the rule works when calculating the cost and delivery time in the Calculator with the Apply custom delivery rates box unchecked. This changes the delivery time and price.
The rules of price formation for the recipient have no effect on the cost of courier service.
To add a new rule:
- Click the Add button..
- Set the Apply the rules radio button..
- In the Delivery Conditions block select the type of delivery fee that is taken into account by the rule:
- Minimum delivery fee from - takes into account delivery cost with surcharges and additional services;
- Base delivery fee from - the base delivery cost without extra charges is taken into account.
- In the text field specify the minimum value of the selected type of delivery fee for which the rule applies.
- In the Region or Location box, specify the cities or regions for which the rule applies.
- In the Client block specify the clients from your system for which the rule applies. This field is available only for API-requests for creating order and delivery fee calculation.
- In the Client group box specify groups of customers from your system for which the rule applies. This field is available for API-requests of order creation and delivery fee calculation only.
- In the External service block specify the desired external services for which the rule is valid.
- In the Rounding shipping cost and delivery time block:
- select whether the condition applies to the base or full delivery fee;
- set the delivery fee depending on the buyout amount;
- specify the number of days to add to the estimated delivery time.
- In the Rounding block, adjust the rounding of the delivery amount calculated by the rule. Possible values:
- Do not round;
- Up. For example, if rounded to 10, 12 dollars and 17 dollars will be rounded to 20 dollars;
- Down. For example, if rounded to 10, 12 dollars and 17 dollars are rounded to 10 dollars;
- Conventional. For example, when rounded to 10:
12 dollars is rounded to 10 dollars,
17 dollars is rounded to 20 dollars.
- Click the Save button.
You can add an unlimited number of rules.
Integration
This main menu tab is designed to manage API.
API allows online retailers and other delivery companies to automate the transfer of orders to courier service companies that use the MeaSoft system.
The Integration menu tab contains the following tabs:
- Integrations — a list of integration modules with popular CMSs. To configure the module you need to specify courier service code as well as the username and password from your client account;
- Integration Settings — lists of all available integrations and your configured integrations. Integration settings are different for each module and are described in the installation instructions;
- Debug — on this page you can try to run requests to the API for debugging, as well as see the history of requests sent from your account and from the current IP address.
Changing the password
To change the password from your client account in the Password tab, enter the old password, new password and confirm it by re-entering it.
General settings
This section contains settings that are valid for all orders.
Default instuction. Default instuction that will be added to the Instruction field in all new delivery orders created in any way in the Client Account and via API. Auto-text is added when the order is saved. If the user filled out the Instruction field when placing the order, the AutoText will be added before the customer text.
Information
Contains messages from the courier service company.
There are two types of these messages:
- Standard - displayed as a counter of unread messages in the Information tab;
- Must-read - an information window is displayed when you enter the CA. To close it, click the Got It button. This is how you let the courier service company know that you have read the news.
Creating an order with parameters
You can create a link to an order with predefined parameters that will be passed to the corresponding fields of the form.
For example, if you follow the link https://home.courierexe.ru/8/order/new?order[receiver][person]=Smith&order[receiver][town]=Chicago&order[sender][town]=Miami откроется форма создания заказа с заполненными полями:
- Recipient name — Smith;
- Sender city/town — Chicago;
- Recipient city/town — Miami.
If the user changes the field filled in the parameter, the value entered by the user will be in the field after the order is saved.
Вид ссылки:
https://home.courierexe.ru/<extra-code>/order/new?Parameter1=Value1&Parameter2=Value2
The maximum link length is not defined, look for information for your browser. If the limit is exceeded, not all of the submitted data will appear in the form.
Correspondence of form fields and query parameters:
| Order form field | Request parameter in the URL |
|---|---|
| Order number | order[@attr][orderno] |
| Order items | order[enclosure] |
| Barcode | order[barcode] |
| Sender company | order[sender][company] |
| Sender name | order[sender][person] |
| Sender city/town | order[sender][town] |
| Sender address | order[sender][address] |
| Sender phone | order[sender][phone] |
| Pickup date | order[sender][date] |
| Pickup time from | order[sender][time_min] |
| Pickup time until | order[sender][time_max] |
| Recipient TIN | order[receiver][inn] |
| Recipient company | order[receiver][company] |
| Recipient name | order[receiver][person] |
| Recipient phone | order[receiver][phone] |
| Recipient city/town | order[receiver][town] |
| Delivery type | order[pvz] |
| Recipient address | order[receiver][address] |
| Recipient postcode | order[receiver][zipcode] |
| Delivery mode | order[service] |
| Weight | order[weight] |
| Amount | order[price] |
| Delivery date | order[receiver][date] |
| Delivery time from | order[receiver][time_min] |
| Delivery time until | order[receiver][time_max] |
| Declared value | order[inshprice] |
| Instruction | order[instruction] |
| Payment type | order[paytype] |
| Total volume | order[overall_volume] |
| Package quantity | order[quantity] |
| Package type | order[type] |
| Payment by recipient | order[ReceiverPays] |
| Attached files | order[attachments] |
| Department | order[otdel] |
| Delivery time slot | order[receiver][time_range] |
| Partial Delivery | order[acceptpartially] |
| Delivery fee conditions | order[deliveryset] |
| Weight at return trip | order[return_weight] |
| Cost code | order[costcode] |
| Contractor code | order[outstrbarcode] |
| Return trip required | order[flag] |
| Return trip mode | order[modev] |
| Return shipment type | order[typev] |
| PIN | order[receiver][deliveryPIN] |
| Items | |
| Supplier SKU ID | order[items][N][@attr][article] (mandatory, can be blank) |
| Item name | order[items][N][item] |
| Quantity | order[items][N][@attr][quantity] |
| Weight, kg | order[items][N][@attr][mass] |
| Price | order[items][N][@attr][retprice] |
| VAT rate | order[items][N][@attr][VATrate] |
| Barcode | order[items][N][@attr][barcode] (mandatory, can be blank) |
| Length, cm | order[items][N][@attr][length] |
| Width, cm | order[items][N][@attr][width] |
| Height, cm | order[items][N][@attr][height] |
| Goods code | order[items][N][@attr][governmentCode] |
| Item type (numeric code) | order[items][N][@attr][type] |
| Packages | |
| Name | order[packages][N][package] (mandatory, can be blank) |
| Weight, kg | order[packages][N][@attr][mass] |
| Barcode | order[packages][N][@attr][strbarcode] (mandatory, can be blank) |
| Length, cm | order[packages][N][@attr][length] |
| Width, cm | order[packages][N][@attr][width] |
| Height, cm | order[packages][N][@attr][height] |
Working with tables
To apply sorting by any parameter, click on the name of the corresponding column.
To select a row in the table, check the box to the left of it. To select all rows displayed on the page, check the box on the top left row.
To change the number of rows displayed on one page, click on the appropriate box at the bottom of the screen and select the desired number from the drop-down list. The page will update automatically.
